This is the full developer documentation for Hono.
# Start of Hono documentation
# Hono
Hono - _**在日语中意为火焰🔥**_ - 是一个小型、简单且超快的 Web 框架,基于 Web Standards 构建。
它可以在任何 JavaScript 运行时上运行:Cloudflare Workers、Fastly Compute、Deno、Bun、Vercel、Netlify、AWS Lambda、Lambda@Edge 和 Node.js。
快速,但不止于快速。
```ts twoslash
import { Hono } from 'hono'
const app = new Hono()
app.get('/', (c) => c.text('Hono!'))
export default app
```
## 快速开始
只需运行:
::: code-group
```sh [npm]
npm create hono@latest
```
```sh [yarn]
yarn create hono
```
```sh [pnpm]
pnpm create hono@latest
```
```sh [bun]
bun create hono@latest
```
```sh [deno]
deno init --npm hono@latest
```
:::
## 特性
- **超快** 🚀 - `RegExpRouter` 路由器非常快。不使用线性循环。快速。
- **轻量** 🪶 - `hono/tiny` 预设小于 14kB。Hono 零依赖,仅使用 Web Standards。
- **多运行时** 🌍 - 可在 Cloudflare Workers、Fastly Compute、Deno、Bun、AWS Lambda 或 Node.js 上运行。相同的代码在所有平台上都能运行。
- **功能齐全** 🔋 - Hono 内置了中间件、自定义中间件、第三方中间件和辅助函数。功能齐全。
- **愉悦的开发体验** 😃 - 超干净的 API。一流的 TypeScript 支持。现在,我们有了"类型"。
## 使用场景
Hono 是一个简单的 Web 应用程序框架,类似于 Express,不包含前端。
但它可以运行在 CDN 边缘,结合中间件可以构建更大的应用程序。
以下是一些使用场景示例。
- 构建 Web API
- 后端服务器代理
- CDN 前端
- 边缘应用程序
- 库的基础服务器
- 全栈应用程序
## 谁在使用 Hono?
| 项目 | 平台 | 用途 |
| ---------------------------------------------------------------------------------- | ------------------ | ------------------------------------------------------------------------------------------------------------ |
| [cdnjs](https://cdnjs.com) | Cloudflare Workers | 免费开源的 CDN 服务。_Hono 用于 API 服务器_。 |
| [Cloudflare D1](https://www.cloudflare.com/developer-platform/d1/) | Cloudflare Workers | 无服务器 SQL 数据库。_Hono 用于内部 API 服务器_。 |
| [Cloudflare Workers KV](https://www.cloudflare.com/developer-platform/workers-kv/) | Cloudflare Workers | 无服务器键值数据库。_Hono 用于内部 API 服务器_。 |
| [BaseAI](https://baseai.dev) | 本地 AI 服务器 | 带记忆的无服务器 AI 代理管道。用于 Web 的开源代理 AI 框架。_使用 Hono 的 API 服务器_。 |
| [Unkey](https://unkey.dev) | Cloudflare Workers | 开源 API 认证和授权。_Hono 用于 API 服务器_。 |
| [OpenStatus](https://openstatus.dev) | Bun | 开源网站和 API 监控平台。_Hono 用于 API 服务器_。 |
| [Deno Benchmarks](https://deno.com/benchmarks) | Deno | 基于 V8 构建的安全 TypeScript 运行时。_Hono 用于基准测试_。 |
| [Clerk](https://clerk.com) | Cloudflare Workers | 开源用户管理平台。_Hono 用于 API 服务器_。 |
以及以下项目:
- [Drivly](https://driv.ly/) - Cloudflare Workers
- [repeat.dev](https://repeat.dev/) - Cloudflare Workers
想看更多?查看 [谁在生产环境中使用 Hono?](https://github.com/orgs/honojs/discussions/1510)。
## 1 分钟了解 Hono
使用 Hono 创建 Cloudflare Workers 应用程序的演示。
## 超快
**Hono 是最快的**,与其他 Cloudflare Workers 路由器相比。
```
Hono x 402,820 ops/sec ±4.78% (80 runs sampled)
itty-router x 212,598 ops/sec ±3.11% (87 runs sampled)
sunder x 297,036 ops/sec ±4.76% (77 runs sampled)
worktop x 197,345 ops/sec ±2.40% (88 runs sampled)
Fastest is Hono
✨ Done in 28.06s.
```
查看 [更多基准测试](/docs/concepts/benchmarks)。
## 轻量
**Hono 非常小**。使用 `hono/tiny` 预设,压缩后大小**小于 14KB**。有许多中间件和适配器,但仅在使用时才会打包。作为参考,Express 的大小为 572KB。
```
$ npx wrangler dev --minify ./src/index.ts
⛅️ wrangler 2.20.0
--------------------
⬣ Listening at http://0.0.0.0:8787
- http://127.0.0.1:8787
- http://192.168.128.165:8787
Total Upload: 11.47 KiB / gzip: 4.34 KiB
```
## 多个路由器
**Hono 有多个路由器**。
**RegExpRouter** 是 JavaScript 世界中最快的路由器。它使用调度前创建的单个大型 Regex 匹配路由。使用 **SmartRouter**,它支持所有路由模式。
**LinearRouter** 注册路由非常快,因此适合每次初始化应用程序的环境。**PatternRouter** 简单地添加和匹配模式,使其变小。
查看 [有关路由的更多信息](/docs/concepts/routers)。
## Web Standards
由于使用 **Web Standards**,Hono 可以在许多平台上运行。
- Cloudflare Workers
- Cloudflare Pages
- Fastly Compute
- Deno
- Bun
- Vercel
- AWS Lambda
- Lambda@Edge
- 其他
通过使用 [Node.js 适配器](https://github.com/honojs/node-server),Hono 可以在 Node.js 上运行。
查看 [有关 Web Standards 的更多信息](/docs/concepts/web-standard)。
## 中间件和辅助函数
**Hono 有许多中间件和辅助函数**。这使得"少写代码,多做事情"成为现实。
开箱即用,Hono 提供以下中间件和辅助函数:
- [基本认证](/docs/middleware/builtin/basic-auth)
- [Bearer 认证](/docs/middleware/builtin/bearer-auth)
- [请求体限制](/docs/middleware/builtin/body-limit)
- [缓存](/docs/middleware/builtin/cache)
- [压缩](/docs/middleware/builtin/compress)
- [上下文存储](/docs/middleware/builtin/context-storage)
- [Cookie](/docs/helpers/cookie)
- [CORS](/docs/middleware/builtin/cors)
- [ETag](/docs/middleware/builtin/etag)
- [html](/docs/helpers/html)
- [JSX](/docs/guides/jsx)
- [JWT 认证](/docs/middleware/builtin/jwt)
- [日志记录器](/docs/middleware/builtin/logger)
- [语言](/docs/middleware/builtin/language)
- [Pretty JSON](/docs/middleware/builtin/pretty-json)
- [安全头](/docs/middleware/builtin/secure-headers)
- [SSG](/docs/helpers/ssg)
- [流式传输](/docs/helpers/streaming)
- [GraphQL 服务器](https://github.com/honojs/middleware/tree/main/packages/graphql-server)
- [Firebase 认证](https://github.com/honojs/middleware/tree/main/packages/firebase-auth)
- [Sentry](https://github.com/honojs/middleware/tree/main/packages/sentry)
- 其他!
例如,使用 Hono 只需几行代码即可添加 ETag 和请求日志记录:
```ts
import { Hono } from 'hono'
import { etag } from 'hono/etag'
import { logger } from 'hono/logger'
const app = new Hono()
app.use(etag(), logger())
```
查看 [有关中间件的更多信息](/docs/concepts/middleware)。
## 开发体验
Hono 提供愉悦的"**开发体验**"。
得益于 `Context` 对象,可以轻松访问请求/响应。
此外,Hono 使用 TypeScript 编写。Hono 拥有"**类型**"。
例如,路径参数将是字面量类型。
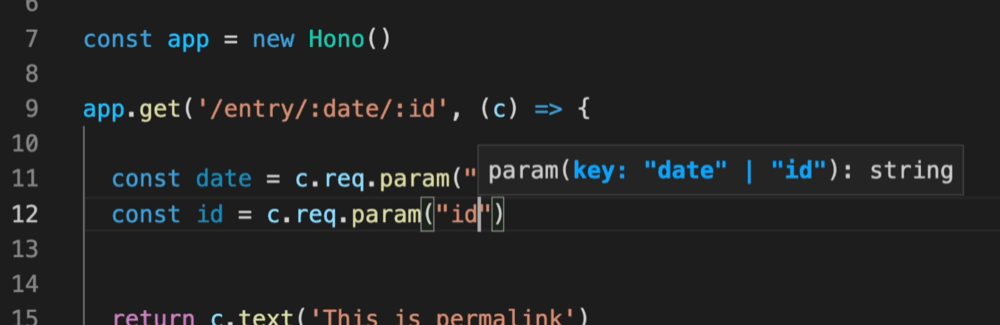
此外,Validator 和 Hono Client `hc` 启用 RPC 模式。在 RPC 模式中,
你可以使用喜欢的验证器(如 Zod),轻松与客户端共享服务器端 API 规范,并构建类型安全的应用程序。
查看 [Hono 技术栈](/docs/concepts/stacks)。
# 第三方中间件
第三方中间件是指未捆绑在 Hono 包中的中间件。
大多数此中间件利用外部库。
### 认证
- [Auth.js(Next Auth)](https://github.com/honojs/middleware/tree/main/packages/auth-js)
- [Casbin](https://github.com/honojs/middleware/tree/main/packages/casbin)
- [Clerk Auth](https://github.com/honojs/middleware/tree/main/packages/clerk-auth)
- [Cloudflare Access](https://github.com/honojs/middleware/tree/main/packages/cloudflare-access)
- [OAuth Providers](https://github.com/honojs/middleware/tree/main/packages/oauth-providers)
- [OIDC Auth](https://github.com/honojs/middleware/tree/main/packages/oidc-auth)
- [Firebase Auth](https://github.com/honojs/middleware/tree/main/packages/firebase-auth)
- [Verify RSA JWT (JWKS)](https://github.com/wataruoguchi/verify-rsa-jwt-cloudflare-worker)
- [Stytch Auth](https://github.com/honojs/middleware/tree/main/packages/stytch-auth)
### 验证器
- [Ajv Validator](https://github.com/honojs/middleware/tree/main/packages/ajv-validator)
- [ArkType Validator](https://github.com/honojs/middleware/tree/main/packages/arktype-validator)
- [Class Validator](https://github.com/honojs/middleware/tree/main/packages/class-validator)
- [Conform Validator](https://github.com/honojs/middleware/tree/main/packages/conform-validator)
- [Effect Schema Validator](https://github.com/honojs/middleware/tree/main/packages/effect-validator)
- [Standard Schema Validator](https://github.com/honojs/middleware/tree/main/packages/standard-validator)
- [TypeBox Validator](https://github.com/honojs/middleware/tree/main/packages/typebox-validator)
- [Typia Validator](https://github.com/honojs/middleware/tree/main/packages/typia-validator)
- [unknownutil Validator](https://github.com/ryoppippi/hono-unknownutil-validator)
- [Valibot Validator](https://github.com/honojs/middleware/tree/main/packages/valibot-validator)
- [Zod Validator](https://github.com/honojs/middleware/tree/main/packages/zod-validator)
### OpenAPI
- [Zod OpenAPI](https://github.com/honojs/middleware/tree/main/packages/zod-openapi)
- [Scalar](https://github.com/scalar/scalar/tree/main/integrations/hono)
- [Swagger UI](https://github.com/honojs/middleware/tree/main/packages/swagger-ui)
- [Swagger Editor](https://github.com/honojs/middleware/tree/main/packages/swagger-editor)
- [Hono OpenAPI](https://github.com/rhinobase/hono-openapi)
- [hono-zod-openapi](https://github.com/paolostyle/hono-zod-openapi)
### 开发
- [ESLint Config](https://github.com/honojs/middleware/tree/main/packages/eslint-config)
- [SSG Plugin Essential](https://github.com/honojs/middleware/tree/main/packages/ssg-plugins-essential)
### 监控/追踪
- [Apitally (API 监控和分析)](https://docs.apitally.io/frameworks/hono)
- [Highlight.io](https://www.highlight.io/docs/getting-started/backend-sdk/js/hono)
- [LogTape (日志记录)](https://logtape.org/manual/integrations#hono)
- [OpenTelemetry](https://github.com/honojs/middleware/tree/main/packages/otel)
- [Prometheus Metrics](https://github.com/honojs/middleware/tree/main/packages/prometheus)
- [Sentry](https://github.com/honojs/middleware/tree/main/packages/sentry)
- [Pino logger](https://github.com/maou-shonen/hono-pino)
### 服务器/适配器
- [GraphQL Server](https://github.com/honojs/middleware/tree/main/packages/graphql-server)
- [Node WebSocket Helper](https://github.com/honojs/middleware/tree/main/packages/node-ws)
- [tRPC Server](https://github.com/honojs/middleware/tree/main/packages/trpc-server)
### 转译器
- [Bun Transpiler](https://github.com/honojs/middleware/tree/main/packages/bun-transpiler)
- [esbuild Transpiler](https://github.com/honojs/middleware/tree/main/packages/esbuild-transpiler)
### UI / 渲染器
- [Qwik City](https://github.com/honojs/middleware/tree/main/packages/qwik-city)
- [React Compatibility](https://github.com/honojs/middleware/tree/main/packages/react-compat)
- [React Renderer](https://github.com/honojs/middleware/tree/main/packages/react-renderer)
### 队列/作业处理
- [GlideMQ (Message Queue REST API + SSE)](https://github.com/avifenesh/glidemq-hono)
### 国际化
- [Intlayer i18n](https://intlayer.org/doc/environment/hono)
### 实用工具
- [Bun Compress](https://github.com/honojs/middleware/tree/main/packages/bun-compress)
- [Cap Checkpoint](https://capjs.js.org/guide/middleware/hono.html)
- [Event Emitter](https://github.com/honojs/middleware/tree/main/packages/event-emitter)
- [Geo](https://github.com/ktkongtong/hono-geo-middleware/tree/main/packages/middleware)
- [Hono Rate Limiter](https://github.com/rhinobase/hono-rate-limiter)
- [Hono Problem Details (RFC 9457)](https://github.com/paveg/hono-problem-details)
- [Hono Simple DI](https://github.com/maou-shonen/hono-simple-DI)
- [Idempotency (Stripe-style idempotency keys)](https://github.com/paveg/hono-idempotency)
- [idempot-js](https://js.idempot.dev) - 符合规范的中间件,支持多种存储后端(redis、postgres、mysql、sqlite)
- [jsonv-ts (Validator, OpenAPI, MCP)](https://github.com/dswbx/jsonv-ts)
- [MCP](https://github.com/honojs/middleware/tree/main/packages/mcp)
- [RONIN (Database)](https://github.com/ronin-co/hono-client)
- [Session](https://github.com/honojs/middleware/tree/main/packages/session)
- [tsyringe](https://github.com/honojs/middleware/tree/main/packages/tsyringe)
- [User Agent based Blocker](https://github.com/honojs/middleware/tree/main/packages/ua-blocker)
# Basic Auth 中间件
此中间件可以对指定路径应用 Basic 认证。
使用 Cloudflare Workers 或其他平台实现 Basic 认证比看起来更复杂,但使用此中间件,这很容易。
有关 Basic 认证方案如何在底层工作的更多信息,请参阅 [MDN 文档](https://developer.mozilla.org/en-US/docs/Web/HTTP/Authentication#basic_authentication_scheme)。
## 导入
```ts
import { Hono } from 'hono'
import { basicAuth } from 'hono/basic-auth'
```
## 用法
```ts
const app = new Hono()
app.use(
'/auth/*',
basicAuth({
username: 'hono',
password: 'acoolproject',
})
)
app.get('/auth/page', (c) => {
return c.text('You are authorized')
})
```
要限制为特定路由 + 方法:
```ts
const app = new Hono()
app.get('/auth/page', (c) => {
return c.text('Viewing page')
})
app.delete(
'/auth/page',
basicAuth({ username: 'hono', password: 'acoolproject' }),
(c) => {
return c.text('Page deleted')
}
)
```
如果你想自己验证用户,请指定 `verifyUser` 选项;返回 `true` 表示接受。
```ts
const app = new Hono()
app.use(
basicAuth({
verifyUser: (username, password, c) => {
return (
username === 'dynamic-user' && password === 'hono-password'
)
},
})
)
```
## 选项
### username: `string`
正在认证的用户的用户名。
### password: `string`
用于认证的所提供用户名的密码值。
### realm: `string`
领域的域名,作为返回的 WWW-Authenticate 挑战 header 的一部分。默认值为 `"Secure Area"`。
请参阅更多:https://developer.mozilla.org/en-US/docs/Web/HTTP/Headers/WWW-Authenticate#directives
### hashFunction: `Function`
用于处理密码安全比较的散列函数。
### verifyUser: `(username: string, password: string, c: Context) => boolean | Promise`
用于验证用户的函数。
### invalidUserMessage: `string | object | MessageFunction`
`MessageFunction` 是 `(c: Context) => string | object | Promise`。如果用户无效,则为自定义消息。
### onAuthSuccess: `(c: Context, username: string) => void | Promise`
成功认证后调用的回调函数。这允许你设置上下文变量或执行副作用,而无需重新解析 Authorization header。
```ts
app.use(
'/auth/*',
basicAuth({
username: 'hono',
password: 'acoolproject',
onAuthSuccess: (c, username) => {
c.set('username', username)
},
})
)
app.get('/auth/page', (c) => {
const username = c.get('username')
return c.text(`Hello, ${username}!`)
})
```
## 更多选项
### ...users: `{ username: string, password: string }[]`
## 示例
### 定义多个用户
此中间件还允许你传递包含定义更多 `username` 和 `password` 对的对象的任意参数。
```ts
app.use(
'/auth/*',
basicAuth(
{
username: 'hono',
password: 'acoolproject',
// 在第一个对象中定义其他参数
realm: 'www.example.com',
},
{
username: 'hono-admin',
password: 'super-secure',
// 不能在此处重新定义其他参数
},
{
username: 'hono-user-1',
password: 'a-secret',
// 或在此处
}
)
)
```
或更少硬编码:
```ts
import { users } from '../config/users'
app.use(
'/auth/*',
basicAuth(
{
realm: 'www.example.com',
...users[0],
},
...users.slice(1)
)
)
```
# Bearer Auth 中间件
Bearer Auth 中间件通过验证 Request header 中的 API 令牌提供认证。
访问端点的 HTTP 客户端将添加带有 `Bearer {token}` 作为 header 值的 `Authorization` header。
从终端使用 `curl`,它将如下所示:
```sh
curl -H 'Authorization: Bearer honoiscool' http://localhost:8787/auth/page
```
## 导入
```ts
import { Hono } from 'hono'
import { bearerAuth } from 'hono/bearer-auth'
```
## 用法
> [!NOTE]
> 你的 `token` 必须匹配正则表达式 `/[A-Za-z0-9._~+/-]+=*/`,否则将返回 400 错误。值得注意的是,此正则表达式同时适用于 URL-safe Base64 和标准 Base64 编码的 JWT。此中间件不要求 bearer 令牌是 JWT,只需匹配上述正则表达式。
```ts
const app = new Hono()
const token = 'honoiscool'
app.use('/api/*', bearerAuth({ token }))
app.get('/api/page', (c) => {
return c.json({ message: 'You are authorized' })
})
```
要限制为特定路由 + 方法:
```ts
const app = new Hono()
const token = 'honoiscool'
app.get('/api/page', (c) => {
return c.json({ message: 'Read posts' })
})
app.post('/api/page', bearerAuth({ token }), (c) => {
return c.json({ message: 'Created post!' }, 201)
})
```
要实现多个令牌(例如,任何有效令牌都可以读取,但创建/更新/删除仅限于特权令牌):
```ts
const app = new Hono()
const readToken = 'read'
const privilegedToken = 'read+write'
const privilegedMethods = ['POST', 'PUT', 'PATCH', 'DELETE']
app.on('GET', '/api/page/*', async (c, next) => {
// 有效令牌列表
const bearer = bearerAuth({ token: [readToken, privilegedToken] })
return bearer(c, next)
})
app.on(privilegedMethods, '/api/page/*', async (c, next) => {
// 单个有效特权令牌
const bearer = bearerAuth({ token: privilegedToken })
return bearer(c, next)
})
// 定义 GET、POST 等的 handlers
```
如果你想自己验证令牌的值,请指定 `verifyToken` 选项;返回 `true` 表示接受。
```ts
const app = new Hono()
app.use(
'/auth-verify-token/*',
bearerAuth({
verifyToken: async (token, c) => {
return token === 'dynamic-token'
},
})
)
```
## 选项
### token: `string` | `string[]`
用于验证传入 bearer 令牌的字符串。
### realm: `string`
领域的域名,作为返回的 WWW-Authenticate 挑战 header 的一部分。默认值为 `""`。
请参阅更多:https://developer.mozilla.org/en-US/docs/Web/HTTP/Headers/WWW-Authenticate#directives
### prefix: `string`
Authorization header 值的前缀(或称为 `schema`)。默认值为 `"Bearer"`。
### headerName: `string`
header 名称。默认值为 `Authorization`。
### hashFunction: `Function`
用于处理认证令牌安全比较的散列函数。
### verifyToken: `(token: string, c: Context) => boolean | Promise`
用于验证令牌的函数。
### noAuthenticationHeader: `object`
自定义请求没有认证 header 时的错误响应。
- `wwwAuthenticateHeader`: `string | object | MessageFunction` - 自定义 WWW-Authenticate header 值。
- `message`: `string | object | MessageFunction` - 响应体的自定义消息。
`MessageFunction` 是 `(c: Context) => string | object | Promise`。
### invalidAuthenticationHeader: `object`
自定义认证 header 格式无效时的错误响应。
- `wwwAuthenticateHeader`: `string | object | MessageFunction` - 自定义 WWW-Authenticate header 值。
- `message`: `string | object | MessageFunction` - 响应体的自定义消息。
### invalidToken: `object`
自定义令牌无效时的错误响应。
- `wwwAuthenticateHeader`: `string | object | MessageFunction` - 自定义 WWW-Authenticate header 值。
- `message`: `string | object | MessageFunction` - 响应体的自定义消息。
# Body Limit 中间件
Body Limit 中间件可以限制请求体的文件大小。
此中间件首先使用请求中 `Content-Length` header 的值(如果存在)。
如果未设置,它将在流中读取 body,如果大于指定的文件大小,则执行错误处理器。
## 导入
```ts
import { Hono } from 'hono'
import { bodyLimit } from 'hono/body-limit'
```
## 用法
```ts
const app = new Hono()
app.post(
'/upload',
bodyLimit({
maxSize: 50 * 1024, // 50kb
onError: (c) => {
return c.text('overflow :(', 413)
},
}),
async (c) => {
const body = await c.req.parseBody()
if (body['file'] instanceof File) {
console.log(`Got file sized: ${body['file'].size}`)
}
return c.text('pass :)')
}
)
```
## 选项
### maxSize: `number`
你想要限制的最大文件大小。默认值为 `100 * 1024` - `100kb`。
### onError: `OnError`
如果超过指定的文件大小,将调用此错误处理器。
## 与 Bun 一起使用以处理大请求
如果显式使用 Body Limit 中间件来允许大于默认值的请求体,则可能需要相应地更改 `Bun.serve` 配置。[在撰写本文时](https://github.com/oven-sh/bun/blob/f2cfa15e4ef9d730fc6842ad8b79fb7ab4c71cb9/packages/bun-types/bun.d.ts#L2191),`Bun.serve` 的默认请求体限制为 128MiB。如果你将 Hono 的 Body Limit 中间件设置为大于该值,你的请求仍将失败,此外,中间件中指定的 `onError` 处理器将不会被调用。这是因为 `Bun.serve()` 将在将请求传递给 Hono 之前将状态码设置为 `413` 并终止连接。
如果你想使用 Hono 和 Bun 接受大于 128MiB 的请求,你也需要为 Bun 设置限制:
```ts
export default {
port: process.env['PORT'] || 3000,
fetch: app.fetch,
maxRequestBodySize: 1024 * 1024 * 200, // 你的值
}
```
或者,根据你的设置:
```ts
Bun.serve({
fetch(req, server) {
return app.fetch(req, { ip: server.requestIP(req) })
},
maxRequestBodySize: 1024 * 1024 * 200, // 你的值
})
```
# Cache 中间件
Cache 中间件使用 Web 标准的 [Cache API](https://developer.mozilla.org/en-US/docs/Web/API/Cache)。
Cache 中间件目前支持使用自定义域的 Cloudflare Workers 项目和使用 [Deno 1.26+](https://github.com/denoland/deno/releases/tag/v1.26.0) 的 Deno 项目。也可用于 Deno Deploy。
Cloudflare Workers 尊重 `Cache-Control` header 并返回缓存的响应。有关详细信息,请参阅 [Cloudflare 文档上的 Cache](https://developers.cloudflare.com/workers/runtime-apis/cache/)。Deno 不尊重 headers,因此如果你需要更新缓存,你需要实现自己的机制。
有关每个平台的说明,请参阅下面的 [用法](#usage)。
## 导入
```ts
import { Hono } from 'hono'
import { cache } from 'hono/cache'
```
## 用法
::: code-group
```ts [Cloudflare Workers]
app.get(
'*',
cache({
cacheName: 'my-app',
cacheControl: 'max-age=3600',
})
)
```
```ts [Deno]
// 必须为 Deno 运行时使用 `wait: true`
app.get(
'*',
cache({
cacheName: 'my-app',
cacheControl: 'max-age=3600',
wait: true,
})
)
```
:::
## 选项
### cacheName: `string` | `(c: Context) => string` | `Promise`
缓存的名称。可用于存储具有不同标识符的多个缓存。
### wait: `boolean`
布尔值,指示 Hono 是否应在继续请求之前等待 `cache.put` 函数的 Promise 解析。_对于 Deno 环境必须为 true_。默认值为 `false`。
### cacheControl: `string`
`Cache-Control` header 的指令字符串。有关更多信息,请参阅 [MDN 文档](https://developer.mozilla.org/en-US/docs/Web/HTTP/Headers/Cache-Control)。当未提供此选项时,不会向请求添加 `Cache-Control` header。
### vary: `string` | `string[]`
在响应中设置 `Vary` header。如果原始响应 header 已经包含 `Vary` header,则合并值,删除任何重复项。将其设置为 `*` 将导致错误。有关 Vary header 及其对缓存策略的影响的更多详细信息,请参阅 [MDN 文档](https://developer.mozilla.org/en-US/docs/Web/HTTP/Headers/Vary)。
### keyGenerator: `(c: Context) => string | Promise`
为 `cacheName` 存储中的每个请求生成 keys。这可用于根据请求参数或上下文参数缓存数据。默认值为 `c.req.url`。
### cacheableStatusCodes: `number[]`
应缓存的状态码数组。默认值为 `[200]`。使用此选项缓存具有特定状态码的响应。
```ts
app.get(
'*',
cache({
cacheName: 'my-app',
cacheControl: 'max-age=3600',
cacheableStatusCodes: [200, 404, 412],
})
)
```
# Combine 中间件
Combine 中间件将多个中间件函数组合为单个中间件。它提供三个函数:
- `some` - 仅运行给定中间件中的一个。
- `every` - 运行所有给定中间件。
- `except` - 仅当不满足条件时运行所有给定中间件。
## 导入
```ts
import { Hono } from 'hono'
import { some, every, except } from 'hono/combine'
```
## 用法
以下是使用 Combine 中间件的复杂访问控制规则示例。
```ts
import { Hono } from 'hono'
import { bearerAuth } from 'hono/bearer-auth'
import { getConnInfo } from 'hono/cloudflare-workers'
import { every, some } from 'hono/combine'
import { ipRestriction } from 'hono/ip-restriction'
import { rateLimit } from '@/my-rate-limit'
const app = new Hono()
app.use(
'*',
some(
every(
ipRestriction(getConnInfo, { allowList: ['192.168.0.2'] }),
bearerAuth({ token })
),
// 如果两个条件都满足,rateLimit 将不会执行。
rateLimit()
)
)
app.get('/', (c) => c.text('Hello Hono!'))
```
### some
运行返回 true 的第一个中间件。中间件按顺序应用,如果任何中间件成功退出,后续中间件将不会运行。
```ts
import { some } from 'hono/combine'
import { bearerAuth } from 'hono/bearer-auth'
import { myRateLimit } from '@/rate-limit'
// 如果客户端有有效令牌,则跳过速率限制。
// 否则,应用速率限制。
app.use(
'/api/*',
some(bearerAuth({ token }), myRateLimit({ limit: 100 }))
)
```
### every
运行所有中间件,如果任何中间件失败则停止。中间件按顺序应用,如果任何中间件抛出错误,后续中间件将不会运行。
```ts
import { some, every } from 'hono/combine'
import { bearerAuth } from 'hono/bearer-auth'
import { myCheckLocalNetwork } from '@/check-local-network'
import { myRateLimit } from '@/rate-limit'
// 如果客户端在本地网络中,则跳过认证和速率限制。
// 否则,应用认证和速率限制。
app.use(
'/api/*',
some(
myCheckLocalNetwork(),
every(bearerAuth({ token }), myRateLimit({ limit: 100 }))
)
)
```
### except
运行所有中间件,除非满足条件。你可以传递字符串或函数作为条件。如果需要匹配多个目标,请将它们作为数组传递。
```ts
import { except } from 'hono/combine'
import { bearerAuth } from 'hono/bearer-auth'
// 如果客户端正在访问公共 API,则跳过认证。
// 否则,需要有效令牌。
app.use('/api/*', except('/api/public/*', bearerAuth({ token })))
```
# Compress 中间件
此中间件根据 `Accept-Encoding` 请求 header 压缩响应体。
::: info
**注意**:在 Cloudflare Workers 和 Deno Deploy 上,响应体将自动压缩,因此无需使用此中间件。
:::
## 导入
```ts
import { Hono } from 'hono'
import { compress } from 'hono/compress'
```
## 用法
```ts
const app = new Hono()
app.use(compress())
```
## 选项
### encoding: `'gzip'` | `'deflate'`
允许响应压缩的压缩方案。`gzip` 或 `deflate`。如果未定义,则两者都允许,并将基于 `Accept-Encoding` header 使用。如果未提供此选项且客户端在 `Accept-Encoding` header 中同时提供两者,则优先使用 `gzip`。
### threshold: `number`
要压缩的最小大小(以字节为单位)。默认为 1024 字节。
# Context Storage 中间件
Context Storage 中间件将 Hono `Context` 存储在 `AsyncLocalStorage` 中,使其可以全局访问。
::: info
**注意** 此中间件使用 `AsyncLocalStorage`。运行时应该支持它。
**Cloudflare Workers**:要启用 `AsyncLocalStorage`,请将 [`nodejs_compat` 或 `nodejs_als` 标志](https://developers.cloudflare.com/workers/configuration/compatibility-dates/#nodejs-compatibility-flag) 添加到你的 `wrangler.toml` 文件。
:::
## 导入
```ts
import { Hono } from 'hono'
import {
contextStorage,
getContext,
tryGetContext,
} from 'hono/context-storage'
```
## 用法
如果 `contextStorage()` 作为中间件应用,`getContext()` 将返回当前 Context 对象。
```ts
type Env = {
Variables: {
message: string
}
}
const app = new Hono()
app.use(contextStorage())
app.use(async (c, next) => {
c.set('message', 'Hello!')
await next()
})
// 你可以在 handler 之外访问变量。
const getMessage = () => {
return getContext().var.message
}
app.get('/', (c) => {
return c.text(getMessage())
})
```
在 Cloudflare Workers 上,你可以在 handler 之外访问 bindings。
```ts
type Env = {
Bindings: {
KV: KVNamespace
}
}
const app = new Hono()
app.use(contextStorage())
const setKV = (value: string) => {
return getContext().env.KV.put('key', value)
}
```
## tryGetContext
`tryGetContext()` 的工作方式类似于 `getContext()`,但在上下文不可用时返回 `undefined` 而不是抛出错误:
```ts
const context = tryGetContext()
if (context) {
// 上下文可用
console.log(context.var.message)
}
```
# CORS 中间件
有许多将 Cloudflare Workers 用作 Web API 并从外部前端应用程序调用它们的用例。
对于它们,我们必须实现 CORS,让我们也用中间件来做这个。
## 导入
```ts
import { Hono } from 'hono'
import { cors } from 'hono/cors'
```
## 用法
```ts
const app = new Hono()
// CORS 应该在路由之前调用
app.use('/api/*', cors())
app.use(
'/api2/*',
cors({
origin: 'http://example.com',
allowHeaders: ['X-Custom-Header', 'Upgrade-Insecure-Requests'],
allowMethods: ['POST', 'GET', 'OPTIONS'],
exposeHeaders: ['Content-Length', 'X-Kuma-Revision'],
maxAge: 600,
credentials: true,
})
)
app.all('/api/abc', (c) => {
return c.json({ success: true })
})
app.all('/api2/abc', (c) => {
return c.json({ success: true })
})
```
多个来源:
```ts
app.use(
'/api3/*',
cors({
origin: ['https://example.com', 'https://example.org'],
})
)
// 或者你可以使用 "function"
app.use(
'/api4/*',
cors({
// `c` 是 `Context` 对象
origin: (origin, c) => {
return origin.endsWith('.example.com')
? origin
: 'http://example.com'
},
})
)
```
基于来源的动态允许方法:
```ts
app.use(
'/api5/*',
cors({
origin: (origin) =>
origin === 'https://example.com' ? origin : '*',
// `c` 是 `Context` 对象
allowMethods: (origin, c) =>
origin === 'https://example.com'
? ['GET', 'HEAD', 'POST', 'PATCH', 'DELETE']
: ['GET', 'HEAD'],
})
)
```
## 选项
### origin: `string` | `string[]` | `(origin:string, c:Context) => string`
"_Access-Control-Allow-Origin_" CORS header 的值。你也可以传递回调函数,如 `origin: (origin) => (origin.endsWith('.example.com') ? origin : 'http://example.com')`。默认值为 `*`。
### allowMethods: `string[]` | `(origin:string, c:Context) => string[]`
"_Access-Control-Allow-Methods_" CORS header 的值。你也可以传递回调函数来根据来源动态确定允许的方法。默认值为 `['GET', 'HEAD', 'PUT', 'POST', 'DELETE', 'PATCH']`。
### allowHeaders: `string[]`
"_Access-Control-Allow-Headers_" CORS header 的值。默认值为 `[]`。
### maxAge: `number`
"_Access-Control-Max-Age_" CORS header 的值。
### credentials: `boolean`
"_Access-Control-Allow-Credentials_" CORS header 的值。
### exposeHeaders: `string[]`
"_Access-Control-Expose-Headers_" CORS header 的值。默认值为 `[]`。
## 依赖于环境的 CORS 配置
如果你想根据执行环境(如开发或生产)调整 CORS 配置,从环境变量注入值很方便,因为它消除了应用程序感知其自身执行环境的需要。请参阅下面的示例以澄清。
```ts
app.use('*', async (c, next) => {
const corsMiddlewareHandler = cors({
origin: c.env.CORS_ORIGIN,
})
return corsMiddlewareHandler(c, next)
})
```
## 与 Vite 一起使用
当将 Hono 与 Vite 一起使用时,你应该通过在 `vite.config.ts` 中将 `server.cors` 设置为 `false` 来禁用 Vite 的内置 CORS 功能。这可以防止与 Hono 的 CORS 中间件冲突。
```ts
// vite.config.ts
import { cloudflare } from '@cloudflare/vite-plugin'
import { defineConfig } from 'vite'
export default defineConfig({
server: {
cors: false, // 禁用 Vite 的内置 CORS 设置
},
plugins: [cloudflare()],
})
```
# CSRF 保护
此中间件通过检查 `Origin` header 和 `Sec-Fetch-Site` header 来防止 CSRF 攻击。如果任一验证通过,则允许请求。
中间件仅验证以下请求:
- 使用不安全的 HTTP 方法(不是 GET、HEAD 或 OPTIONS)
- 具有可以由 HTML 表单发送的内容类型(`application/x-www-form-urlencoded`、`multipart/form-data` 或 `text/plain`)
不发送 `Origin` headers 的旧浏览器,或使用反向代理删除这些 headers 的环境,可能无法正常工作。在此类环境中,请使用其他 CSRF 令牌方法。
## 导入
```ts
import { Hono } from 'hono'
import { csrf } from 'hono/csrf'
```
## 用法
```ts
const app = new Hono()
// 默认:origin 和 sec-fetch-site 验证
app.use(csrf())
// 允许特定来源
app.use(csrf({ origin: 'https://myapp.example.com' }))
// 允许多个来源
app.use(
csrf({
origin: [
'https://myapp.example.com',
'https://development.myapp.example.com',
],
})
)
// 允许特定 sec-fetch-site 值
app.use(csrf({ secFetchSite: 'same-origin' }))
app.use(csrf({ secFetchSite: ['same-origin', 'none'] }))
// 动态 origin 验证
强烈建议验证协议以确保匹配 `$`。
你绝不应该进行正向匹配。
app.use(
'*',
csrf({
origin: (origin) =>
/https:\/\/(\w+\.)?myapp\.example\.com$/.test(origin),
})
)
// 动态 sec-fetch-site 验证
app.use(
csrf({
secFetchSite: (secFetchSite, c) => {
// 始终允许 same-origin
if (secFetchSite === 'same-origin') return true
// 为 webhook 端点允许 cross-site
if (
secFetchSite === 'cross-site' &&
c.req.path.startsWith('/webhook/')
) {
return true
}
return false
},
})
)
```
## 选项
### origin: `string` | `string[]` | `Function`
指定 CSRF 保护的允许来源。
- **`string`**:单个允许的来源(例如 `'https://example.com'`)
- **`string[]`**:允许的来源数组
- **`Function`**:自定义处理器 `(origin: string, context: Context) => boolean` 用于灵活的来源验证和绕过逻辑
**默认**:仅与请求 URL 相同的来源
函数处理器接收请求的 `Origin` header 值和请求上下文,允许基于请求属性(如路径、headers 或其他上下文数据)进行动态验证。
### secFetchSite: `string` | `string[]` | `Function`
使用 [Fetch Metadata](https://web.dev/articles/fetch-metadata) 指定 CSRF 保护的允许 Sec-Fetch-Site header 值。
- **`string`**:单个允许的值(例如 `'same-origin'`)
- **`string[]`**:允许的值数组(例如 `['same-origin', 'none']`)
- **`Function`**:自定义处理器 `(secFetchSite: string, context: Context) => boolean` 用于灵活验证
**默认**:仅允许 `'same-origin'`
标准 Sec-Fetch-Site 值:
- `same-origin`:来自同一来源的请求
- `same-site`:来自同一站点(不同子域)的请求
- `cross-site`:来自不同站点的请求
- `none`:不是来自网页的请求(例如,浏览器地址栏、书签)
函数处理器接收请求的 `Sec-Fetch-Site` header 值和请求上下文,支持基于请求属性的动态验证。
# ETag 中间件
使用此中间件,你可以轻松添加 ETag headers。
## 导入
```ts
import { Hono } from 'hono'
import { etag } from 'hono/etag'
```
## 用法
```ts
const app = new Hono()
app.use('/etag/*', etag())
app.get('/etag/abc', (c) => {
return c.text('Hono is cool')
})
```
## 保留的 headers
304 响应必须包括在等效 200 OK 响应中发送的 headers。默认的 headers 是 Cache-Control、Content-Location、Date、ETag、Expires 和 Vary。
如果你想添加发送的 header,你可以使用 `retainedHeaders` 选项和包含默认 headers 的 `RETAINED_304_HEADERS` 字符串数组变量:
```ts
import { etag, RETAINED_304_HEADERS } from 'hono/etag'
// ...
app.use(
'/etag/*',
etag({
retainedHeaders: ['x-message', ...RETAINED_304_HEADERS],
})
)
```
## 选项
### weak: `boolean`
定义是否使用 [弱验证](https://developer.mozilla.org/en-US/docs/Web/HTTP/Conditional_requests#weak_validation)。如果设置为 `true`,则在值的前缀添加 `w/`。默认值为 `false`。
### retainedHeaders: `string[]`
你希望在 304 响应中保留的 headers。
### generateDigest: `(body: Uint8Array) => ArrayBuffer | Promise`
自定义摘要生成函数。默认情况下,它使用 `SHA-1`。此函数使用响应体作为 `Uint8Array` 调用,并应返回哈希作为 `ArrayBuffer` 或其 Promise。
# IP Restriction 中间件
IP Restriction 中间件是根据用户的 IP 地址限制对资源访问的中间件。
## 导入
```ts
import { Hono } from 'hono'
import { ipRestriction } from 'hono/ip-restriction'
```
## 用法
对于在 Bun 上运行的应用程序,如果你只想允许来自本地的访问,你可以按以下方式编写。在 `denyList` 中指定你想要拒绝的规则,在 `allowList` 中指定你想要允许的规则。
```ts
import { Hono } from 'hono'
import { getConnInfo } from 'hono/bun'
import { ipRestriction } from 'hono/ip-restriction'
const app = new Hono()
app.use(
'*',
ipRestriction(getConnInfo, {
denyList: [],
allowList: ['127.0.0.1', '::1'],
})
)
app.get('/', (c) => c.text('Hello Hono!'))
```
将适合你的环境的 [ConnInfo 辅助工具](/docs/helpers/conninfo) 中的 `getConninfo` 作为 `ipRestriction` 的第一个参数传递。例如,对于 Deno,它将如下所示:
```ts
import { getConnInfo } from 'hono/deno'
import { ipRestriction } from 'hono/ip-restriction'
//...
app.use(
'*',
ipRestriction(getConnInfo, {
// ...
})
)
```
## 规则
请按照以下说明编写规则。
### IPv4
- `192.168.2.0` - 静态 IP 地址
- `192.168.2.0/24` - CIDR 表示法
- `*` - 所有地址
### IPv6
- `::1` - 静态 IP 地址
- `::1/10` - CIDR 表示法
- `*` - 所有地址
## 错误处理
要自定义错误,请在第三个参数中返回 `Response`。
```ts
app.use(
'*',
ipRestriction(
getConnInfo,
{
denyList: ['192.168.2.0/24'],
},
async (remote, c) => {
return c.text(`Blocking access from ${remote.addr}`, 403)
}
)
)
```
# JSX Renderer 中间件
JSX Renderer 中间件允许你在使用 `c.render()` 函数渲染 JSX 时设置布局,而无需使用 `c.setRenderer()`。此外,它通过使用 `useRequestContext()` 使得可以在组件中访问 Context 实例。
## 导入
```ts
import { Hono } from 'hono'
import { jsxRenderer, useRequestContext } from 'hono/jsx-renderer'
```
## 用法
```jsx
const app = new Hono()
app.get(
'/page/*',
jsxRenderer(({ children }) => {
return (
{children}
)
})
)
app.get('/page/about', (c) => {
return c.render(About me!
)
})
```
## 选项
### docType: `boolean` | `string`
如果你不想在 HTML 开头添加 DOCTYPE,请将 `docType` 选项设置为 `false`。
```tsx
app.use(
'*',
jsxRenderer(
({ children }) => {
return (
{children}
)
},
{ docType: false }
)
)
```
你可以指定 DOCTYPE。
```tsx
app.use(
'*',
jsxRenderer(
({ children }) => {
return (
{children}
)
},
{
docType:
'',
}
)
)
```
### stream: `boolean` | `Record`
如果你将其设置为 `true` 或提供 Record 值,它将渲染为流式响应。
```tsx
const AsyncComponent = async () => {
await new Promise((r) => setTimeout(r, 1000)) // 睡眠 1 秒
return Hi!
}
app.get(
'*',
jsxRenderer(
({ children }) => {
return (
SSR Streaming
{children}
)
},
{ stream: true }
)
)
app.get('/', (c) => {
return c.render(
loading...}>
)
})
```
如果设置了 `true`,则添加以下 headers:
```ts
{
'Transfer-Encoding': 'chunked',
'Content-Type': 'text/html; charset=UTF-8',
'Content-Encoding': 'Identity'
}
```
你可以通过指定 Record 值来自定义 header 值。
### 基于函数的选项
你可以传递接收 `Context` 对象的函数而不是静态选项对象。这允许你根据请求上下文(如环境变量或请求参数)动态设置选项。
```tsx
app.use(
'*',
jsxRenderer(
({ children }) => {
return (
{children}
)
},
(c) => ({
stream: c.req.header('X-Enable-Streaming') === 'true',
})
)
)
```
作为一个具体示例,你可以使用它在使用 `` 生成静态站点 (SSG) 时禁用流式,通过使用 [`isSSGContext`](/docs/helpers/ssg#isssgcontext) 辅助工具:
```tsx
app.use(
'*',
jsxRenderer(
({ children }) => {
return (
)
},
(c) => ({
stream: !isSSGContext(c),
})
)
)
```
## 嵌套布局
`Layout` 组件支持嵌套布局。
```tsx
app.use(
jsxRenderer(({ children }) => {
return (
{children}
)
})
)
const blog = new Hono()
blog.use(
jsxRenderer(({ children, Layout }) => {
return (
{children}
)
})
)
app.route('/blog', blog)
```
## `useRequestContext()`
`useRequestContext()` 返回 Context 实例。
```tsx
import { useRequestContext, jsxRenderer } from 'hono/jsx-renderer'
const app = new Hono()
app.use(jsxRenderer())
const RequestUrlBadge: FC = () => {
const c = useRequestContext()
return {c.req.url}
}
app.get('/page/info', (c) => {
return c.render(
You are accessing:
)
})
```
::: warning
你不能在 Deno 的 `precompile` JSX 选项中使用 `useRequestContext()`。请使用 `react-jsx`:
```json
"compilerOptions": {
"jsx": "precompile", // [!code --]
"jsx": "react-jsx", // [!code ++]
"jsxImportSource": "hono/jsx"
}
}
```
:::
## 扩展 `ContextRenderer`
通过按以下方式定义 `ContextRenderer`,你可以将附加内容传递给渲染器。例如,当你想根据页面更改 head 标签的内容时,这很方便。
```tsx
declare module 'hono' {
interface ContextRenderer {
(
content: string | Promise,
props: { title: string }
): Response
}
}
const app = new Hono()
app.get(
'/page/*',
jsxRenderer(({ children, title }) => {
return (
{title}
{children}
)
})
)
app.get('/page/favorites', (c) => {
return c.render(
- Eating sushi
- Watching baseball games
,
{
title: 'My favorites',
}
)
})
```
# JWK Auth 中间件
JWK Auth 中间件通过使用 JWK (JSON Web Key) 验证令牌来认证请求。它检查 `Authorization` header 和其他配置来源(如 cookies,如果指定)。它使用提供的 `keys` 验证令牌,如果指定则从 `jwks_uri` 获取 keys,并且如果设置了 `cookie` 选项则支持从 cookies 提取令牌。
## 此中间件验证的内容
对于每个令牌,`jwk()`:
- 解析并验证 JWT header 格式。
- 需要 `kid` header 并通过 `kid` 查找匹配的 key。
- 拒绝对称算法(`HS256`、`HS384`、`HS512`)。
- 要求 header `alg` 包含在配置的 `alg` 允许列表中。
- 如果匹配的 JWK 有 `alg` 字段,则要求它与 JWT header `alg` 匹配。
- 使用匹配的 key 验证令牌签名。
- 默认情况下,验证基于时间的 claims:`nbf`、`exp` 和 `iat`。
可以使用 `verification` 选项配置可选的 claim 验证:
- `iss`:提供时验证颁发者。
- `aud`:提供时验证受众。
如果你需要在上述之外进行额外的令牌检查(例如,自定义应用程序级授权规则),请在 `jwk()` 之后在自己的中间件中添加它们。
:::info
从客户端发送的 Authorization header 必须具有指定的方案。
示例:`Bearer my.token.value` 或 `Basic my.token.value`
:::
## 导入
```ts
import { Hono } from 'hono'
import { jwk } from 'hono/jwk'
import { verifyWithJwks } from 'hono/jwt'
```
## 用法
```ts
const app = new Hono()
app.use(
'/auth/*',
jwk({
jwks_uri: `https://${backendServer}/.well-known/jwks.json`,
alg: ['RS256'],
})
)
app.get('/auth/page', (c) => {
return c.text('You are authorized')
})
```
获取 payload:
```ts
const app = new Hono()
app.use(
'/auth/*',
jwk({
jwks_uri: `https://${backendServer}/.well-known/jwks.json`,
alg: ['RS256'],
})
)
app.get('/auth/page', (c) => {
const payload = c.get('jwtPayload')
return c.json(payload) // 例如:{ "sub": "1234567890", "name": "John Doe", "iat": 1516239022 }
})
```
匿名访问:
```ts
const app = new Hono()
app.use(
'/auth/*',
jwk({
jwks_uri: (c) =>
`https://${c.env.authServer}/.well-known/jwks.json`,
alg: ['RS256'],
allow_anon: true,
})
)
app.get('/auth/page', (c) => {
const payload = c.get('jwtPayload')
return c.json(payload ?? { message: 'hello anon' })
})
```
## 在中间件之外使用 `verifyWithJwks`
`verifyWithJwks` 实用函数可用于在 Hono 中间件上下文之外验证 JWT 令牌,例如在 SvelteKit SSR 页面或其他服务器端环境中:
```ts
const id_payload = await verifyWithJwks(
id_token,
{
jwks_uri: 'https://your-auth-server/.well-known/jwks.json',
allowedAlgorithms: ['RS256'],
},
{
cf: { cacheEverything: true, cacheTtl: 3600 },
}
)
```
## 配置 JWKS fetch 请求选项
要配置如何从 `jwks_uri` 检索 JWKS,请将 fetch 请求选项作为 `jwk()` 的第二个参数传递。
此参数是 `RequestInit`,仅用于 JWKS fetch 请求。
```ts
const app = new Hono()
app.use(
'/auth/*',
jwk(
{
jwks_uri: `https://${backendServer}/.well-known/jwks.json`,
alg: ['RS256'],
},
{
headers: {
Authorization: 'Bearer TOKEN',
},
}
)
)
```
## 选项
### alg: `AsymmetricAlgorithm[]`
用于令牌验证的允许非对称算法数组。
可用类型为 `RS256` | `RS384` | `RS512` | `PS256` | `PS384` | `PS512` | `ES256` | `ES384` | `ES512` | `EdDSA`。
### keys: `HonoJsonWebKey[] | (c: Context) => Promise`
你的公钥的值,或返回它们的函数。函数接收 Context 对象。
### jwks_uri: `string` | `(c: Context) => Promise`
如果设置了此值,则尝试从此 URI 获取 JWKs,期望具有 `keys` 的 JSON 响应,并将其添加到提供的 `keys` 选项。你也可以传递回调函数来使用 Context 动态确定 JWKS URI。
### allow_anon: `boolean`
如果将此值设置为 `true`,则没有有效令牌的请求将被允许通过中间件。使用 `c.get('jwtPayload')` 检查请求是否已认证。默认值为 `false`。
### cookie: `string`
如果设置了此值,则使用该值作为键从 cookie header 中检索值,然后将其验证为令牌。
### headerName: `string`
用于查找 JWT 令牌的 header 名称。默认值为 `Authorization`。
### verification: `VerifyOptions`
配置除签名验证之外的 claim 验证行为:
- `iss`:预期颁发者。
- `aud`:预期受众。
- `exp`、`nbf`、`iat`:默认启用,如果需要可以禁用。
# JWT Auth 中间件
JWT Auth 中间件通过验证 JWT 令牌提供认证。
如果未设置 `cookie` 选项,中间件将检查 `Authorization` header。你可以使用 `headerName` 选项自定义 header 名称。
:::info
从客户端发送的 Authorization header 必须具有指定的方案。
示例:`Bearer my.token.value` 或 `Basic my.token.value`
:::
## 导入
```ts
import { Hono } from 'hono'
import { jwt } from 'hono/jwt'
import type { JwtVariables } from 'hono/jwt'
```
## 用法
```ts
// 指定变量类型以推断 `c.get('jwtPayload')`:
type Variables = JwtVariables
const app = new Hono<{ Variables: Variables }>()
app.use(
'/auth/*',
jwt({
secret: 'it-is-very-secret',
alg: 'HS256',
})
)
app.get('/auth/page', (c) => {
return c.text('You are authorized')
})
```
获取 payload:
```ts
const app = new Hono()
app.use(
'/auth/*',
jwt({
secret: 'it-is-very-secret',
alg: 'HS256',
issuer: 'my-trusted-issuer',
})
)
app.get('/auth/page', (c) => {
const payload = c.get('jwtPayload')
return c.json(payload) // 例如:{ "sub": "1234567890", "name": "John Doe", "iat": 1516239022, "iss": "my-trusted-issuer" }
})
```
::: tip
`jwt()` 只是一个中间件函数。如果你想使用环境变量(例如 `c.env.JWT_SECRET`),你可以按以下方式使用:
```js
app.use('/auth/*', (c, next) => {
const jwtMiddleware = jwt({
secret: c.env.JWT_SECRET,
alg: 'HS256',
})
return jwtMiddleware(c, next)
})
```
:::
## 选项
### secret: `string`
你的密钥的值。
### alg: `string`
用于验证的算法类型。
可用类型为 `HS256` | `HS384` | `HS512` | `RS256` | `RS384` | `RS512` | `PS256` | `PS384` | `PS512` | `ES256` | `ES384` | `ES512` | `EdDSA`。
### cookie: `string`
如果设置了此值,则使用该值作为键从 cookie header 中检索值,然后将其验证为令牌。
### headerName: `string`
用于查找 JWT 令牌的 header 名称。默认值为 `Authorization`。
```ts
app.use(
'/auth/*',
jwt({
secret: 'it-is-very-secret',
alg: 'HS256',
headerName: 'x-custom-auth-header',
})
)
```
### verifyOptions: `VerifyOptions`
控制令牌验证的选项。
#### verifyOptions.iss: `string | RexExp`
用于令牌验证的预期颁发者。如果未设置此选项,则**不**检查 `iss` claim。
#### verifyOptions.nbf: `boolean`
如果存在 `nbf`(not before)claim 并且设置为 `true`,则将验证它。默认值为 `true`。
#### verifyOptions.iat: `boolean`
如果存在 `iat`(issued at)claim 并且设置为 `true`,则将验证它。默认值为 `true`。
#### verifyOptions.exp: `boolean`
如果存在 `exp`(expiration time)claim 并且设置为 `true`,则将验证它。默认值为 `true`。
# Language 中间件
Language Detector 中间件自动从各种来源确定用户的首选语言(区域设置),并通过 `c.get('language')` 提供。检测策略包括查询参数、cookies、headers 和 URL 路径段。非常适合国际化(i18n)和特定区域设置的内容。
## 导入
```ts
import { Hono } from 'hono'
import { languageDetector } from 'hono/language'
```
## 基本用法
从查询字符串、cookie 和 header 检测语言(默认顺序),并回退到英语:
```ts
const app = new Hono()
app.use(
languageDetector({
supportedLanguages: ['en', 'ar', 'ja'], // 必须包含回退
fallbackLanguage: 'en', // 必需
})
)
app.get('/', (c) => {
const lang = c.get('language')
return c.text(`Hello! Your language is ${lang}`)
})
```
### 客户端示例
```sh
# 通过路径
curl http://localhost:8787/ar/home
# 通过查询参数
curl http://localhost:8787/?lang=ar
# 通过 cookie
curl -H 'Cookie: language=ja' http://localhost:8787/
# 通过 header
curl -H 'Accept-Language: ar,en;q=0.9' http://localhost:8787/
```
## 默认配置
```ts
export const DEFAULT_OPTIONS: DetectorOptions = {
order: ['querystring', 'cookie', 'header'],
lookupQueryString: 'lang',
lookupCookie: 'language',
lookupFromHeaderKey: 'accept-language',
lookupFromPathIndex: 0,
caches: ['cookie'],
ignoreCase: true,
fallbackLanguage: 'en',
supportedLanguages: ['en'],
cookieOptions: {
sameSite: 'Strict',
secure: true,
maxAge: 365 * 24 * 60 * 60,
httpOnly: true,
},
debug: false,
}
```
## 关键行为
### 检测工作流程
1. **顺序**:默认按此顺序检查来源:
- 查询参数 (?lang=ar)
- Cookie (language=ar)
- Accept-Language header
2. **缓存**:将检测到的语言存储在 cookie 中(默认 1 年)
3. **回退**:如果没有有效检测,则使用 `fallbackLanguage`(必须在 `supportedLanguages` 中)
## 高级配置
### 自定义检测顺序
优先考虑 URL 路径检测(例如 /en/about):
```ts
app.use(
languageDetector({
order: ['path', 'cookie', 'querystring', 'header'],
lookupFromPathIndex: 0, // /en/profile → index 0 = 'en'
supportedLanguages: ['en', 'ar'],
fallbackLanguage: 'en',
})
)
```
### 渐进式区域设置匹配
当检测到的区域设置代码(如 `ja-JP`)不在 `supportedLanguages` 中时,中间件会渐进式地截断子标签以找到匹配项。例如,`zh-Hant-CN` 将尝试 `zh-Hant`,然后尝试 `zh`。始终首选精确匹配。
```ts
app.use(
languageDetector({
supportedLanguages: ['en', 'ja', 'zh-Hant'],
fallbackLanguage: 'en',
})
)
// Accept-Language: ja-JP → 匹配 'ja'
// Accept-Language: zh-Hant-CN → 匹配 'zh-Hant'
```
### 语言代码转换
规范化复杂代码(例如 en-US → en):
```ts
app.use(
languageDetector({
convertDetectedLanguage: (lang) => lang.split('-')[0],
supportedLanguages: ['en', 'ja'],
fallbackLanguage: 'en',
})
)
```
### Cookie 配置
```ts
app.use(
languageDetector({
lookupCookie: 'app_lang',
caches: ['cookie'],
cookieOptions: {
path: '/', // Cookie 路径
sameSite: 'Lax', // Cookie same-site 策略
secure: true, // 仅通过 HTTPS 发送
maxAge: 86400 * 365, // 1 年过期
httpOnly: true, // 无法通过 JavaScript 访问
domain: '.example.com', // 可选:特定域
},
})
)
```
要禁用 cookie 缓存:
```ts
languageDetector({
caches: false,
})
```
### 调试
记录检测步骤:
```ts
languageDetector({
debug: true, // 显示:"Detected from querystring: ar"
})
```
## 选项参考
### 基本选项
| 选项 | 类型 | 默认值 | 必需 | 描述 |
| :------------------- | :--------------- | :------------------------------------ | :------- | :--------------------- |
| `supportedLanguages` | `string[]` | `['en']` | 是 | 允许的语言代码 |
| `fallbackLanguage` | `string` | `'en'` | 是 | 默认语言 |
| `order` | `DetectorType[]` | `['querystring', 'cookie', 'header']` | 否 | 检测顺序 |
| `debug` | `boolean` | `false` | 否 | 启用日志记录 |
### 检测选项
| 选项 | 类型 | 默认值 | 描述 |
| :-------------------- | :------- | :------------------ | :------------------- |
| `lookupQueryString` | `string` | `'lang'` | 查询参数名称 |
| `lookupCookie` | `string` | `'language'` | Cookie 名称 |
| `lookupFromHeaderKey` | `string` | `'accept-language'` | Header 名称 |
| `lookupFromPathIndex` | `number` | `0` | 路径段索引 |
### Cookie 选项
| 选项 | 类型 | 默认值 | 描述 |
| :----------------------- | :---------------------------- | :----------- | :------------------- |
| `caches` | `CacheType[] \| false` | `['cookie']` | 缓存设置 |
| `cookieOptions.path` | `string` | `'/'` | Cookie 路径 |
| `cookieOptions.sameSite` | `'Strict' \| 'Lax' \| 'None'` | `'Strict'` | SameSite 策略 |
| `cookieOptions.secure` | `boolean` | `true` | 仅 HTTPS |
| `cookieOptions.maxAge` | `number` | `31536000` | 过期时间(秒) |
| `cookieOptions.httpOnly` | `boolean` | `true` | JS 可访问性 |
| `cookieOptions.domain` | `string` | `undefined` | Cookie 域 |
### 高级选项
| 选项 | 类型 | 默认值 | 描述 |
| :------------------------ | :------------------------- | :---------- | :------------------------ |
| `ignoreCase` | `boolean` | `true` | 不区分大小写匹配 |
| `convertDetectedLanguage` | `(lang: string) => string` | `undefined` | 语言代码转换器 |
## 验证和错误处理
- `fallbackLanguage` 必须在 `supportedLanguages` 中(设置时抛出错误)
- `lookupFromPathIndex` 必须 ≥ 0
- 无效配置在中间件初始化期间抛出错误
- 失败的检测静默使用 `fallbackLanguage`
## 常见示例
### 基于路径的路由
```ts
app.get('/:lang/home', (c) => {
const lang = c.get('language') // 'en', 'ar' 等
return c.json({ message: getLocalizedContent(lang) })
})
```
### 多种支持的语言
```ts
languageDetector({
supportedLanguages: ['en', 'en-GB', 'ar', 'ar-EG'],
convertDetectedLanguage: (lang) => lang.replace('_', '-'), // 规范化
})
```
# Logger 中间件
它是一个简单的记录器。
## 导入
```ts
import { Hono } from 'hono'
import { logger } from 'hono/logger'
```
## 用法
```ts
const app = new Hono()
app.use(logger())
app.get('/', (c) => c.text('Hello Hono!'))
```
## 记录详情
Logger 中间件为每个请求记录以下详情:
- **传入请求**:记录 HTTP 方法、请求路径和传入请求。
- **传出响应**:记录 HTTP 方法、请求路径、响应状态码和请求/响应时间。
- **状态码着色**:响应状态码进行颜色编码,以提高可见性和快速识别状态类别。不同的状态码类别由不同的颜色表示。
- **经过时间**:请求/响应周期所花费的时间以人类可读的格式记录,以毫秒 (ms) 或秒 (s) 为单位。
通过使用 Logger 中间件,你可以轻松监控 Hono 应用程序中的请求和响应流,并快速识别任何问题或性能瓶颈。
你还可以通过提供自己的 `PrintFunc` 函数来进一步扩展中间件,以实现定制的记录行为。
::: tip
要禁用_状态码着色_,你可以设置 `NO_COLOR` 环境变量。这是在记录库中禁用 ANSI 颜色转义代码的常见方法,并在 中描述。请注意,Cloudflare Workers 没有 `process.env` 对象,因此将默认为纯文本日志输出。
:::
## PrintFunc
Logger 中间件接受可选的 `PrintFunc` 函数作为参数。此函数允许你自定义记录器并添加额外的日志。
## 选项
### fn: `PrintFunc(str: string, ...rest: string[])`
- `str`:由记录器传递。
- `...rest`:要打印到控制台的其他字符串属性。
### 示例
将自定义 `PrintFunc` 函数设置到 Logger 中间件:
```ts
export const customLogger = (message: string, ...rest: string[]) => {
console.log(message, ...rest)
}
app.use(logger(customLogger))
```
在路由中设置自定义记录器:
```ts
app.post('/blog', (c) => {
// 路由逻辑
customLogger('Blog saved:', `Path: ${blog.url},`, `ID: ${blog.id}`)
// 输出
// <-- POST /blog
// Blog saved: Path: /blog/example, ID: 1
// --> POST /blog 201 93ms
// 返回 Context
})
```
# Method Override 中间件
此中间件根据 form、header 或 query 的值执行指定方法的 handler(与请求的实际方法不同),并返回其响应。
## 导入
```ts
import { Hono } from 'hono'
import { methodOverride } from 'hono/method-override'
```
## 用法
```ts
const app = new Hono()
// 如果未指定选项,则使用 form 中的 `_method` 的值,
// 例如 DELETE,作为方法。
app.use('/posts', methodOverride({ app }))
app.delete('/posts', (c) => {
// ....
})
```
## 例如
由于 HTML 表单无法发送 DELETE 方法,你可以将值 `DELETE` 放入名为 `_method` 的属性中并发送。然后 `app.delete()` 的 handler 将执行。
HTML 表单:
```html
```
应用程序:
```ts
import { methodOverride } from 'hono/method-override'
const app = new Hono()
app.use('/posts', methodOverride({ app }))
app.delete('/posts', () => {
// ...
})
```
你可以更改默认值或使用 header 值和 query 值:
```ts
app.use('/posts', methodOverride({ app, form: '_custom_name' }))
app.use(
'/posts',
methodOverride({ app, header: 'X-METHOD-OVERRIDE' })
)
app.use('/posts', methodOverride({ app, query: '_method' }))
```
## 选项
### app: `Hono`
你的应用程序中使用的 `Hono` 实例。
### form: `string`
包含方法名的值的 Form 键。
默认值为 `_method`。
### header: `boolean`
包含方法名的值的 Header 名称。
### query: `boolean`
包含方法名的值的 Query 参数键。
# Pretty JSON 中间件
Pretty JSON 中间件为 JSON 响应体启用"_JSON 美化打印_"。
将 `?pretty` 添加到 URL 查询参数,JSON 字符串将被美化。
```js
// GET /
{"project":{"name":"Hono","repository":"https://github.com/honojs/hono"}}
```
将变为:
```js
// GET /?pretty
{
"project": {
"name": "Hono",
"repository": "https://github.com/honojs/hono"
}
}
```
## 导入
```ts
import { Hono } from 'hono'
import { prettyJSON } from 'hono/pretty-json'
```
## 用法
```ts
const app = new Hono()
app.use(prettyJSON()) // 带有选项:prettyJSON({ space: 4 })
app.get('/', (c) => {
return c.json({ message: 'Hono!' })
})
```
## 选项
### space: `number`
缩进的空格数。默认值为 `2`。
### query: `string`
应用的查询字符串名称。默认值为 `pretty`。
### force: `boolean`
设置为 `true` 时,JSON 响应将始终美化,无论查询参数如何。默认值为 `false`。
# Request ID 中间件
Request ID 中间件为每个请求生成唯一的 ID,你可以在 handlers 中使用它。
::: info
**Node.js**:此中间件使用 `crypto.randomUUID()` 生成 ID。全局 `crypto` 在 Node.js 20 或更高版本中引入。因此,在更早的版本中可能会出现错误。在这种情况下,请指定 `generator`。但是,如果你使用 [Node.js 适配器](https://github.com/honojs/node-server),它会自动全局设置 `crypto`,因此不需要这样做。
:::
## 导入
```ts
import { Hono } from 'hono'
import { requestId } from 'hono/request-id'
```
## 用法
你可以通过应用了 Request ID 中间件的 handlers 和中间件中的 `requestId` 变量访问 Request ID。
```ts
const app = new Hono()
app.use('*', requestId())
app.get('/', (c) => {
return c.text(`Your request id is ${c.get('requestId')}`)
})
```
如果你想明确指定类型,请导入 `RequestIdVariables` 并在 `new Hono()` 的泛型中传递它。
```ts
import type { RequestIdVariables } from 'hono/request-id'
const app = new Hono<{
Variables: RequestIdVariables
}>()
```
### 设置 Request ID
如果你在 header(默认:`X-Request-Id`)中设置自定义 request ID,中间件将使用该值而不是生成新值:
```ts
const app = new Hono()
app.use('*', requestId())
app.get('/', (c) => {
return c.text(`${c.get('requestId')}`)
})
const res = await app.request('/', {
headers: {
'X-Request-Id': 'your-custom-id',
},
})
console.log(await res.text()) // your-custom-id
```
如果你想禁用此功能,请将 [`headerName` 选项](#headername-string) 设置为空字符串。
## 选项
### limitLength: `number`
Request ID 的最大长度。默认值为 `255`。
### headerName: `string`
用于 Request ID 的 header 名称。默认值为 `X-Request-Id`。
### generator: `(c: Context) => string`
Request ID 生成函数。默认情况下,它使用 `crypto.randomUUID()`。
## 平台特定的 Request IDs
一些平台(如 AWS Lambda)已经为每个请求生成自己的 Request IDs。
无需任何额外配置,此中间件不知道这些特定的 Request IDs
并生成新的 Request ID。这可能在查看应用程序日志时导致混淆。
要统一这些 ID,请使用 `generator` 函数捕获平台特定的 Request ID 并在此中间件中使用它。
### 平台特定链接
- AWS Lambda
- [AWS 文档:Context 对象](https://docs.aws.amazon.com/lambda/latest/dg/nodejs-context.html)
- [Hono:访问 AWS Lambda 对象](/docs/getting-started/aws-lambda#access-aws-lambda-object)
- Cloudflare
- [Cloudflare Ray ID](https://developers.cloudflare.com/fundamentals/reference/cloudflare-ray-id/)
- Deno
- [Deno 博客上的 Request ID](https://deno.com/blog/zero-config-debugging-deno-opentelemetry#:~:text=s%20automatically%20have-,unique%20request%20IDs,-associated%20with%20them)
- Fastly
- [Fastly 文档:req.xid](https://www.fastly.com/documentation/reference/vcl/variables/client-request/req-xid/)
# Secure Headers 中间件
Secure Headers 中间件简化了安全 headers 的设置。部分受到 Helmet 功能的启发,它允许你控制特定安全 headers 的激活和停用。
## 导入
```ts
import { Hono } from 'hono'
import { secureHeaders } from 'hono/secure-headers'
```
## 用法
你可以使用默认的最佳设置。
```ts
const app = new Hono()
app.use(secureHeaders())
```
你可以通过将它们设置为 false 来抑制不必要的 headers。
```ts
const app = new Hono()
app.use(
'*',
secureHeaders({
xFrameOptions: false,
xXssProtection: false,
})
)
```
你可以使用字符串覆盖默认的 header 值。
```ts
const app = new Hono()
app.use(
'*',
secureHeaders({
strictTransportSecurity:
'max-age=63072000; includeSubDomains; preload',
xFrameOptions: 'DENY',
xXssProtection: '1',
})
)
```
## 支持的选项
每个选项对应以下 Header 键值对。
| 选项 | Header | 值 | 默认值 |
| ------------------------------- | ---------------------------------------------------------------------------------------------------------------------------------------------- | -------------------------------------------------------------------------- | ---------- |
| - | X-Powered-By | (删除 Header) | True |
| contentSecurityPolicy | [Content-Security-Policy](https://developer.mozilla.org/en-US/docs/Web/HTTP/CSP) | 用法:[设置 Content-Security-Policy](#setting-content-security-policy) | 无设置 |
| contentSecurityPolicyReportOnly | [Content-Security-Policy-Report-Only](https://developer.mozilla.org/en-US/docs/Web/HTTP/Headers/Content-Security-Policy-Report-Only) | 用法:[设置 Content-Security-Policy](#setting-content-security-policy) | 无设置 |
| trustedTypes | [Trusted Types](https://developer.mozilla.org/en-US/docs/Web/HTTP/Headers/Content-Security-Policy/trusted-types) | 用法:[设置 Content-Security-Policy](#setting-content-security-policy) | 无设置 |
| requireTrustedTypesFor | [Require Trusted Types For](https://developer.mozilla.org/en-US/docs/Web/HTTP/Headers/Content-Security-Policy/require-trusted-types-for) | 用法:[设置 Content-Security-Policy](#setting-content-security-policy) | 无设置 |
| crossOriginEmbedderPolicy | [Cross-Origin-Embedder-Policy](https://developer.mozilla.org/en-US/docs/Web/HTTP/Headers/Cross-Origin-Embedder-Policy) | require-corp | **False** |
| crossOriginResourcePolicy | [Cross-Origin-Resource-Policy](https://developer.mozilla.org/en-US/docs/Web/HTTP/Headers/Cross-Origin-Resource-Policy) | same-origin | True |
| crossOriginOpenerPolicy | [Cross-Origin-Opener-Policy](https://developer.mozilla.org/en-US/docs/Web/HTTP/Headers/Cross-Origin-Opener-Policy) | same-origin | True |
| originAgentCluster | [Origin-Agent-Cluster](https://developer.mozilla.org/en-US/docs/Web/HTTP/Headers/Origin-Agent-Cluster) | ?1 | True |
| referrerPolicy | [Referrer-Policy](https://developer.mozilla.org/en-US/docs/Web/HTTP/Headers/Referrer-Policy) | no-referrer | True |
| reportingEndpoints | [Reporting-Endpoints](https://www.w3.org/TR/reporting-1/#header) | 用法:[设置 Content-Security-Policy](#setting-content-security-policy) | 无设置 |
| reportTo | [Report-To](https://developer.mozilla.org/en-US/docs/Web/HTTP/Headers/Content-Security-Policy/report-to) | 用法:[设置 Content-Security-Policy](#setting-content-security-policy) | 无设置 |
| strictTransportSecurity | [Strict-Transport-Security](https://developer.mozilla.org/en-US/docs/Web/HTTP/Headers/Strict-Transport-Security) | max-age=15552000; includeSubDomains | True |
| xContentTypeOptions | [X-Content-Type-Options](https://developer.mozilla.org/en-US/docs/Web/HTTP/Headers/X-Content-Type-Options) | nosniff | True |
| xDnsPrefetchControl | [X-DNS-Prefetch-Control](https://developer.mozilla.org/en-US/docs/Web/HTTP/Headers/X-DNS-Prefetch-Control) | off | True |
| xDownloadOptions | [X-Download-Options](https://learn.microsoft.com/en-us/archive/blogs/ie/ie8-security-part-v-comprehensive-protection#mime-handling-force-save) | noopen | True |
| xFrameOptions | [X-Frame-Options](https://developer.mozilla.org/en-US/docs/Web/HTTP/Headers/X-Frame-Options) | SAMEORIGIN | True |
| xPermittedCrossDomainPolicies | [X-Permitted-Cross-Domain-Policies](https://developer.mozilla.org/en-US/docs/Web/HTTP/Headers/X-Permitted-Cross-Domain-Policies) | none | True |
| xXssProtection | [X-XSS-Protection](https://developer.mozilla.org/en-US/docs/Web/HTTP/Headers/X-XSS-Protection) | 0 | True |
| permissionPolicy | [Permissions-Policy](https://developer.mozilla.org/en-US/docs/Web/HTTP/Headers/Permissions-Policy) | 用法:[设置 Permission-Policy](#setting-permission-policy) | 无设置 |
## 中间件冲突
在处理操作相同 header 的中间件时,请注意指定顺序。
在这种情况下,Secure-headers 运行并删除 `x-powered-by`:
```ts
const app = new Hono()
app.use(secureHeaders())
app.use(poweredBy())
```
在这种情况下,Powered-By 运行并添加 `x-powered-by`:
```ts
const app = new Hono()
app.use(poweredBy())
app.use(secureHeaders())
```
## 设置 Content-Security-Policy
```ts
const app = new Hono()
app.use(
'/test',
secureHeaders({
reportingEndpoints: [
{
name: 'endpoint-1',
url: 'https://example.com/reports',
},
],
// 或 alternatively
// reportTo: [
// {
// group: 'endpoint-1',
// max_age: 10886400,
// endpoints: [{ url: 'https://example.com/reports' }],
// },
// ],
contentSecurityPolicy: {
defaultSrc: ["'self'"],
baseUri: ["'self'"],
childSrc: ["'self'"],
connectSrc: ["'self'"],
fontSrc: ["'self'", 'https:', 'data:'],
formAction: ["'self'"],
frameAncestors: ["'self'"],
frameSrc: ["'self'"],
imgSrc: ["'self'", 'data:'],
manifestSrc: ["'self'"],
mediaSrc: ["'self'"],
objectSrc: ["'none'"],
reportTo: 'endpoint-1',
reportUri: '/csp-report',
sandbox: ['allow-same-origin', 'allow-scripts'],
scriptSrc: ["'self'"],
scriptSrcAttr: ["'none'"],
scriptSrcElem: ["'self'"],
styleSrc: ["'self'", 'https:', "'unsafe-inline'"],
styleSrcAttr: ['none'],
styleSrcElem: ["'self'", 'https:', "'unsafe-inline'"],
upgradeInsecureRequests: [],
workerSrc: ["'self'"],
},
})
)
```
### `nonce` 属性
你可以通过将从 `hono/secure-headers` 导入的 `NONCE` 添加到 `scriptSrc` 或 `styleSrc`,将 [`nonce` 属性](https://developer.mozilla.org/en-US/docs/Web/HTML/Global_attributes/nonce) 添加到 `script` 或 `style` 元素:
```tsx
import { secureHeaders, NONCE } from 'hono/secure-headers'
import type { SecureHeadersVariables } from 'hono/secure-headers'
// 指定变量类型以推断 `c.get('secureHeadersNonce')`:
type Variables = SecureHeadersVariables
const app = new Hono<{ Variables: Variables }>()
// 将预定义的 nonce 值设置为 `scriptSrc`:
app.get(
'*',
secureHeaders({
contentSecurityPolicy: {
scriptSrc: [NONCE, 'https://allowed1.example.com'],
},
})
)
// 从 `c.get('secureHeadersNonce')` 获取值:
app.get('/', (c) => {
return c.html(
{/** contents */}
)
})
```
如果你想自己生成 nonce 值,你也可以按以下方式指定函数:
```tsx
const app = new Hono<{
Variables: { myNonce: string }
}>()
const myNonceGenerator: ContentSecurityPolicyOptionHandler = (c) => {
// 此函数在每次请求时调用。
const nonce = Math.random().toString(36).slice(2)
c.set('myNonce', nonce)
return `'nonce-${nonce}'`
}
app.get(
'*',
secureHeaders({
contentSecurityPolicy: {
scriptSrc: [myNonceGenerator, 'https://allowed1.example.com'],
},
})
)
app.get('/', (c) => {
return c.html(
{/** contents */}
)
})
```
## 设置 Permission-Policy
Permission-Policy header 允许你控制浏览器中可以使用哪些功能和 API。以下是如何设置它的示例:
```ts
const app = new Hono()
app.use(
'*',
secureHeaders({
permissionsPolicy: {
fullscreen: ['self'], // fullscreen=(self)
bluetooth: ['none'], // bluetooth=(none)
payment: ['self', 'https://example.com'], // payment=(self "https://example.com")
syncXhr: [], // sync-xhr=()
camera: false, // camera=none
microphone: true, // microphone=*
geolocation: ['*'], // geolocation=*
usb: ['self', 'https://a.example.com', 'https://b.example.com'], // usb=(self "https://a.example.com" "https://b.example.com")
accelerometer: ['https://*.example.com'], // accelerometer=("https://*.example.com")
gyroscope: ['src'], // gyroscope=(src)
magnetometer: [
'https://a.example.com',
'https://b.example.com',
], // magnetometer=("https://a.example.com" "https://b.example.com")
},
})
)
```
# Timeout 中间件
Timeout 中间件使你能够轻松管理应用程序中的请求超时。它允许你设置请求的最大持续时间,并可选地定义如果超过指定超时的自定义错误响应。
## 导入
```ts
import { Hono } from 'hono'
import { timeout } from 'hono/timeout'
```
## 用法
以下是如何使用具有默认和自定义设置的 Timeout 中间件:
默认设置:
```ts
const app = new Hono()
// 应用 5 秒超时
app.use('/api', timeout(5000))
// 处理路由
app.get('/api/data', async (c) => {
// 你的路由 handler 逻辑
return c.json({ data: 'Your data here' })
})
```
自定义设置:
```ts
import { HTTPException } from 'hono/http-exception'
// 自定义异常工厂函数
const customTimeoutException = (context) =>
new HTTPException(408, {
message: `Request timeout after waiting ${context.req.headers.get(
'Duration'
)} seconds. Please try again later.`,
})
// 对于静态异常消息
// const customTimeoutException = new HTTPException(408, {
// message: 'Operation timed out. Please try again later.'
// });
// 应用 1 分钟超时并带有自定义异常
app.use('/api/long-process', timeout(60000, customTimeoutException))
app.get('/api/long-process', async (c) => {
// 模拟长时间过程
await new Promise((resolve) => setTimeout(resolve, 61000))
return c.json({ data: 'This usually takes longer' })
})
```
## 注意事项
- 超时的持续时间可以以毫秒为单位指定。如果超过指定的持续时间,中间件将自动拒绝 promise 并可能抛出错误。
- timeout 中间件不能与 stream 一起使用因此,请一起使用 `stream.close` 和 `setTimeout`。
```ts
app.get('/sse', async (c) => {
let id = 0
let running = true
let timer: number | undefined
return streamSSE(c, async (stream) => {
timer = setTimeout(() => {
console.log('Stream timeout reached, closing stream')
stream.close()
}, 3000) as unknown as number
stream.onAbort(async () => {
console.log('Client closed connection')
running = false
clearTimeout(timer)
})
while (running) {
const message = `It is ${new Date().toISOString()}`
await stream.writeSSE({
data: message,
event: 'time-update',
id: String(id++),
})
await stream.sleep(1000)
}
})
})
```
## 中间件冲突
注意中间件的顺序,特别是使用错误处理或其他与时间相关的中间件时,因为它可能会影响此 timeout 中间件的行为。
# Server-Timing 中间件
[Server-Timing](https://developer.mozilla.org/en-US/docs/Web/HTTP/Headers/Server-Timing) 中间件在响应 headers 中提供性能指标。
::: info
注意:在 Cloudflare Workers 上,计时器指标可能不准确,因为 [计时器仅显示上次 I/O 的时间](https://developers.cloudflare.com/workers/learning/security-model/#step-1-disallow-timers-and-multi-threading)。
:::
## 导入
```ts [npm]
import { Hono } from 'hono'
import {
timing,
setMetric,
startTime,
endTime,
wrapTime,
} from 'hono/timing'
import type { TimingVariables } from 'hono/timing'
```
## 用法
```js
// 指定变量类型以推断 `c.get('metric')`:
type Variables = TimingVariables
const app = new Hono<{ Variables: Variables }>()
// 将中间件添加到你的路由
app.use(timing());
app.get('/', async (c) => {
// 添加自定义指标
setMetric(c, 'region', 'europe-west3')
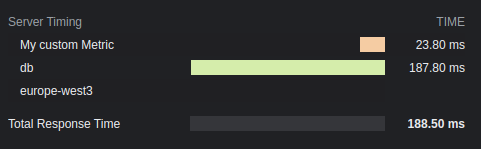
// 添加带有计时的自定义指标,必须以毫秒为单位
setMetric(c, 'custom', 23.8, 'My custom Metric')
// 启动新计时器
startTime(c, 'db');
const data = await db.findMany(...);
// 结束计时器
endTime(c, 'db');
// ...或者你也可以使用此函数包装 Promise:
const data = await wrapTime(c, 'db', db.findMany(...));
return c.json({ response: data });
});
```
### 有条件启用
```ts
const app = new Hono()
app.use(
'*',
timing({
// c: 请求的 Context
enabled: (c) => c.req.method === 'POST',
})
)
```
## 结果
## 选项
### total: `boolean`
显示总响应时间。默认值为 `true`。
### enabled: `boolean` | `(c: Context) => boolean`
是否应将计时添加到 headers。默认值为 `true`。
### totalDescription: `boolean`
总响应时间的描述。默认值为 `Total Response Time`。
### autoEnd: `boolean`
`startTime()` 是否应在请求结束时自动结束。
如果禁用,未手动结束的计时器将不会显示。
### crossOrigin: `boolean` | `string` | `(c: Context) => boolean | string`
此计时 header 应该可读的来源。
- 如果为 false,仅来自当前来源。
- 如果为 true,来自所有来源。
- 如果为字符串,来自此域。多个域必须用逗号分隔。
默认值为 `false`。请参阅更多 [文档](https://developer.mozilla.org/en-US/docs/Web/HTTP/Headers/Timing-Allow-Origin)。
# Trailing Slash 中间件
此中间件处理 GET 请求中 URL 的 Trailing Slash。
`appendTrailingSlash` 如果未找到内容,则将 URL 重定向到添加了 Trailing Slash 的 URL。`trimTrailingSlash` 将删除 Trailing Slash。
## 导入
```ts
import { Hono } from 'hono'
import {
appendTrailingSlash,
trimTrailingSlash,
} from 'hono/trailing-slash'
```
## 用法
将 `/about/me` 的 GET 请求重定向到 `/about/me/` 的示例。
```ts
import { Hono } from 'hono'
import { appendTrailingSlash } from 'hono/trailing-slash'
const app = new Hono({ strict: true })
app.use(appendTrailingSlash())
app.get('/about/me/', (c) => c.text('With Trailing Slash'))
```
将 `/about/me/` 的 GET 请求重定向到 `/about/me` 的示例。
```ts
import { Hono } from 'hono'
import { trimTrailingSlash } from 'hono/trailing-slash'
const app = new Hono({ strict: true })
app.use(trimTrailingSlash())
app.get('/about/me', (c) => c.text('Without Trailing Slash'))
```
## 选项
### alwaysRedirect: `boolean`
默认情况下,trailing slash 中间件仅在响应状态为 `404` 时重定向。当 `alwaysRedirect` 设置为 `true` 时,中间件在执行 handlers 之前重定向。这对于默认行为不起作用的通配符路由(`*`)很有用。
```ts
const app = new Hono()
app.use(trimTrailingSlash({ alwaysRedirect: true }))
app.get('/my-path/*', (c) => c.text('Wildcard route'))
```
此选项可用于 `trimTrailingSlash` 和 `appendTrailingSlash`。
## 注意
当请求方法为 `GET` 且响应状态为 `404` 时将启用。
# Accepts Helper
Accepts Helper 有助于处理请求中的 Accept headers。
## Import
```ts
import { Hono } from 'hono'
import { accepts } from 'hono/accepts'
```
## `accepts()`
`accepts()` 函数查看 Accept header(如 Accept-Encoding 和 Accept-Language)并返回适当的值。
```ts
import { accepts } from 'hono/accepts'
app.get('/', (c) => {
const accept = accepts(c, {
header: 'Accept-Language',
supports: ['en', 'ja', 'zh'],
default: 'en',
})
return c.json({ lang: accept })
})
```
### `AcceptHeader` type
`AcceptHeader` 类型的定义如下。
```ts
export type AcceptHeader =
| 'Accept'
| 'Accept-Charset'
| 'Accept-Encoding'
| 'Accept-Language'
| 'Accept-Patch'
| 'Accept-Post'
| 'Accept-Ranges'
```
## Options
### header: `AcceptHeader`
目标 accept header。
### supports: `string[]`
你的应用程序支持的头值。
### default: `string`
默认值。
### match: `(accepts: Accept[], config: acceptsConfig) => string`
自定义匹配函数。
# Adapter Helper
Adapter Helper 提供了一种通过统一接口与各种平台交互的无缝方式。
## Import
```ts
import { Hono } from 'hono'
import { env, getRuntimeKey } from 'hono/adapter'
```
## `env()`
`env()` 函数有助于在不同的 runtimes 中检索环境变量,不仅限于 Cloudflare Workers 的 Bindings。可以使用 `env(c)` 检索的值因 runtimes 而异。
```ts
import { env } from 'hono/adapter'
app.get('/env', (c) => {
// NAME 在 Node.js 或 Bun 上是 process.env.NAME
// NAME 在 Cloudflare 上是 `wrangler.toml` 中写入的值
const { NAME } = env<{ NAME: string }>(c)
return c.text(NAME)
})
```
支持的 Runtimes、Serverless Platforms 和 Cloud Services:
- Cloudflare Workers
- `wrangler.toml`
- `wrangler.jsonc`
- Deno
- [`Deno.env`](https://docs.deno.com/runtime/manual/basics/env_variables)
- `.env` file
- Bun
- [`Bun.env`](https://bun.com/guides/runtime/set-env)
- `process.env`
- Node.js
- `process.env`
- Vercel
- [Environment Variables on Vercel](https://vercel.com/docs/projects/environment-variables)
- AWS Lambda
- [Environment Variables on AWS Lambda](https://docs.aws.amazon.com/lambda/latest/dg/samples-blank.html#samples-blank-architecture)
- Lambda@Edge\
Lambda 上的环境变量 [不支持](https://docs.aws.amazon.com/AmazonCloudFront/latest/DeveloperGuide/add-origin-custom-headers.html) Lambda@Edge,你需要使用 [Lambda@Edge event](https://docs.aws.amazon.com/AmazonCloudFront/latest/DeveloperGuide/lambda-event-structure.html) 作为替代。
- Fastly Compute\
在 Fastly Compute 上,你可以使用 ConfigStore 来管理用户定义的数据。
- Netlify\
在 Netlify 上,你可以使用 [Netlify Contexts](https://docs.netlify.com/site-deploys/overview/#deploy-contexts) 来管理用户定义的数据。
### Specify the runtime
你可以通过将 runtime key 作为第二个参数传递来指定 runtime 以获取环境变量。
```ts
app.get('/env', (c) => {
const { NAME } = env<{ NAME: string }>(c, 'workerd')
return c.text(NAME)
})
```
## `getRuntimeKey()`
`getRuntimeKey()` 函数返回当前 runtime 的标识符。
```ts
app.get('/', (c) => {
if (getRuntimeKey() === 'workerd') {
return c.text('You are on Cloudflare')
} else if (getRuntimeKey() === 'bun') {
return c.text('You are on Bun')
}
...
})
```
### Available Runtimes Keys
以下是可用的 runtimes keys,不可用的 runtime key runtimes 可能被支持并标记为 `other`,其中一些受到 [WinterCG's Runtime Keys](https://runtime-keys.proposal.wintercg.org/) 的启发:
- `workerd` - Cloudflare Workers
- `deno`
- `bun`
- `node`
- `edge-light` - Vercel Edge Functions
- `fastly` - Fastly Compute
- `other` - 其他未知 runtimes keys
# ConnInfo Helper
ConnInfo Helper 帮助你获取连接信息。例如,你可以轻松获取客户端的远程地址。
## Import
::: code-group
```ts [Cloudflare Workers]
import { Hono } from 'hono'
import { getConnInfo } from 'hono/cloudflare-workers'
```
```ts [Deno]
import { Hono } from 'hono'
import { getConnInfo } from 'hono/deno'
```
```ts [Bun]
import { Hono } from 'hono'
import { getConnInfo } from 'hono/bun'
```
```ts [Vercel]
import { Hono } from 'hono'
import { getConnInfo } from 'hono/vercel'
```
```ts [AWS Lambda]
import { Hono } from 'hono'
import { getConnInfo } from 'hono/aws-lambda'
```
```ts [Cloudflare Pages]
import { Hono } from 'hono'
import { getConnInfo } from 'hono/cloudflare-pages'
```
```ts [Netlify]
import { Hono } from 'hono'
import { getConnInfo } from 'hono/netlify'
```
```ts [Lambda@Edge]
import { Hono } from 'hono'
import { getConnInfo } from 'hono/lambda-edge'
```
```ts [Node.js]
import { Hono } from 'hono'
import { getConnInfo } from '@hono/node-server/conninfo'
```
:::
## Usage
```ts
const app = new Hono()
app.get('/', (c) => {
const info = getConnInfo(c) // info 是 `ConnInfo`
return c.text(`Your remote address is ${info.remote.address}`)
})
```
## Type Definitions
你可以从 `getConnInfo()` 获取的值的类型定义如下:
```ts
type AddressType = 'IPv6' | 'IPv4' | undefined
type NetAddrInfo = {
/**
* 传输协议类型
*/
transport?: 'tcp' | 'udp'
/**
* 传输端口号
*/
port?: number
address?: string
addressType?: AddressType
} & (
| {
/**
* 主机名(如 IP 地址)
*/
address: string
/**
* 主机名类型
*/
addressType: AddressType
}
| {}
)
/**
* HTTP 连接信息
*/
interface ConnInfo {
/**
* 远程信息
*/
remote: NetAddrInfo
}
```
# Cookie Helper
Cookie Helper 提供了一个简单的接口来管理 cookies,使开发人员能够无缝设置、解析和删除 cookies。
## Import
```ts
import { Hono } from 'hono'
import {
deleteCookie,
getCookie,
getSignedCookie,
setCookie,
setSignedCookie,
generateCookie,
generateSignedCookie,
} from 'hono/cookie'
```
## Usage
### Regular cookies
```ts
app.get('/cookie', (c) => {
setCookie(c, 'cookie_name', 'cookie_value')
const yummyCookie = getCookie(c, 'cookie_name')
deleteCookie(c, 'cookie_name')
const allCookies = getCookie(c)
// ...
})
```
### Signed cookies
**注意**:设置和检索 signed cookies 会返回 Promise,因为使用了 WebCrypto API 的异步特性,该 API 用于创建 HMAC SHA-256 签名。
```ts
app.get('/signed-cookie', (c) => {
const secret = 'secret' // 确保它是足够大的字符串以保证安全
await setSignedCookie(c, 'cookie_name0', 'cookie_value', secret)
const fortuneCookie = await getSignedCookie(
c,
secret,
'cookie_name0'
)
deleteCookie(c, 'cookie_name0')
// 如果签名被篡改或无效,`getSignedCookie` 将对指定的 cookie 返回 `false`
const allSignedCookies = await getSignedCookie(c, secret)
// ...
})
```
### Cookie Generation
`generateCookie` 和 `generateSignedCookie` 函数允许你直接生成 cookie 字符串,而无需将它们设置在响应 headers 中。
#### `generateCookie`
```ts
// 基本 cookie 生成
const cookie = generateCookie('delicious_cookie', 'macha')
// 返回:'delicious_cookie=macha; Path=/'
// 带选项的 cookie
const cookie = generateCookie('delicious_cookie', 'macha', {
path: '/',
secure: true,
httpOnly: true,
domain: 'example.com',
})
```
#### `generateSignedCookie`
```ts
// 基本 signed cookie 生成
const signedCookie = await generateSignedCookie(
'delicious_cookie',
'macha',
'secret chocolate chips'
)
// 带选项的 signed cookie
const signedCookie = await generateSignedCookie(
'delicious_cookie',
'macha',
'secret chocolate chips',
{
path: '/',
secure: true,
httpOnly: true,
}
)
```
**注意**:与 `setCookie` 和 `setSignedCookie` 不同,这些函数仅生成 cookie 字符串。如果需要,你需要手动将它们设置在 headers 中。
## Options
### `setCookie` & `setSignedCookie`
- domain: `string`
- expires: `Date`
- httpOnly: `boolean`
- maxAge: `number`
- path: `string`
- secure: `boolean`
- sameSite: `'Strict'` | `'Lax'` | `'None'`
- priority: `'Low' | 'Medium' | 'High'`
- prefix: `secure` | `'host'`
- partitioned: `boolean`
示例:
```ts
// Regular cookies
setCookie(c, 'great_cookie', 'banana', {
path: '/',
secure: true,
domain: 'example.com',
httpOnly: true,
maxAge: 1000,
expires: new Date(Date.UTC(2000, 11, 24, 10, 30, 59, 900)),
sameSite: 'Strict',
})
// Signed cookies
await setSignedCookie(
c,
'fortune_cookie',
'lots-of-money',
'secret ingredient',
{
path: '/',
secure: true,
domain: 'example.com',
httpOnly: true,
maxAge: 1000,
expires: new Date(Date.UTC(2000, 11, 24, 10, 30, 59, 900)),
sameSite: 'Strict',
}
)
```
### `deleteCookie`
- path: `string`
- secure: `boolean`
- domain: `string`
示例:
```ts
deleteCookie(c, 'banana', {
path: '/',
secure: true,
domain: 'example.com',
})
```
`deleteCookie` 返回删除的值:
```ts
const deletedCookie = deleteCookie(c, 'delicious_cookie')
```
## `__Secure-` and `__Host-` prefix
Cookie helper 支持 cookie 名称的 `__Secure-` 和 `__Host-` 前缀。
如果你想验证 cookie 名称是否有前缀,指定 prefix 选项。
```ts
const securePrefixCookie = getCookie(c, 'yummy_cookie', 'secure')
const hostPrefixCookie = getCookie(c, 'yummy_cookie', 'host')
const securePrefixSignedCookie = await getSignedCookie(
c,
secret,
'fortune_cookie',
'secure'
)
const hostPrefixSignedCookie = await getSignedCookie(
c,
secret,
'fortune_cookie',
'host'
)
```
另外,如果你想在设置 cookie 时指定前缀,为 prefix 选项指定一个值。
```ts
setCookie(c, 'delicious_cookie', 'macha', {
prefix: 'secure', // 或 `host`
})
await setSignedCookie(
c,
'delicious_cookie',
'macha',
'secret choco chips',
{
prefix: 'secure', // 或 `host`
}
)
```
## Following the best practices
新的 Cookie RFC(又称 cookie-bis)和 CHIPS 包含开发人员应遵循的 Cookie 设置最佳实践。
- [RFC6265bis-13](https://datatracker.ietf.org/doc/html/draft-ietf-httpbis-rfc6265bis-13)
- `Max-Age`/`Expires` 限制
- `__Host-`/`__Secure-` 前缀限制
- [CHIPS-01](https://www.ietf.org/archive/id/draft-cutler-httpbis-partitioned-cookies-01.html)
- `Partitioned` 限制
Hono 遵循最佳实践。
在以下条件下,cookie helper 在解析 cookies 时会抛出 `Error`:
- cookie 名称以 `__Secure-` 开头,但未设置 `secure` 选项。
- cookie 名称以 `__Host-` 开头,但未设置 `secure` 选项。
- cookie 名称以 `__Host-` 开头,但 `path` 不是 `/`。
- cookie 名称以 `__Host-` 开头,但设置了 `domain`。
- `maxAge` 选项值大于 400 天。
- `expires` 选项值比当前时间晚 400 天。
# css 辅助工具
CSS 辅助工具 - `hono/css` - 是 Hono 的内置 CSS in JS(X)。
你可以在名为 `css` 的 JavaScript 模板字面量中以 JSX 编写 CSS。`css` 的返回值将是类名,设置为 class 属性的值。然后 `` 组件将包含 CSS 的值。
## 导入
```ts
import { Hono } from 'hono'
import { css, cx, keyframes, Style, createCssContext } from 'hono/css'
```
## `css`
你可以在 `css` 模板字面量中编写 CSS。在这种情况下,它使用 `headerClass` 作为 `class` 属性的值。不要忘记添加 ``,因为它包含 CSS 内容。
```ts{10,13}
app.get('/', (c) => {
const headerClass = css`
background-color: orange;
color: white;
padding: 1rem;
`
return c.html(
)
})
```
你可以使用 [嵌套选择器](https://developer.mozilla.org/en-US/docs/Web/CSS/Nesting_selector) `&` 来设置 `:hover` 等伪类的样式:
```ts
const buttonClass = css`
background-color: #fff;
&:hover {
background-color: red;
}
`
```
### 扩展
你可以通过嵌入类名来扩展 CSS 定义。
```tsx
const baseClass = css`
color: white;
background-color: blue;
`
const header1Class = css`
${baseClass}
font-size: 3rem;
`
const header2Class = css`
${baseClass}
font-size: 2rem;
`
```
此外,`${baseClass} {}` 语法可以嵌套类。
```tsx
const headerClass = css`
color: white;
background-color: blue;
`
const containerClass = css`
${headerClass} {
h1 {
font-size: 3rem;
}
}
`
return c.render(
)
```
### 全局样式
一个名为 `:-hono-global` 的伪选择器允许你定义全局样式。
```tsx
const globalClass = css`
:-hono-global {
html {
font-family: Arial, Helvetica, sans-serif;
}
}
`
return c.render(
Hello!
Today is a good day.
)
```
或者你可以在 `` 组件中使用 `css` 字面量编写 CSS。
```tsx
export const renderer = jsxRenderer(({ children, title }) => {
return (
{title}
{children}
)
})
```
## `keyframes`
你可以使用 `keyframes` 来编写 `@keyframes` 的内容。在这种情况下,`fadeInAnimation` 将是动画的名称。
```tsx
const fadeInAnimation = keyframes`
from {
opacity: 0;
}
to {
opacity: 1;
}
`
const headerClass = css`
animation-name: ${fadeInAnimation};
animation-duration: 2s;
`
const Header = () =>
```
## `cx`
`cx` 组合两个类名。
```tsx
const buttonClass = css`
border-radius: 10px;
`
const primaryClass = css`
background: orange;
`
const Button = () => (
Click!
)
```
它也可以组合简单的字符串。
```tsx
const Header = () => Hi
```
## 与 [Secure Headers](/docs/middleware/builtin/secure-headers) 中间件结合使用
如果你想将 CSS 辅助工具与 [Secure Headers](/docs/middleware/builtin/secure-headers) 中间件结合使用,你可以将 [`nonce` 属性](https://developer.mozilla.org/en-US/docs/Web/HTML/Global_attributes/nonce) 添加到 `` 以避免 CSS 辅助工具引起的 Content-Security-Policy。
```tsx{8,23}
import { secureHeaders, NONCE } from 'hono/secure-headers'
app.get(
'*',
secureHeaders({
contentSecurityPolicy: {
// 将预定义的 nonce 值设置为 `styleSrc`:
styleSrc: [NONCE],
},
})
)
app.get('/', (c) => {
const headerClass = css`
background-color: orange;
color: white;
padding: 1rem;
`
return c.html(
{/* 在 CSS 辅助工具 `style` 和 `script` 元素上设置 `nonce` 属性 */}
)
})
```
## `createCssContext`
`createCssContext` 创建具有自定义上下文的 CSS 辅助工具函数(`css`、`cx`、`keyframes`、`viewTransition`、`Style`)。你可以使用它来自定义样式元素 ID 和生成的类名。
```ts
import { createCssContext } from 'hono/css'
const { css, cx, keyframes, Style } = createCssContext({
id: 'my-app',
})
```
### `classNameSlug`
默认情况下,CSS 类名以 `css-1234567890` 格式生成。你可以通过传递 `classNameSlug` 函数来自定义。
该函数接收三个参数:
- `hash` - 默认生成的类名(例如 `css-1234567890`)
- `label` - 从 CSS 模板开头的 `/* comment */` 提取(如果没有则为空字符串)
- `css` - 压缩后的 CSS 字符串
```ts
const { css, Style } = createCssContext({
id: 'my-styles',
classNameSlug: (hash, label) => (label ? `h-${label}` : hash),
})
const heroClass = css`
/* hero-section */
background: blue;
`
// 生成的类名:"h-hero-section"
```
### `onInvalidSlug`
如果 `classNameSlug` 函数返回无效的 CSS 类名,默认情况下会记录警告。你可以使用 `onInvalidSlug` 自定义此行为。
```ts
const { css, Style } = createCssContext({
id: 'my-styles',
classNameSlug: (hash, label) => label || hash,
onInvalidSlug: (slug) => {
throw new Error(`Invalid CSS class name: ${slug}`)
},
})
```
## 技巧
如果你使用 VS Code,你可以使用 [vscode-styled-components](https://marketplace.visualstudio.com/items?itemName=styled-components.vscode-styled-components) 来为 CSS 标记字面量提供语法高亮和 IntelliSense。
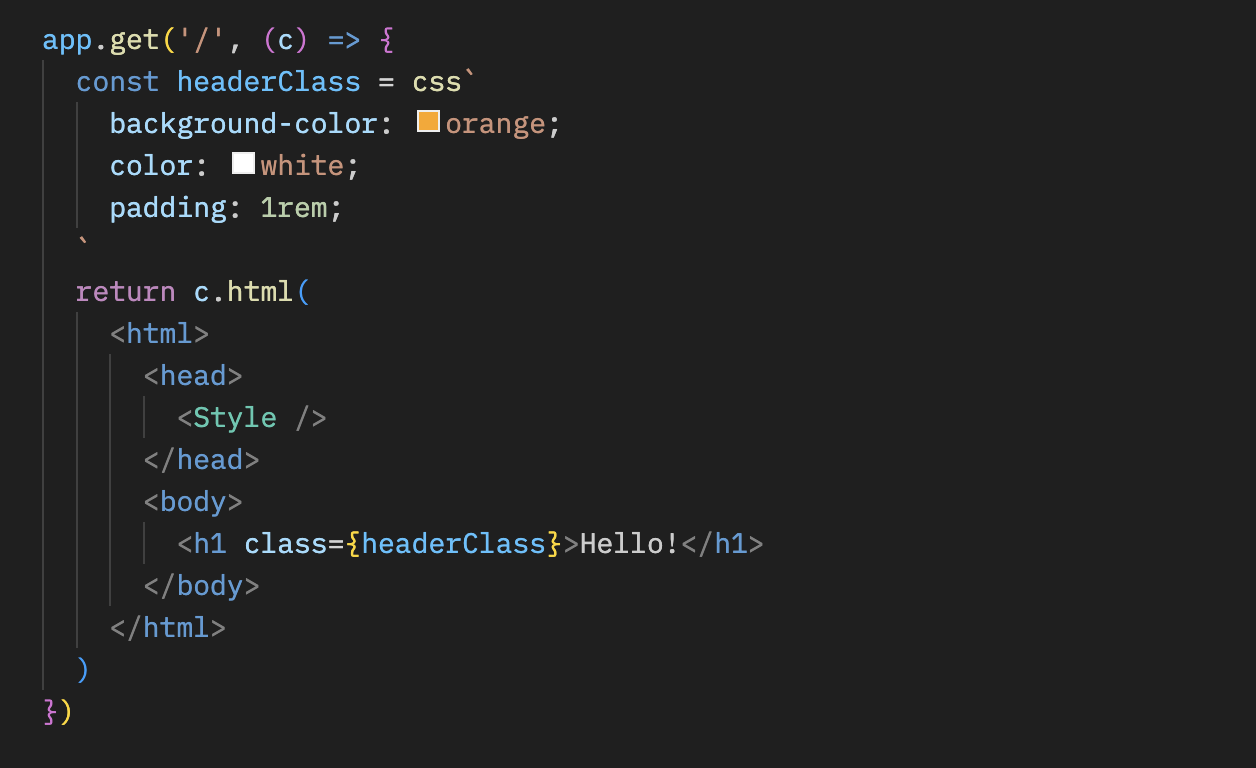
# Dev 辅助工具
Dev 辅助工具提供你在开发中可使用的有用方法。
```ts
import { Hono } from 'hono'
import { getRouterName, showRoutes } from 'hono/dev'
```
## `getRouterName()`
你可以使用 `getRouterName()` 获取当前使用的路由器的名称。
```ts
const app = new Hono()
// ...
console.log(getRouterName(app))
```
## `showRoutes()`
`showRoutes()` 函数在你的控制台中显示已注册的路由。
考虑如下应用程序:
```ts
const app = new Hono().basePath('/v1')
app.get('/posts', (c) => {
// ...
})
app.get('/posts/:id', (c) => {
// ...
})
app.post('/posts', (c) => {
// ...
})
showRoutes(app, {
verbose: true,
})
```
当此应用程序开始运行时,路由将如下显示在你的控制台中:
```txt
GET /v1/posts
GET /v1/posts/:id
POST /v1/posts
```
## 选项
### verbose: `boolean`
设置为 `true` 时,显示详细信息。
### colorize: `boolean`
设置为 `false` 时,输出将不着色。
# Factory 辅助工具
Factory 辅助工具提供有用的函数来创建 Hono 的组件(如中间件)。有时设置适当的 TypeScript 类型很困难,但这个辅助工具简化了这一点。
## 导入
```ts
import { Hono } from 'hono'
import { createFactory, createMiddleware } from 'hono/factory'
```
## `createFactory()`
`createFactory()` 将创建 Factory 类的实例。
```ts
import { createFactory } from 'hono/factory'
const factory = createFactory()
```
你可以将 Env 类型作为泛型传递:
```ts
type Env = {
Variables: {
foo: string
}
}
const factory = createFactory()
```
### 选项
### defaultAppOptions: `HonoOptions`
传递给 `createApp()` 创建的 Hono 应用程序的默认选项。
```ts
const factory = createFactory({
defaultAppOptions: { strict: false },
})
const app = factory.createApp() // 应用了 `strict: false`
```
## `createMiddleware()`
`createMiddleware()` 是 `factory.createMiddleware()` 的快捷方式。
此函数将创建你的自定义中间件。
```ts
const messageMiddleware = createMiddleware(async (c, next) => {
await next()
c.res.headers.set('X-Message', 'Good morning!')
})
```
提示:如果你想获取像 `message` 这样的参数,你可以按以下方式创建为函数。
```ts
const messageMiddleware = (message: string) => {
return createMiddleware(async (c, next) => {
await next()
c.res.headers.set('X-Message', message)
})
}
app.use(messageMiddleware('Good evening!'))
```
## `factory.createHandlers()`
`createHandlers()` 有助于在与 `app.get('/')` 不同的地方定义 handlers。
```ts
import { createFactory } from 'hono/factory'
import { logger } from 'hono/logger'
// ...
const factory = createFactory()
const middleware = factory.createMiddleware(async (c, next) => {
c.set('foo', 'bar')
await next()
})
const handlers = factory.createHandlers(logger(), middleware, (c) => {
return c.json(c.var.foo)
})
app.get('/api', ...handlers)
```
## `factory.createApp()`
`createApp()` 有助于创建具有适当类型的 Hono 实例。如果你将此方法与 `createFactory()` 一起使用,你可以避免 `Env` 类型定义中的冗余。
如果你的应用程序是这样的,你必须在两个地方设置 `Env`:
```ts
import { createMiddleware } from 'hono/factory'
type Env = {
Variables: {
myVar: string
}
}
// 1. 将 `Env` 设置为 `new Hono()`
const app = new Hono()
// 2. 将 `Env` 设置为 `createMiddleware()`
const mw = createMiddleware(async (c, next) => {
await next()
})
app.use(mw)
```
通过使用 `createFactory()` 和 `createApp()`,你可以只在一个地方设置 `Env`。
```ts
import { createFactory } from 'hono/factory'
// ...
// 将 `Env` 设置为 `createFactory()`
const factory = createFactory()
const app = factory.createApp()
// factory 也有 `createMiddleware()`
const mw = factory.createMiddleware(async (c, next) => {
await next()
})
```
`createFactory()` 可以接收 `initApp` 选项来初始化由 `createApp()` 创建的 `app`。以下是使用该选项的示例。
```ts
// factory-with-db.ts
type Env = {
Bindings: {
MY_DB: D1Database
}
Variables: {
db: DrizzleD1Database
}
}
export default createFactory({
initApp: (app) => {
app.use(async (c, next) => {
const db = drizzle(c.env.MY_DB)
c.set('db', db)
await next()
})
},
})
```
```ts
// crud.ts
import factoryWithDB from './factory-with-db'
const app = factoryWithDB.createApp()
app.post('/posts', (c) => {
c.var.db.insert()
// ...
})
```
# html 辅助工具
html 辅助工具让你可以在名为 `html` 的 JavaScript 模板字面量中编写 HTML。使用 `raw()`,内容将按原样渲染。你必须自己转义这些字符串。
## 导入
```ts
import { Hono } from 'hono'
import { html, raw } from 'hono/html'
```
## `html`
```ts
const app = new Hono()
app.get('/:username', (c) => {
const { username } = c.req.param()
return c.html(
html`
Hello! ${username}!
`
)
})
```
### 将代码片段插入 JSX
将内联脚本插入 JSX:
```tsx
app.get('/', (c) => {
return c.html(
Test Site
{html`
`}
Hello!
)
})
```
### 作为功能组件
由于 `html` 返回 HtmlEscapedString,它可以作为完全功能组件而无需使用 JSX。
#### 使用 `html` 来加速处理而不是 `memo`
```typescript
const Footer = () => html`
`
```
### 接收 props 并嵌入值
```typescript
interface SiteData {
title: string
description: string
image: string
children?: any
}
const Layout = (props: SiteData) => html`
${props.title}
${props.children}
`
const Content = (props: { siteData: SiteData; name: string }) => (
Hello {props.name}
)
app.get('/', (c) => {
const props = {
name: 'World',
siteData: {
title: 'Hello <> World',
description: 'This is a description',
image: 'https://example.com/image.png',
},
}
return c.html()
})
```
## `raw()`
```ts
app.get('/', (c) => {
const name = 'John "Johnny" Smith'
return c.html(html`I'm ${raw(name)}.
`)
})
```
## 技巧
由于这些库,Visual Studio Code 和 vim 也将模板字面量解释为 HTML,允许应用语法高亮和格式化。
-
-
# JWT 认证辅助工具
此辅助工具提供用于编码、解码、签名和验证 JSON Web Tokens (JWTs) 的函数。JWTs 通常在 Web 应用程序中用于认证和授权。此辅助工具提供强大的 JWT 功能,支持各种加密算法。
## 导入
要使用此辅助工具,你可以按以下方式导入:
```ts
import { decode, sign, verify } from 'hono/jwt'
```
::: info
[JWT 中间件](/docs/middleware/builtin/jwt) 也从 `hono/jwt` 导入 `jwt` 函数。
:::
## `sign()`
此函数通过使用指定的算法和密钥对 payload 进行编码和签名来生成 JWT 令牌。
```ts
sign(
payload: unknown,
secret: string,
alg?: 'HS256';
): Promise;
```
### 示例
```ts
import { sign } from 'hono/jwt'
const payload = {
sub: 'user123',
role: 'admin',
exp: Math.floor(Date.now() / 1000) + 60 * 5, // 令牌 5 分钟后过期
}
const secret = 'mySecretKey'
const token = await sign(payload, secret)
```
### 选项
#### payload: `unknown`
要签名的 JWT payload。你可以包含其他 claims,如 [Payload Validation](#payload-validation) 中所述。
#### secret: `string`
用于 JWT 验证或签名的密钥。
#### alg: [AlgorithmTypes](#supported-algorithmtypes)
用于 JWT 签名或验证的算法。默认是 HS256。
## `verify()`
此函数检查 JWT 令牌是否真实且仍然有效。它确保令牌未被篡改,并且仅在你添加了 [Payload Validation](#payload-validation) 时检查有效性。
```ts
verify(
token: string,
secret: string,
alg: 'HS256';
issuer?: string | RegExp;
): Promise;
```
### 示例
```ts
import { verify } from 'hono/jwt'
const tokenToVerify = 'token'
const secretKey = 'mySecretKey'
const decodedPayload = await verify(tokenToVerify, secretKey, 'HS256')
console.log(decodedPayload)
```
### 选项
#### token: `string`
要验证的 JWT 令牌。
#### secret: `string`
用于 JWT 验证或签名的密钥。
#### alg: [AlgorithmTypes](#supported-algorithmtypes)
用于 JWT 签名或验证的算法。
#### issuer: `string | RegExp`
用于 JWT 验证的预期颁发者。
## `decode()`
此函数在不执行签名验证的情况下解码 JWT 令牌。它从令牌中提取并返回 header 和 payload。
```ts
decode(token: string): { header: any; payload: any };
```
### 示例
```ts
import { decode } from 'hono/jwt'
// 解码 JWT 令牌
const tokenToDecode =
'eyJhbGciOiAiSFMyNTYiLCAidHlwIjogIkpXVCJ9.eyJzdWIiOiAidXNlcjEyMyIsICJyb2xlIjogImFkbWluIn0.JxUwx6Ua1B0D1B0FtCrj72ok5cm1Pkmr_hL82sd7ELA'
const { header, payload } = decode(tokenToDecode)
console.log('Decoded Header:', header)
console.log('Decoded Payload:', payload)
```
### 选项
#### token: `string`
要解码的 JWT 令牌。
> `decode` 函数允许你在_**不**_ 执行验证的情况下检查 JWT 令牌的 header 和 payload。这对于调试或从 JWT 令牌中提取信息很有用。
## Payload 验证
验证 JWT 令牌时,会执行以下 payload 验证:
- `exp`:检查令牌是否未过期。
- `nbf`:检查令牌是否在指定时间之前未被使用。
- `iat`:检查令牌是否未在未来签发。
- `iss`:检查令牌是否由受信任的颁发者签发。
如果你打算在验证期间执行这些检查,请确保你的 JWT payload 包含这些字段(作为对象)。
## 自定义错误类型
该模块还定义了自定义错误类型来处理 JWT 相关错误。
- `JwtAlgorithmNotImplemented`:表示未实现请求的 JWT 算法。
- `JwtTokenInvalid`:表示 JWT 令牌无效。
- `JwtTokenNotBefore`:表示令牌在其有效日期之前被使用。
- `JwtTokenExpired`:表示令牌已过期。
- `JwtTokenIssuedAt`:表示令牌中的 "iat" claim 不正确。
- `JwtTokenIssuer`:表示令牌中的 "iss" claim 不正确。
- `JwtTokenSignatureMismatched`:表示令牌中的签名不匹配。
## 支持的 AlgorithmTypes
该模块支持以下 JWT 加密算法:
- `HS256`:使用 SHA-256 的 HMAC
- `HS384`:使用 SHA-384 的 HMAC
- `HS512`:使用 SHA-512 的 HMAC
- `RS256`:使用 SHA-256 的 RSASSA-PKCS1-v1_5
- `RS384`:使用 SHA-384 的 RSASSA-PKCS1-v1_5
- `RS512`:使用 SHA-512 的 RSASSA-PKCS1-v1_5
- `PS256`:使用 SHA-256 和 MGF1 with SHA-256 的 RSASSA-PSS
- `PS384`:使用 SHA-386 和 MGF1 with SHA-386 的 RSASSA-PSS
- `PS512`:使用 SHA-512 和 MGF1 with SHA-512 的 RSASSA-PSS
- `ES256`:使用 P-256 和 SHA-256 的 ECDSA
- `ES384`:使用 P-384 和 SHA-384 的 ECDSA
- `ES512`:使用 P-521 和 SHA-512 的 ECDSA
- `EdDSA`:使用 Ed25519 的 EdDSA
# Proxy 辅助工具
Proxy 辅助工具在将 Hono 应用程序用作(反向)代理时提供有用的函数。
## 导入
```ts
import { Hono } from 'hono'
import { proxy } from 'hono/proxy'
```
## `proxy()`
`proxy()` 是用于代理的 `fetch()` API 包装器。参数和返回值与 `fetch()` 相同(代理特定选项除外)。
`Accept-Encoding` header 被替换为当前运行时可以处理的编码。不必要的响应 headers 被删除,并返回可以从 handler 发送的 `Response` 对象。
### 示例
简单用法:
```ts
app.get('/proxy/:path', (c) => {
return proxy(`http://${originServer}/${c.req.param('path')}`)
})
```
复杂用法:
```ts
app.get('/proxy/:path', async (c) => {
const res = await proxy(
`http://${originServer}/${c.req.param('path')}`,
{
headers: {
...c.req.header(), // 可选,仅在需要转发所有请求数据(包括凭据)时指定。
'X-Forwarded-For': '127.0.0.1',
'X-Forwarded-Host': c.req.header('host'),
Authorization: undefined, // 不传播包含在 c.req.header('Authorization') 中的请求 headers
},
}
)
res.headers.delete('Set-Cookie')
return res
})
```
或者你可以将 `c.req` 作为参数传递。
```ts
app.all('/proxy/:path', (c) => {
return proxy(`http://${originServer}/${c.req.param('path')}`, {
...c.req, // 可选,仅在需要转发所有请求数据(包括凭据)时指定。
headers: {
...c.req.header(),
'X-Forwarded-For': '127.0.0.1',
'X-Forwarded-Host': c.req.header('host'),
Authorization: undefined, // 不传播包含在 c.req.header('Authorization') 中的请求 headers
},
})
})
```
你可以使用 `customFetch` 选项覆盖默认全局 `fetch` 函数:
```ts
app.get('/proxy', (c) => {
return proxy('https://example.com/', {
customFetch,
})
})
```
### Connection Header 处理
默认情况下,`proxy()` 忽略 `Connection` header 以防止 Hop-by-Hop Header 注入攻击。你可以使用 `strictConnectionProcessing` 选项启用严格的 RFC 9110 合规性:
```ts
// 默认行为(推荐用于不受信任的客户端)
app.get('/proxy/:path', (c) => {
return proxy(`http://${originServer}/${c.req.param('path')}`, c.req)
})
// 严格的 RFC 9110 合规性(仅在受信任的环境中使用)
app.get('/internal-proxy/:path', (c) => {
return proxy(`http://${internalServer}/${c.req.param('path')}`, {
...c.req,
strictConnectionProcessing: true,
})
})
```
### `ProxyFetch`
`proxy()` 的类型定义为 `ProxyFetch`,如下所示
```ts
interface ProxyRequestInit extends Omit {
raw?: Request
customFetch?: (request: Request) => Promise
strictConnectionProcessing?: boolean
headers?:
| HeadersInit
| [string, string][]
| Record
| Record
}
interface ProxyFetch {
(
input: string | URL | Request,
init?: ProxyRequestInit
): Promise
}
```
# Route 辅助工具
Route 辅助工具为调试和中间件开发提供增强的路由信息。它允许你访问有关匹配路由和当前正在处理的路由的详细信息。
## 导入
```ts
import { Hono } from 'hono'
import {
matchedRoutes,
routePath,
baseRoutePath,
basePath,
} from 'hono/route'
```
## 用法
### 基本路由信息
```ts
const app = new Hono()
app.get('/posts/:id', (c) => {
const currentPath = routePath(c) // '/posts/:id'
const routes = matchedRoutes(c) // 匹配路由的数组
return c.json({
path: currentPath,
totalRoutes: routes.length,
})
})
```
### 与子应用程序一起使用
```ts
const app = new Hono()
const apiApp = new Hono()
apiApp.get('/posts/:id', (c) => {
return c.json({
routePath: routePath(c), // '/posts/:id'
baseRoutePath: baseRoutePath(c), // '/api'
basePath: basePath(c), // '/api'(带有实际参数)
})
})
app.route('/api', apiApp)
```
## `matchedRoutes()`
返回与当前请求匹配的所有路由的数组,包括中间件。
```ts
app.all('/api/*', (c, next) => {
console.log('API middleware')
return next()
})
app.get('/api/users/:id', (c) => {
const routes = matchedRoutes(c)
// 返回:[
// { method: 'ALL', path: '/api/*', handler: [Function] },
// { method: 'GET', path: '/api/users/:id', handler: [Function] }
// ]
return c.json({ routes: routes.length })
})
```
## `routePath()`
返回为当前 handler 注册的路由路径模式。
```ts
app.get('/posts/:id', (c) => {
console.log(routePath(c)) // '/posts/:id'
return c.text('Post details')
})
```
### 与 index 参数一起使用
你可以选择传递 index 参数来获取特定位置的路由路径,类似于 `Array.prototype.at()`。
```ts
app.all('/api/*', (c, next) => {
return next()
})
app.get('/api/users/:id', (c) => {
console.log(routePath(c, 0)) // '/api/*'(第一个匹配的路由)
console.log(routePath(c, -1)) // '/api/users/:id'(最后一个匹配的路由)
return c.text('User details')
})
```
## `baseRoutePath()`
返回当前路由在路由中指定的基础路径模式。
```ts
const subApp = new Hono()
subApp.get('/posts/:id', (c) => {
return c.text(baseRoutePath(c)) // '/:sub'
})
app.route('/:sub', subApp)
```
### 与 index 参数一起使用
你可以选择传递 index 参数来获取特定位置的基础路由路径,类似于 `Array.prototype.at()`。
```ts
app.all('/api/*', (c, next) => {
return next()
})
const subApp = new Hono()
subApp.get('/users/:id', (c) => {
console.log(baseRoutePath(c, 0)) // '/'(第一个匹配的路由)
console.log(baseRoutePath(c, -1)) // '/api'(最后一个匹配的路由)
return c.text('User details')
})
app.route('/api', subApp)
```
## `basePath()`
返回来自实际请求的带有嵌入式参数的基础路径。
```ts
const subApp = new Hono()
subApp.get('/posts/:id', (c) => {
return c.text(basePath(c)) // '/api'(对于对 '/api/posts/123' 的请求)
})
app.route('/:sub', subApp)
```
# SSG 辅助工具
SSG 辅助工具从你的 Hono 应用程序生成静态站点。它将检索已注册路由的内容并将它们保存为静态文件。
## 用法
### 手动
如果你有以下简单的 Hono 应用程序:
```tsx
// index.tsx
const app = new Hono()
app.get('/', (c) => c.html('Hello, World!'))
app.use('/about', async (c, next) => {
c.setRenderer((content) => {
return c.html(
{content}
)
})
await next()
})
app.get('/about', (c) => {
return c.render(
<>
Hono SSG PageHello!
)
})
export default app
```
对于 Node.js,创建如下构建脚本:
```ts
// build.ts
import app from './index'
import { toSSG } from 'hono/ssg'
import fs from 'fs/promises'
toSSG(app, fs)
```
执行脚本后,文件将输出如下:
```bash
ls ./static
about.html index.html
```
### Vite 插件
使用 `@hono/vite-ssg` Vite 插件,你可以轻松处理此过程。
有关更多详细信息,请参阅:
https://github.com/honojs/vite-plugins/tree/main/packages/ssg
## toSSG
`toSSG` 是生成静态站点的主要函数,接受应用程序和文件系统模块作为参数。它基于以下内容:
### 输入
toSSG 的参数在 ToSSGInterface 中指定。
```ts
export interface ToSSGInterface {
(
app: Hono,
fsModule: FileSystemModule,
options?: ToSSGOptions
): Promise
}
```
- `app` 指定已注册路由的 `new Hono()`。
- `fs` 指定以下对象,假设 `node:fs/promise`。
```ts
export interface FileSystemModule {
writeFile(path: string, data: string | Uint8Array): Promise
mkdir(
path: string,
options: { recursive: boolean }
): Promise
}
```
### 使用 Deno 和 Bun 的适配器
如果你想在 Deno 或 Bun 上使用 SSG,则为每个文件系统提供了 `toSSG` 函数。
对于 Deno:
```ts
import { toSSG } from 'hono/deno'
toSSG(app) // 第二个参数是类型为 `ToSSGOptions` 的选项。
```
对于 Bun:
```ts
import { toSSG } from 'hono/bun'
toSSG(app) // 第二个参数是类型为 `ToSSGOptions` 的选项。
```
### 选项
选项在 ToSSGOptions 接口中指定。
```ts
export interface ToSSGOptions {
dir?: string
concurrency?: number
extensionMap?: Record
plugins?: SSGPlugin[]
}
```
- `dir` 是静态文件的输出目的地。默认值为 `./static`。
- `concurrency` 是同时生成的文件并发数。默认值为 `2`。
- `extensionMap` 是包含 `Content-Type` 作为键和扩展名字符串作为值的映射。这用于确定输出文件的文件扩展名。
- `plugins` 是扩展静态站点生成过程功能的 SSG 插件数组。
### 输出
`toSSG` 返回以下 Result 类型的结果。
```ts
export interface ToSSGResult {
success: boolean
files: string[]
error?: Error
}
```
## 生成文件
### 路由和文件名
以下规则适用于已注册的路由信息和生成的文件名。默认 `./static` 的行为如下:
- `/` -> `./static/index.html`
- `/path` -> `./static/path.html`
- `/path/` -> `./static/path/index.html`
### 文件扩展名
文件扩展名取决于每个路由返回的 `Content-Type`。例如,来自 `c.html` 的响应保存为 `.html`。
如果你想自定义文件扩展名,请设置 `extensionMap` 选项。
```ts
import { toSSG, defaultExtensionMap } from 'hono/ssg'
// 将 `application/x-html` 内容保存为 `.html`
toSSG(app, fs, {
extensionMap: {
'application/x-html': 'html',
...defaultExtensionMap,
},
})
```
请注意,以斜杠结尾的路径无论扩展名如何都保存为 index.ext。
```ts
// 保存到 ./static/html/index.html
app.get('/html/', (c) => c.html('html'))
// 保存到 ./static/text/index.txt
app.get('/text/', (c) => c.text('text'))
```
## 中间件
介绍支持 SSG 的内置中间件。
### ssgParams
你可以使用类似于 Next.js 的 `generateStaticParams` 的 API。
示例:
```ts
app.get(
'/shops/:id',
ssgParams(async () => {
const shops = await getShops()
return shops.map((shop) => ({ id: shop.id }))
}),
async (c) => {
const shop = await getShop(c.req.param('id'))
if (!shop) {
return c.notFound()
}
return c.render(
{shop.name}
)
}
)
```
### isSSGContext
`isSSGContext` 是一个辅助函数,如果当前应用程序在由 `toSSG` 触发的 SSG 上下文中运行,则返回 `true`。
```ts
app.get('/page', (c) => {
if (isSSGContext(c)) {
return c.text('This is generated by SSG')
}
return c.text('This is served dynamically')
})
```
### disableSSG
设置了 `disableSSG` 中间件的路由将从 `toSSG` 的静态文件生成中排除。
```ts
app.get('/api', disableSSG(), (c) => c.text('an-api'))
```
### onlySSG
设置了 `onlySSG` 中间件的路由将在 `toSSG` 执行后被 `c.notFound()` 覆盖。
```ts
app.get('/static-page', onlySSG(), (c) => c.html(Welcome to my site
))
```
## 插件
插件允许你扩展静态站点生成过程的功能。它们使用 hooks 在生成过程的不同阶段进行自定义。
### 默认插件
默认情况下,`toSSG` 使用 `defaultPlugin`,它跳过非 200 状态响应(如重定向、错误或 404)。这可以防止为不成功的响应生成文件。
```ts
import { toSSG, defaultPlugin } from 'hono/ssg'
// 未指定插件时自动应用 defaultPlugin
toSSG(app, fs)
// 等价于:
toSSG(app, fs, { plugins: [defaultPlugin] })
```
如果你指定了自定义插件,`defaultPlugin` **不**会自动包含。要在添加自定义插件的同时保持默认行为,请显式包含它:
```ts
toSSG(app, fs, {
plugins: [defaultPlugin, myCustomPlugin],
})
```
### 重定向插件
`redirectPlugin` 为返回 HTTP 重定向响应(301、302、303、307、308)的路由生成 HTML 重定向页面。生成的 HTML 包含 `` 标签和规范链接。
```ts
import { toSSG, redirectPlugin, defaultPlugin } from 'hono/ssg'
toSSG(app, fs, {
plugins: [redirectPlugin(), defaultPlugin()],
})
```
例如,如果你的应用程序有:
```ts
app.get('/old', (c) => c.redirect('/new'))
```
`redirectPlugin` 将在 `/old.html` 生成一个包含 meta refresh 重定向到 `/new` 的 HTML 文件。
> [!NOTE]
> 与 `defaultPlugin` 一起使用时,将 `redirectPlugin` 放在 `defaultPlugin` **之前**。由于 `defaultPlugin` 跳过非 200 响应,先放置它会阻止 `redirectPlugin` 处理重定向响应。
### Hook 类型
插件可以使用以下 hooks 来自定义 `toSSG` 过程:
```ts
export type BeforeRequestHook = (req: Request) => Request | false
export type AfterResponseHook = (res: Response) => Response | false
export type AfterGenerateHook = (
result: ToSSGResult
) => void | Promise
```
- **BeforeRequestHook**:在处理每个请求之前调用。返回 `false` 跳过路由。
- **AfterResponseHook**:在接收每个响应之后调用。返回 `false` 跳过文件生成。
- **AfterGenerateHook**:在整个生成过程完成后调用。
### 插件接口
```ts
export interface SSGPlugin {
beforeRequestHook?: BeforeRequestHook | BeforeRequestHook[]
afterResponseHook?: AfterResponseHook | AfterResponseHook[]
afterGenerateHook?: AfterGenerateHook | AfterGenerateHook[]
}
```
### 基本插件示例
仅过滤 GET 请求:
```ts
const getOnlyPlugin: SSGPlugin = {
beforeRequestHook: (req) => {
if (req.method === 'GET') {
return req
}
return false
},
}
```
按状态码过滤:
```ts
const statusFilterPlugin: SSGPlugin = {
afterResponseHook: (res) => {
if (res.status === 200 || res.status === 500) {
return res
}
return false
},
}
```
记录生成的文件:
```ts
const logFilesPlugin: SSGPlugin = {
afterGenerateHook: (result) => {
if (result.files) {
result.files.forEach((file) => console.log(file))
}
},
}
```
### 高级插件示例
这是一个创建生成 `sitemap.xml` 文件的 sitemap 插件的示例:
```ts
// plugins.ts
import fs from 'node:fs/promises'
import path from 'node:path'
import type { SSGPlugin } from 'hono/ssg'
import { DEFAULT_OUTPUT_DIR } from 'hono/ssg'
export const sitemapPlugin = (baseURL: string): SSGPlugin => {
return {
afterGenerateHook: (result, fsModule, options) => {
const outputDir = options?.dir ?? DEFAULT_OUTPUT_DIR
const filePath = path.join(outputDir, 'sitemap.xml')
const urls = result.files.map((file) =>
new URL(file, baseURL).toString()
)
const siteMapText = `
${urls.map((url) => `${url}`).join('\n')}
`
fsModule.writeFile(filePath, siteMapText)
},
}
}
```
应用插件:
```ts
import app from './index'
import { toSSG } from 'hono/ssg'
import { sitemapPlugin } from './plugins'
toSSG(app, fs, {
plugins: [
getOnlyPlugin,
statusFilterPlugin,
logFilesPlugin,
sitemapPlugin('https://example.com'),
],
})
```
# Streaming 辅助工具
Streaming 辅助工具提供用于流式响应的方法。
## 导入
```ts
import { Hono } from 'hono'
import { stream, streamText, streamSSE } from 'hono/streaming'
```
## `stream()`
它返回简单的流式响应作为 `Response` 对象。
```ts
app.get('/stream', (c) => {
return stream(c, async (stream) => {
// 写入中止时执行的过程。
stream.onAbort(() => {
console.log('Aborted!')
})
// 写入 Uint8Array。
await stream.write(new Uint8Array([0x48, 0x65, 0x6c, 0x6c, 0x6f]))
// 管道可读流。
await stream.pipe(anotherReadableStream)
})
})
```
## `streamText()`
它返回带有 `Content-Type:text/plain`、`Transfer-Encoding:chunked` 和 `X-Content-Type-Options:nosniff` headers 的流式响应。
```ts
app.get('/streamText', (c) => {
return streamText(c, async (stream) => {
// 写入带有新行 ('\n') 的文本。
await stream.writeln('Hello')
// 等待 1 秒。
await stream.sleep(1000)
// 写入不带新行的文本。
await stream.write(`Hono!`)
})
})
```
::: warning
如果你正在为 Cloudflare Workers 开发应用程序,流式可能在 Wrangler 上无法正常工作。如果是这样,请为 `Content-Encoding` header 添加 `Identity`。
```ts
app.get('/streamText', (c) => {
c.header('Content-Encoding', 'Identity')
return streamText(c, async (stream) => {
// ...
})
})
```
:::
## `streamSSE()`
它允许你无缝流式传输 Server-Sent Events (SSE)。
```ts
const app = new Hono()
let id = 0
app.get('/sse', async (c) => {
return streamSSE(c, async (stream) => {
while (true) {
const message = `It is ${new Date().toISOString()}`
await stream.writeSSE({
data: message,
event: 'time-update',
id: String(id++),
})
await stream.sleep(1000)
}
})
})
```
## 错误处理
流式辅助工具的第三个参数是错误处理器。
此参数是可选的,如果你不指定它,错误将作为控制台错误输出。
```ts
app.get('/stream', (c) => {
return stream(
c,
async (stream) => {
// 写入中止时执行的过程。
stream.onAbort(() => {
console.log('Aborted!')
})
// 写入 Uint8Array。
await stream.write(
new Uint8Array([0x48, 0x65, 0x6c, 0x6c, 0x6f])
)
// 管道可读流。
await stream.pipe(anotherReadableStream)
},
(err, stream) => {
stream.writeln('An error occurred!')
console.error(err)
}
)
})
```
流将在回调执行后自动关闭。
::: warning
如果流式辅助工具的回调函数抛出错误,Hono 的 `onError` 事件将不会触发。
`onError` 是在发送响应之前处理错误并覆盖响应的钩子。但是,当回调函数执行时,流式已经开始,因此无法覆盖。
:::
# Testing 辅助工具
Testing 辅助工具提供函数,使 Hono 应用程序的测试更容易。
## 导入
```ts
import { Hono } from 'hono'
import { testClient } from 'hono/testing'
```
## `testClient()`
`testClient()` 函数将 Hono 实例作为第一个参数,并返回根据 Hono 应用程序的路由进行类型化的对象,类似于 [Hono Client](/docs/guides/rpc#client)。这允许你在测试中以类型安全的方式调用已定义的路由,并具有编辑器自动完成功能。
**关于类型推断的重要说明:**
为了让 `testClient` 正确推断路由类型并提供自动完成,**你必须使用链接方法直接在 `Hono` 实例上定义路由**。
类型推断依赖于类型通过链接的 `.get()`、`.post()` 等调用流动。如果你在创建 Hono 实例后单独定义路由(如 "Hello World" 示例中显示的常见模式:`const app = new Hono(); app.get(...)`),`testClient` 将没有特定路由的必要类型信息,你将无法获得类型安全的客户端功能。
**示例:**
此示例有效,因为 `.get()` 方法直接链接到 `new Hono()` 调用:
```ts
// index.ts
const app = new Hono().get('/search', (c) => {
const query = c.req.query('q')
return c.json({ query: query, results: ['result1', 'result2'] })
})
export default app
```
```ts
// index.test.ts
import { Hono } from 'hono'
import { testClient } from 'hono/testing'
import { describe, it, expect } from 'vitest' // 或你首选的测试运行器
import app from './app'
describe('Search Endpoint', () => {
// 从应用程序实例创建测试客户端
const client = testClient(app)
it('should return search results', async () => {
// 使用类型化客户端调用端点
// 注意查询参数的类型安全性(如果在路由中定义)
// 以及通过 .$get() 直接访问
const res = await client.search.$get({
query: { q: 'hono' },
})
// 断言
expect(res.status).toBe(200)
expect(await res.json()).toEqual({
query: 'hono',
results: ['result1', 'result2'],
})
})
})
```
要在测试中包含 headers,请将它们作为调用中的第二个参数传递。第二个参数还可以将 `init` 属性作为 `RequestInit` 对象,允许你设置 headers、method、body 等。在此处了解有关 `init` 属性的更多信息 [here](/docs/guides/rpc#init-option)。
```ts
// index.test.ts
import { Hono } from 'hono'
import { testClient } from 'hono/testing'
import { describe, it, expect } from 'vitest' // 或你首选的测试运行器
import app from './app'
describe('Search Endpoint', () => {
// 从应用程序实例创建测试客户端
const client = testClient(app)
it('should return search results', async () => {
// 在 headers 中包含令牌并设置内容类型
const token = 'this-is-a-very-clean-token'
const res = await client.search.$get(
{
query: { q: 'hono' },
},
{
headers: {
Authorization: `Bearer ${token}`,
'Content-Type': `application/json`,
},
}
)
// 断言
expect(res.status).toBe(200)
expect(await res.json()).toEqual({
query: 'hono',
results: ['result1', 'result2'],
})
})
})
```
# WebSocket 辅助工具
WebSocket 辅助工具是用于 Hono 应用程序中服务器端 WebSocket 的辅助工具。
目前 Cloudflare Workers / Pages、Deno 和 Bun 适配器可用。
## 导入
::: code-group
```ts [Cloudflare Workers]
import { Hono } from 'hono'
import { upgradeWebSocket } from 'hono/cloudflare-workers'
```
```ts [Deno]
import { Hono } from 'hono'
import { upgradeWebSocket } from 'hono/deno'
```
```ts [Bun]
import { Hono } from 'hono'
import { upgradeWebSocket, websocket } from 'hono/bun'
// ...
export default {
fetch: app.fetch,
websocket,
}
```
:::
如果你使用 Node.js,你可以使用 [@hono/node-ws](https://github.com/honojs/middleware/tree/main/packages/node-ws)。
## `upgradeWebSocket()`
`upgradeWebSocket()` 返回用于处理 WebSocket 的 handler。
```ts
const app = new Hono()
app.get(
'/ws',
upgradeWebSocket((c) => {
return {
onMessage(event, ws) {
console.log(`Message from client: ${event.data}`)
ws.send('Hello from server!')
},
onClose: () => {
console.log('Connection closed')
},
}
})
)
```
可用的事件:
- `onOpen` - 目前,Cloudflare Workers 不支持。
- `onMessage`
- `onClose`
- `onError`
::: warning
如果你在具有 WebSocket 辅助工具的路由上使用修改 headers 的中间件(例如,应用 CORS),你可能会遇到错误,说你无法修改不可变的 headers。这是因为 `upgradeWebSocket()` 也在内部更改 headers。
因此,如果你同时使用 WebSocket 辅助工具和中间件,请小心。
:::
## RPC 模式
使用 WebSocket 辅助工具定义的 handlers 支持 RPC 模式。
```ts
// server.ts
const wsApp = app.get(
'/ws',
upgradeWebSocket((c) => {
//...
})
)
export type WebSocketApp = typeof wsApp
// client.ts
const client = hc('http://localhost:8787')
const socket = client.ws.$ws() // 客户端的 WebSocket 对象
```
## 示例
请参阅使用 WebSocket 辅助工具的示例。
### 服务器和客户端
```ts
// server.ts
import { Hono } from 'hono'
import { upgradeWebSocket } from 'hono/cloudflare-workers'
const app = new Hono().get(
'/ws',
upgradeWebSocket(() => {
return {
onMessage: (event) => {
console.log(event.data)
},
}
})
)
export default app
```
```ts
// client.ts
import { hc } from 'hono/client'
import type app from './server'
const client = hc('http://localhost:8787')
const ws = client.ws.$ws(0)
ws.addEventListener('open', () => {
setInterval(() => {
ws.send(new Date().toString())
}, 1000)
})
```
### Bun with JSX
```tsx
import { Hono } from 'hono'
import { upgradeWebSocket, websocket } from 'hono/bun'
import { html } from 'hono/html'
const app = new Hono()
app.get('/', (c) => {
return c.html(
{html`
`}
)
})
const ws = app.get(
'/ws',
upgradeWebSocket((c) => {
let intervalId
return {
onOpen(_event, ws) {
intervalId = setInterval(() => {
ws.send(new Date().toString())
}, 200)
},
onClose() {
clearInterval(intervalId)
},
}
})
)
export default {
fetch: app.fetch,
websocket,
}
```
# Best Practices
Hono 非常灵活。你可以随心所欲地编写应用程序。然而,有一些最佳实践最好遵循。
## Don't make "Controllers" when possible
在可能的情况下,你不应该创建"Ruby on Rails-like Controllers"。
```ts
// 🙁
// 一个 RoR-like Controller
const booksList = (c: Context) => {
return c.json('list books')
}
app.get('/books', booksList)
```
问题与类型有关。例如,路径参数无法在 Controller 中推断,除非编写复杂的泛型。
```ts
// 🙁
// 一个 RoR-like Controller
const bookPermalink = (c: Context) => {
const id = c.req.param('id') // 无法推断路径参数
return c.json(`get ${id}`)
}
```
因此,你不需要创建 RoR-like controllers,应该在路径定义后直接编写 handlers。
```ts
// 😃
app.get('/books/:id', (c) => {
const id = c.req.param('id') // 可以推断路径参数
return c.json(`get ${id}`)
})
```
## `factory.createHandlers()` in `hono/factory`
如果你仍然想创建 RoR-like Controller,使用 `hono/factory` 中的 `factory.createHandlers()`。如果使用这个,类型推断将正常工作。
```ts
import { createFactory } from 'hono/factory'
import { logger } from 'hono/logger'
// ...
// 😃
const factory = createFactory()
const middleware = factory.createMiddleware(async (c, next) => {
c.set('foo', 'bar')
await next()
})
const handlers = factory.createHandlers(logger(), middleware, (c) => {
return c.json(c.var.foo)
})
app.get('/api', ...handlers)
```
## Building a larger application
使用 `app.route()` 来构建更大的应用程序,而无需创建"Ruby on Rails-like Controllers"。
如果你的应用程序有 `/authors` 和 `/books` 端点,并且你想从 `index.ts` 分离文件,创建 `authors.ts` 和 `books.ts`。
```ts
// authors.ts
import { Hono } from 'hono'
const app = new Hono()
app.get('/', (c) => c.json('list authors'))
app.post('/', (c) => c.json('create an author', 201))
app.get('/:id', (c) => c.json(`get ${c.req.param('id')}`))
export default app
```
```ts
// books.ts
import { Hono } from 'hono'
const app = new Hono()
app.get('/', (c) => c.json('list books'))
app.post('/', (c) => c.json('create a book', 201))
app.get('/:id', (c) => c.json(`get ${c.req.param('id')}`))
export default app
```
然后,导入它们并使用 `app.route()` 挂载到路径 `/authors` 和 `/books`。
```ts
// index.ts
import { Hono } from 'hono'
import authors from './authors'
import books from './books'
const app = new Hono()
// 😃
app.route('/authors', authors)
app.route('/books', books)
export default app
```
### If you want to use RPC features
上面的代码在普通用例中效果很好。但是,如果你想使用 `RPC` 功能,你可以通过链式获取正确的类型。
```ts
// authors.ts
import { Hono } from 'hono'
const app = new Hono()
.get('/', (c) => c.json('list authors'))
.post('/', (c) => c.json('create an author', 201))
.get('/:id', (c) => c.json(`get ${c.req.param('id')}`))
export default app
export type AppType = typeof app
```
如果你将 `app` 的类型传递给 `hc`,它将获得正确的类型。
```ts
import type { AppType } from './authors'
import { hc } from 'hono/client'
// 😃
const client = hc('http://localhost') // 正确推断类型
```
更多详细信息,请查看 [RPC page](/docs/guides/rpc#using-rpc-with-larger-applications)。
# Create-hono
`create-hono` 支持的命令行选项 - 这是运行 `npm create hono@latest`、`npx create-hono@latest` 或 `pnpm create hono@latest` 时运行的项目初始化工具。
> [!NOTE]
> **为什么有这个页面?** 安装/快速入门示例通常显示最小的 `npm create hono@latest my-app` 命令。`create-hono` 支持一些有用的标志,你可以传递这些标志来自动化和自定义项目创建(选择 templates、跳过提示、选择包管理器、使用本地缓存等)。
## Passing arguments:
当你使用 `npm create`(或 `npx`)时,用于初始化脚本的参数必须放在 `--` 之后。`--` 之后的任何内容都会转发给初始化脚本。
::: code-group
```sh [npm]
# 转发参数到 create-hono(npm 需要 `--`)
npm create hono@latest my-app -- --template cloudflare-workers
```
```sh [yarn]
# "--template cloudflare-workers" 选择 Cloudflare Workers template
yarn create hono my-app --template cloudflare-workers
```
```sh [pnpm]
# "--template cloudflare-workers" 选择 Cloudflare Workers template
pnpm create hono@latest my-app --template cloudflare-workers
```
```sh [bun]
# "--template cloudflare-workers" 选择 Cloudflare Workers template
bun create hono@latest my-app --template cloudflare-workers
```
```sh [deno]
# "--template cloudflare-workers" 选择 Cloudflare Workers template
deno init --npm hono@latest my-app --template cloudflare-workers
```
:::
## Commonly used arguments
| Argument | Description | Example |
| :---------------------- | :----------------------------------------------------------------------------------------------------------------------------------------------- | :------------------------------ |
| `--template ` | 选择 starter template 并跳过交互式 template 提示。Templates 可能包括名称如 `bun`、`cloudflare-workers`、`vercel` 等。 | `--template cloudflare-workers` |
| `--install` | 在创建 template 后自动安装依赖项。 | `--install` |
| `--pm ` | 指定安装依赖项时运行哪个包管理器。常用值:`npm`、`pnpm`、`yarn`。 | `--pm pnpm` |
| `--offline` | 使用本地缓存/templates 而不是获取最新的远程 templates。适用于离线环境或确定性本地运行。 | `--offline` |
> [!NOTE]
> 确切的 templates 集和可用选项由 `create-hono` 项目维护。此文档页面总结了最常用的标志 - 查看下面链接的仓库获取完整、权威的参考。
## Example flows
### Minimal, interactive
```bash
npm create hono@latest my-app
```
这会提示你选择 template 和选项。
### Non-interactive, pick template and package manager
```bash
npm create hono@latest my-app -- --template vercel --pm npm --install
```
这使用 `vercel` template 创建 `my-app`,使用 `npm` 安装依赖项,并跳过交互式提示。
### Use offline cache (no network)
```bash
pnpm create hono@latest my-app --template deno --offline
```
## Troubleshooting & tips
- 如果某个选项似乎未被识别,请确保在使用 `npm create` / `npx` 时使用 `--` 转发它。
- 要查看最新的 templates 和标志列表,请咨询 `create-hono` 仓库或在本地运行初始化脚本并遵循其帮助输出。
## Links & references
- `create-hono` 仓库:[create-hono](https://github.com/honojs/create-hono)
# Examples
查看 [Examples section](/examples/)。
# Frequently Asked Questions
本指南是关于 Hono 的常见问题解答(FAQ)以及如何解决它们。
## Is there an official Renovate config for Hono?
Hono 团队目前不维护 [Renovate](https://github.com/renovatebot/renovate) 配置。因此,请使用如下第三方 renovate-config。
在你的 `renovate.json` 中:
```json
// renovate.json
{
"$schema": "https://docs.renovatebot.com/renovate-schema.json",
"extends": [
"github>shinGangan/renovate-config-hono" // [!code ++]
]
}
```
查看 [renovate-config-hono](https://github.com/shinGangan/renovate-config-hono) 仓库了解更多详情。
# Helpers
Helpers 可用于协助开发你的应用程序。与中间件不同,它们不作为 handlers,而是提供有用的函数。
例如,以下是使用 [Cookie helper](/docs/helpers/cookie) 的方法:
```ts
import { getCookie, setCookie } from 'hono/cookie'
const app = new Hono()
app.get('/cookie', (c) => {
const yummyCookie = getCookie(c, 'yummy_cookie')
// ...
setCookie(c, 'delicious_cookie', 'macha')
//
})
```
## Available Helpers
- [Accepts](/docs/helpers/accepts)
- [Adapter](/docs/helpers/adapter)
- [Cookie](/docs/helpers/cookie)
- [css](/docs/helpers/css)
- [Dev](/docs/helpers/dev)
- [Factory](/docs/helpers/factory)
- [html](/docs/helpers/html)
- [JWT](/docs/helpers/jwt)
- [SSG](/docs/helpers/ssg)
- [Streaming](/docs/helpers/streaming)
- [Testing](/docs/helpers/testing)
- [WebSocket](/docs/helpers/websocket)
# Client Components
`hono/jsx` 不仅支持服务器端,也支持客户端。这意味着可以创建在浏览器中运行的交互式 UI。我们称之为 Client Components 或 `hono/jsx/dom`。
它非常快且非常小。`hono/jsx/dom` 中的计数器程序使用 Brotli 压缩后仅为 2.8KB,而 React 为 47.8KB。
本节介绍 Client Components 特定的功能。
## Counter example
这是一个简单计数器的示例,与 React 中的代码相同。
```tsx
import { useState } from 'hono/jsx'
import { render } from 'hono/jsx/dom'
function Counter() {
const [count, setCount] = useState(0)
return (
Count: {count}
)
}
function App() {
return (
)
}
const root = document.getElementById('root')
render(, root)
```
## `render()`
你可以使用 `render()` 在指定的 HTML 元素内插入 JSX 组件。
```tsx
render(, container)
```
你可以在此处查看完整示例代码:[Counter example](https://github.com/honojs/examples/tree/main/hono-vite-jsx)。
## Hooks compatible with React
hono/jsx/dom 具有与 React 兼容或部分兼容的 Hooks。你可以通过查看 [React documentation](https://react.dev/reference/react/hooks) 了解这些 APIs。
- `useState()`
- `useEffect()`
- `useRef()`
- `useCallback()`
- `use()`
- `startTransition()`
- `useTransition()`
- `useDeferredValue()`
- `useMemo()`
- `useLayoutEffect()`
- `useReducer()`
- `useDebugValue()`
- `createElement()`
- `memo()`
- `isValidElement()`
- `useId()`
- `createRef()`
- `forwardRef()`
- `useImperativeHandle()`
- `useSyncExternalStore()`
- `useInsertionEffect()`
- `useFormStatus()`
- `useActionState()`
- `useOptimistic()`
## `startViewTransition()` family
`startViewTransition()` 系列包含原始的 hooks 和函数,用于轻松处理 [View Transitions API](https://developer.mozilla.org/en-US/docs/Web/API/View_Transitions_API)。以下是如何使用它们的示例。
### 1. An easiest example
你可以使用 `startViewTransition()` 简短地编写使用 `document.startViewTransition` 的过渡。
```tsx
import { useState, startViewTransition } from 'hono/jsx'
import { css, Style } from 'hono/css'
export default function App() {
const [showLargeImage, setShowLargeImage] = useState(false)
return (
<>
{!showLargeImage ? (

) : (
)}
{!showLargeImage ? (
) : (
)}
{!showLargeImage ? (
) : (
)}
Hello Hono!
{props.messages.map((message) => {
return - {message}!!
})}
)
}
app.get('/', (c) => {
const messages = ['Good Morning', 'Good Evening', 'Good Night']
return c.html()
})
export default app
```
## Metadata hoisting
你可以直接在组件内编写文档元数据标签,如 ``、`<link>` 和 `<meta>`。这些标签将自动提升到文档的 `<head>` 部分。当 `<head>` 元素远离确定适当元数据的组件渲染时,这特别有用。
```tsx
import { Hono } from 'hono'
const app = new Hono()
app.use('*', async (c, next) => {
c.setRenderer((content) => {
return c.html(
<html>
<head></head>
<body>{content}</body>
</html>
)
})
await next()
})
app.get('/about', (c) => {
return c.render(
<>
<title>About Page
about page content
)
})
export default app
```
:::info
当发生提升时,现有元素不会被移除。后面出现的元素会添加到末尾。例如,如果你在 `` 中有 `Default` 并且组件渲染 `Page Title`,两个标题都会出现在 head 中。
:::
## Fragment
使用 Fragment 将多个元素分组而不添加额外的节点:
```tsx
import { Fragment } from 'hono/jsx'
const List = () => (
first child
second child
third child
)
```
或者,如果设置正确,你可以用 `<>` 编写。
```tsx
const List = () => (
<>
first child
second child
third child
)
```
## `PropsWithChildren`
你可以使用 `PropsWithChildren` 在函数组件中正确推断子元素。
```tsx
import { PropsWithChildren } from 'hono/jsx'
type Post = {
id: number
title: string
}
function Component({ title, children }: PropsWithChildren) {
return (
{title}
{children}
)
}
```
## Inserting Raw HTML
要直接插入 HTML,使用 `dangerouslySetInnerHTML`:
```tsx
app.get('/foo', (c) => {
const inner = { __html: 'JSX · SSR' }
const Div =
})
```
## Memoization
使用 `memo` 通过记忆计算的字符串来优化你的组件:
```tsx
import { memo } from 'hono/jsx'
const Header = memo(() => )
const Footer = memo(() => )
const Layout = (
)
```
## Context
通过使用 `useContext`,你可以在 Component 树的任何级别全局共享数据,而无需通过 props 传递值。
```tsx
import type { FC } from 'hono/jsx'
import { createContext, useContext } from 'hono/jsx'
const themes = {
light: {
color: '#000000',
background: '#eeeeee',
},
dark: {
color: '#ffffff',
background: '#222222',
},
}
const ThemeContext = createContext(themes.light)
const Button: FC = () => {
const theme = useContext(ThemeContext)
return
}
const Toolbar: FC = () => {
return (
)
}
// ...
app.get('/', (c) => {
return c.html(
)
})
```
## Async Component
`hono/jsx` 支持 Async Component,因此你可以在组件中使用 `async`/`await`。如果你使用 `c.html()` 渲染它,它将自动等待。
```tsx
const AsyncComponent = async () => {
await new Promise((r) => setTimeout(r, 1000)) // sleep 1s
return Done!
}
app.get('/', (c) => {
return c.html(
)
})
```
## Suspense
可以使用 React-like 的 `Suspense` 功能。如果你用 `Suspense` 包装 async component,fallback 中的内容将首先渲染,一旦 Promise 解析,将显示等待的内容。你可以将其与 `renderToReadableStream()` 一起使用。
```tsx
import { renderToReadableStream, Suspense } from 'hono/jsx/streaming'
//...
app.get('/', (c) => {
const stream = renderToReadableStream(
loading...}>
)
return c.body(stream, {
headers: {
'Content-Type': 'text/html; charset=UTF-8',
'Transfer-Encoding': 'chunked',
},
})
})
```
## ErrorBoundary
你可以使用 `ErrorBoundary` 捕获子组件中的错误。
在下面的示例中,如果发生错误,它将显示在 `fallback` 中指定的内容。
```tsx
function SyncComponent() {
throw new Error('Error')
return Hello
}
app.get('/sync', async (c) => {
return c.html(
Out of Service}>
)
})
```
`ErrorBoundary` 也可以与 async components 和 `Suspense` 一起使用。
```tsx
async function AsyncComponent() {
await new Promise((resolve) => setTimeout(resolve, 2000))
throw new Error('Error')
return Hello
}
app.get('/with-suspense', async (c) => {
return c.html(
Out of Service}>
Loading...}>
)
})
```
## StreamingContext
你可以使用 `StreamingContext` 为 `Suspense` 和 `ErrorBoundary` 等流式组件提供配置。这对于为这些组件生成的脚本标签添加 nonce 值以用于 Content Security Policy (CSP) 很有用。
```tsx
import { Suspense, StreamingContext } from 'hono/jsx/streaming'
// ...
app.get('/', (c) => {
const stream = renderToReadableStream(
Loading...}>
)
return c.body(stream, {
headers: {
'Content-Type': 'text/html; charset=UTF-8',
'Transfer-Encoding': 'chunked',
'Content-Security-Policy':
"script-src 'nonce-random-nonce-value'",
},
})
})
```
`scriptNonce` 值将自动添加到 `Suspense` 和 `ErrorBoundary` 组件生成的任何 `
) : (
)}
Hello
)
})
```
为了正确构建脚本,你可以使用以下示例配置文件 `vite.config.ts`。
```ts
import pages from '@hono/vite-cloudflare-pages'
import devServer from '@hono/vite-dev-server'
import { defineConfig } from 'vite'
export default defineConfig(({ mode }) => {
if (mode === 'client') {
return {
build: {
rollupOptions: {
input: './src/client.ts',
output: {
entryFileNames: 'static/client.js',
},
},
},
}
} else {
return {
plugins: [
pages(),
devServer({
entry: 'src/index.tsx',
}),
],
}
}
})
```
你可以运行以下命令来构建服务器和客户端脚本。
```sh
vite build --mode client && vite build
```
## Cloudflare Pages Middleware
Cloudflare Pages 使用自己的 [middleware](https://developers.cloudflare.com/pages/functions/middleware/) 系统,与 Hono 的中间件不同。你可以通过在名为 `_middleware.ts` 的文件中导出 `onRequest` 来启用它,如下所示:
```ts
// functions/_middleware.ts
export async function onRequest(pagesContext) {
console.log(`You are accessing ${pagesContext.request.url}`)
return await pagesContext.next()
}
```
使用 `handleMiddleware`,你可以将 Hono 的中间件用作 Cloudflare Pages 中间件。
```ts
// functions/_middleware.ts
import { handleMiddleware } from 'hono/cloudflare-pages'
export const onRequest = handleMiddleware(async (c, next) => {
console.log(`You are accessing ${c.req.url}`)
await next()
})
```
你也可以使用 Hono 的内置和第三方中间件。例如,要添加 Basic Authentication,你可以使用 [Hono's Basic Authentication Middleware](/docs/middleware/builtin/basic-auth)。
```ts
// functions/_middleware.ts
import { handleMiddleware } from 'hono/cloudflare-pages'
import { basicAuth } from 'hono/basic-auth'
export const onRequest = handleMiddleware(
basicAuth({
username: 'hono',
password: 'acoolproject',
})
)
```
如果你想应用多个中间件,可以这样写:
```ts
import { handleMiddleware } from 'hono/cloudflare-pages'
// ...
export const onRequest = [
handleMiddleware(middleware1),
handleMiddleware(middleware2),
handleMiddleware(middleware3),
]
```
### Accessing `EventContext`
你可以通过 `handleMiddleware` 中的 `c.env` 访问 [`EventContext`](https://developers.cloudflare.com/pages/functions/api-reference/#eventcontext) 对象。
```ts
// functions/_middleware.ts
import { handleMiddleware } from 'hono/cloudflare-pages'
export const onRequest = [
handleMiddleware(async (c, next) => {
c.env.eventContext.data.user = 'Joe'
await next()
}),
]
```
然后,你可以通过处理器中的 `c.env.eventContext` 访问数据值:
```ts
// functions/api/[[route]].ts
import type { EventContext } from 'hono/cloudflare-pages'
import { handle } from 'hono/cloudflare-pages'
// ...
type Env = {
Bindings: {
eventContext: EventContext
}
}
const app = new Hono().basePath('/api')
app.get('/hello', (c) => {
return c.json({
message: `Hello, ${c.env.eventContext.data.user}!`, // 'Joe'
})
})
export const onRequest = handle(app)
```
# Cloudflare Workers
[Cloudflare Workers](https://workers.cloudflare.com) 是 Cloudflare CDN 上的 JavaScript edge runtime。
你可以使用 [Wrangler](https://developers.cloudflare.com/workers/wrangler/) 在本地开发应用程序并通过几个命令发布它。Wrangler 包含转译器,所以我们可以用 TypeScript 编写代码。
让我们用 Hono 创建你的第一个 Cloudflare Workers 应用程序。
## 1. Setup
Cloudflare Workers 有一个 starter。使用 "create-hono" 命令开始你的项目。为此示例选择 `cloudflare-workers` template。
::: code-group
```sh [npm]
npm create hono@latest my-app
```
```sh [yarn]
yarn create hono my-app
```
```sh [pnpm]
pnpm create hono my-app
```
```sh [bun]
bun create hono@latest my-app
```
```sh [deno]
deno init --npm hono my-app
```
:::
进入 `my-app` 并安装依赖项。
::: code-group
```sh [npm]
cd my-app
npm i
```
```sh [yarn]
cd my-app
yarn
```
```sh [pnpm]
cd my-app
pnpm i
```
```sh [bun]
cd my-app
bun i
```
:::
## 2. Hello World
编辑 `src/index.ts` 如下。
```ts
import { Hono } from 'hono'
const app = new Hono()
app.get('/', (c) => c.text('Hello Cloudflare Workers!'))
export default app
```
## 3. Run
在本地运行开发服务器。然后在 Web 浏览器中访问 `http://localhost:8787`。
::: code-group
```sh [npm]
npm run dev
```
```sh [yarn]
yarn dev
```
```sh [pnpm]
pnpm dev
```
```sh [bun]
bun run dev
```
:::
### Change port number
如果你需要更改端口号,可以按照此处的说明更新 `wrangler.toml` / `wrangler.json` / `wrangler.jsonc` 文件:[Wrangler Configuration](https://developers.cloudflare.com/workers/wrangler/configuration/#local-development-settings)
或者,你可以按照此处的说明设置 CLI 选项:[Wrangler CLI](https://developers.cloudflare.com/workers/wrangler/commands/#dev)
## 4. Deploy
如果你有 Cloudflare 账户,可以部署到 Cloudflare。在 `package.json` 中,`$npm_execpath` 需要更改为你选择的包管理器。
::: code-group
```sh [npm]
npm run deploy
```
```sh [yarn]
yarn deploy
```
```sh [pnpm]
pnpm run deploy
```
```sh [bun]
bun run deploy
```
:::
就是这样!
## Using Hono with other event handlers
你可以在 _Module Worker mode_ 中将 Hono 与其他事件处理器(如 `scheduled`)集成。
为此,将 `app.fetch` 导出为模块的 `fetch` 处理器,然后根据需求实现其他处理器:
```ts
const app = new Hono()
export default {
fetch: app.fetch,
scheduled: async (batch, env) => {},
}
```
## Serve static files
如果你想提供静态文件,可以使用 Cloudflare Workers 的 [Static Assets feature](https://developers.cloudflare.com/workers/static-assets/)。在 `wrangler.toml` 中指定文件的目录:
```toml
assets = { directory = "public" }
```
然后创建 `public` 目录并将文件放在那里。例如,`./public/static/hello.txt` 将作为 `/static/hello.txt` 提供。
```
.
├── package.json
├── public
│ ├── favicon.ico
│ └── static
│ └── hello.txt
├── src
│ └── index.ts
└── wrangler.toml
```
## Types
如果你想要 workers 类型,你必须安装 `@cloudflare/workers-types`。
::: code-group
```sh [npm]
npm i --save-dev @cloudflare/workers-types
```
```sh [yarn]
yarn add -D @cloudflare/workers-types
```
```sh [pnpm]
pnpm add -D @cloudflare/workers-types
```
```sh [bun]
bun add --dev @cloudflare/workers-types
```
:::
## Testing
对于测试,我们推荐使用 `@cloudflare/vitest-pool-workers`。参考 [examples](https://github.com/honojs/examples) 进行设置。
如果有下面的应用程序。
```ts
import { Hono } from 'hono'
const app = new Hono()
app.get('/', (c) => c.text('Please test me!'))
```
我们可以测试它是否返回 "_200 OK_" Response。
```ts
describe('Test the application', () => {
it('Should return 200 response', async () => {
const res = await app.request('http://localhost/')
expect(res.status).toBe(200)
})
})
```
## Bindings
在 Cloudflare Workers 中,我们可以绑定环境变量、KV namespace、R2 bucket 或 Durable Object。你可以在 `c.env` 中访问它们。如果你将 bindings 的"_类型定义_"作为泛型传递给 `Hono`,它将具有类型。
```ts
type Bindings = {
MY_BUCKET: R2Bucket
USERNAME: string
PASSWORD: string
}
const app = new Hono<{ Bindings: Bindings }>()
// 访问环境值
app.put('/upload/:key', async (c, next) => {
const key = c.req.param('key')
await c.env.MY_BUCKET.put(key, c.req.body)
return c.text(`Put ${key} successfully!`)
})
```
## Using Variables in Middleware
这仅适用于 Module Worker mode。如果你想在中间件中使用 Variables 或 Secret Variables,例如 Basic Authentication Middleware 中的 "username" 或 "password",你需要这样写:
```ts
import { basicAuth } from 'hono/basic-auth'
type Bindings = {
USERNAME: string
PASSWORD: string
}
const app = new Hono<{ Bindings: Bindings }>()
//...
app.use('/auth/*', async (c, next) => {
const auth = basicAuth({
username: c.env.USERNAME,
password: c.env.PASSWORD,
})
return auth(c, next)
})
```
同样的方法适用于 Bearer Authentication Middleware、JWT Authentication 等。
## Deploy from GitHub Actions
在通过 CI 部署代码到 Cloudflare 之前,你需要一个 Cloudflare token。你可以从 [User API Tokens](https://dash.cloudflare.com/profile/api-tokens) 管理它。
如果是新创建的 token,选择 **Edit Cloudflare Workers** template。如果你已经有另一个 token,请确保 token 具有相应的权限。(注意:token 权限在 Cloudflare Pages 和 Cloudflare Workers 之间不共享)。
然后进入你的 GitHub 仓库设置 dashboard:`Settings->Secrets and variables->Actions->Repository secrets`,并添加一个名为 `CLOUDFLARE_API_TOKEN` 的新 secret。
然后在你的 Hono 项目根文件夹中创建 `.github/workflows/deploy.yml`,粘贴以下代码:
```yml
name: Deploy
on:
push:
branches:
- main
jobs:
deploy:
runs-on: ubuntu-latest
name: Deploy
steps:
- uses: actions/checkout@v4
- name: Deploy
uses: cloudflare/wrangler-action@v3
with:
apiToken: ${{ secrets.CLOUDFLARE_API_TOKEN }}
```
然后编辑 `wrangler.toml`,在 `compatibility_date` 行后添加此代码。
```toml
main = "src/index.ts"
minify = true
```
一切都准备好了!现在推送代码并享受它。
## Load env when local development
要配置本地开发的环境变量,在项目根目录创建 `.dev.vars` 文件或 `.env` 文件。这些文件应使用 [dotenv](https://hexdocs.pm/dotenvy/dotenv-file-format.html) 语法格式化。例如:
```
SECRET_KEY=value
API_TOKEN=eyJhbGciOiJIUzI1NiIsInR5cCI6IkpXVCJ9
```
> 有关此部分的更多信息,你可以在 Cloudflare 文档中找到:https://developers.cloudflare.com/workers/wrangler/configuration/#secrets
然后我们使用 `c.env.*` 在代码中获取环境变量。
::: info
默认情况下,`process.env` 在 Cloudflare Workers 中不可用,因此建议从 `c.env` 获取环境变量。如果你想使用它,你需要启用 [`nodejs_compat_populate_process_env`](https://developers.cloudflare.com/workers/configuration/compatibility-flags/#enable-auto-populating-processenv) 标志。你也可以从 `cloudflare:workers` 导入 `env`。详细信息请查看 [How to access `env` on Cloudflare docs](https://developers.cloudflare.com/workers/runtime-apis/bindings/#how-to-access-env)
:::
```ts
type Bindings = {
SECRET_KEY: string
}
const app = new Hono<{ Bindings: Bindings }>()
app.get('/env', (c) => {
const SECRET_KEY = c.env.SECRET_KEY
return c.text(SECRET_KEY)
})
```
在将项目部署到 Cloudflare 之前,记得在 Cloudflare Workers 项目的配置中设置环境变量/secrets。
> 有关此部分的更多信息,你可以在 Cloudflare 文档中找到:https://developers.cloudflare.com/workers/configuration/environment-variables/#add-environment-variables-via-the-dashboard
# Deno
[Deno](https://deno.com/) 是一个基于 V8 的 JavaScript runtime。它不是 Node.js。Hono 也可以在 Deno 上运行。
你可以使用 Hono,用 TypeScript 编写代码,使用 `deno` 命令运行应用程序,并部署到 "Deno Deploy"。
## 1. Install Deno
首先,安装 `deno` 命令。请参考 [官方文档](https://docs.deno.com/runtime/getting_started/installation/)。
## 2. Setup
Deno 有一个 starter。使用 [`deno init`](https://docs.deno.com/runtime/reference/cli/init/) 命令开始你的项目。
```sh
deno init --npm hono --template=deno my-app
```
进入 `my-app`。对于 Deno,你不必显式安装 Hono。
```sh
cd my-app
```
## 3. Hello World
编辑 `main.ts`:
```ts [main.ts]
import { Hono } from 'hono'
const app = new Hono()
app.get('/', (c) => c.text('Hello Deno!'))
Deno.serve(app.fetch)
```
## 4. Run
在本地运行开发服务器。然后在 Web 浏览器中访问 `http://localhost:8000`。
```sh
deno task start
```
## Change port number
你可以通过更新 `main.ts` 中 `Deno.serve` 的参数来指定端口号:
```ts
Deno.serve(app.fetch) // [!code --]
Deno.serve({ port: 8787 }, app.fetch) // [!code ++]
```
## Serve static files
要提供静态文件,使用从 `hono/deno` 导入的 `serveStatic`。
```ts
import { Hono } from 'hono'
import { serveStatic } from 'hono/deno'
const app = new Hono()
app.use('/static/*', serveStatic({ root: './' }))
app.use('/favicon.ico', serveStatic({ path: './favicon.ico' }))
app.get('/', (c) => c.text('You can access: /static/hello.txt'))
app.get('*', serveStatic({ path: './static/fallback.txt' }))
Deno.serve(app.fetch)
```
对于上面的代码,它将适用于以下目录结构。
```
./
├── favicon.ico
├── index.ts
└── static
├── demo
│ └── index.html
├── fallback.txt
├── hello.txt
└── images
└── dinotocat.png
```
### `rewriteRequestPath`
如果你想将 `http://localhost:8000/static/*` 映射到 `./statics`,可以使用 `rewriteRequestPath` 选项:
```ts
app.get(
'/static/*',
serveStatic({
root: './',
rewriteRequestPath: (path) =>
path.replace(/^\/static/, '/statics'),
})
)
```
### `mimes`
你可以使用 `mimes` 添加 MIME 类型:
```ts
app.get(
'/static/*',
serveStatic({
mimes: {
m3u8: 'application/vnd.apple.mpegurl',
ts: 'video/mp2t',
},
})
)
```
### `onFound`
你可以使用 `onFound` 指定找到请求文件时的处理:
```ts
app.get(
'/static/*',
serveStatic({
// ...
onFound: (_path, c) => {
c.header('Cache-Control', `public, immutable, max-age=31536000`)
},
})
)
```
### `onNotFound`
你可以使用 `onNotFound` 指定未找到请求文件时的处理:
```ts
app.get(
'/static/*',
serveStatic({
onNotFound: (path, c) => {
console.log(`${path} is not found, you access ${c.req.path}`)
},
})
)
```
### `precompressed`
`precompressed` 选项检查具有 `.br` 或 `.gz` 等扩展名的文件是否可用,并根据 `Accept-Encoding` header 提供它们。它优先考虑 Brotli,然后是 Zstd 和 Gzip。如果都不可用,则提供原始文件。
```ts
app.get(
'/static/*',
serveStatic({
precompressed: true,
})
)
```
## Deno Deploy
Deno Deploy 是一个用于在云中运行 JavaScript 和 TypeScript 应用程序的无服务器平台。它通过 GitHub 部署等集成为部署和运行应用程序提供管理平面。
Hono 也可以在 Deno Deploy 上运行。请参考 [官方文档](https://docs.deno.com/deploy/manual/)。
## Testing
在 Deno 上测试应用程序很容易。你可以使用 `Deno.test` 编写,并使用 [@std/assert](https://jsr.io/@std/assert) 中的 `assert` 或 `assertEquals`。
```sh
deno add jsr:@std/assert
```
```ts [hello.ts]
import { Hono } from 'hono'
import { assertEquals } from '@std/assert'
Deno.test('Hello World', async () => {
const app = new Hono()
app.get('/', (c) => c.text('Please test me'))
const res = await app.request('http://localhost/')
assertEquals(res.status, 200)
})
```
然后运行命令:
```sh
deno test hello.ts
```
## npm and JSR
Hono 在 [npm](https://www.npmjs.com/package/hono) 和 [JSR](https://jsr.io/@hono/hono)(JavaScript Registry)上都可用。你可以在 `deno.json` 中使用 `npm:hono` 或 `jsr:@hono/hono`:
```json
{
"imports": {
"hono": "jsr:@hono/hono" // [!code --]
"hono": "npm:hono" // [!code ++]
}
}
```
要使用中间件,你需要在导入中使用 [Deno directory](https://docs.deno.com/runtime/fundamentals/configuration/#custom-path-mappings) 语法。
```json
{
"imports": {
"hono/": "npm:/hono/"
}
}
```
当使用第三方中间件时,你可能需要使用与中间件相同 registry 的 Hono 以获得正确的 TypeScript 类型推断。例如,如果使用 npm 的中间件,你也应该使用 npm 的 Hono:
```json
{
"imports": {
"hono": "npm:hono",
"zod": "npm:zod",
"@hono/zod-validator": "npm:@hono/zod-validator"
}
}
```
我们还在 [JSR](https://jsr.io/@hono) 上提供许多第三方中间件包。当使用 JSR 上的中间件时,使用 JSR 的 Hono:
```json
{
"imports": {
"hono": "jsr:@hono/hono",
"zod": "npm:zod",
"@hono/zod-validator": "jsr:@hono/zod-validator"
}
}
```
# Fastly Compute
[Fastly Compute](https://www.fastly.com/products/edge-compute) 是一个先进的边缘计算系统,可以在 Fastly 的全球边缘网络上用你喜欢的语言运行你的代码。Hono 也可以在 Fastly Compute 上运行。
你可以使用 [Fastly CLI](https://www.fastly.com/documentation/reference/tools/cli/) 在本地开发应用程序并通过几个命令发布它,该 CLI 作为 template 的一部分自动本地安装。
## 1. Setup
Fastly Compute 有一个 starter。使用 "create-hono" 命令开始你的项目。为此示例选择 `fastly` template。
::: code-group
```sh [npm]
npm create hono@latest my-app
```
```sh [yarn]
yarn create hono my-app
```
```sh [pnpm]
pnpm create hono my-app
```
```sh [bun]
bun create hono@latest my-app
```
```sh [deno]
deno init --npm hono my-app
```
:::
进入 `my-app` 并安装依赖项。
::: code-group
```sh [npm]
cd my-app
npm i
```
```sh [yarn]
cd my-app
yarn
```
```sh [pnpm]
cd my-app
pnpm i
```
```sh [bun]
cd my-app
bun i
```
:::
## 2. Hello World
编辑 `src/index.ts`:
```ts
// src/index.ts
import { Hono } from 'hono'
import { fire } from '@fastly/hono-fastly-compute'
const app = new Hono()
app.get('/', (c) => c.text('Hello Fastly!'))
fire(app)
```
> [!NOTE]
> 当在应用程序的顶层使用 `@fastly/hono-fastly-compute'` 的 `fire`(或 `buildFire()`)时,适合使用 `'hono'` 的 `Hono` 而不是 `'hono/quick'`,因为 `fire` 会导致其 router 在应用程序初始化阶段构建其内部数据。
## 3. Run
在本地运行开发服务器。然后在 Web 浏览器中访问 `http://localhost:7676`。
::: code-group
```sh [npm]
npm run start
```
```sh [yarn]
yarn start
```
```sh [pnpm]
pnpm run start
```
```sh [bun]
bun run start
```
:::
## 4. Deploy
要构建并部署你的应用程序到你的 Fastly 账户,输入以下命令。第一次部署应用程序时,系统会提示你在账户中创建新服务。
如果你还没有账户,你必须 [创建你的 Fastly 账户](https://www.fastly.com/signup/)。
::: code-group
```sh [npm]
npm run deploy
```
```sh [yarn]
yarn deploy
```
```sh [pnpm]
pnpm run deploy
```
```sh [bun]
bun run deploy
```
:::
## Bindings
在 Fastly Compute 中,你可以绑定 Fastly 平台资源,如 KV Stores、Config Stores、Secret Stores、Backends、Access Control Lists、Named Log Streams 和 Environment Variables。你可以通过 `c.env` 访问它们,并将拥有它们各自的 SDK 类型。
要使用这些 bindings,从 `@fastly/hono-fastly-compute` 导入 `buildFire` 而不是 `fire`。定义你的 [bindings](https://github.com/fastly/compute-js-context?tab=readme-ov-file#typed-bindings-with-buildcontextproxy) 并将它们传递给 [`buildFire()`](https://github.com/fastly/hono-fastly-compute?tab=readme-ov-file#basic-example) 以获取 `fire`。然后使用 `fire.Bindings` 定义你的 `Env` 类型来构建 `Hono`。
```ts
// src/index.ts
import { buildFire } from '@fastly/hono-fastly-compute'
const fire = buildFire({
siteData: 'KVStore:site-data', // 我有一个名为 "site-data" 的 KV Store
})
const app = new Hono<{ Bindings: typeof fire.Bindings }>()
app.put('/upload/:key', async (c, next) => {
// 例如,访问 KV Store
const key = c.req.param('key')
await c.env.siteData.put(key, c.req.body)
return c.text(`Put ${key} successfully!`)
})
fire(app)
```
# Google Cloud Run
[Google Cloud Run](https://cloud.google.com/run) 是由 Google Cloud 构建的无服务器平台。你可以在响应事件时运行代码,Google 会自动为你管理底层计算资源。
Google Cloud Run 使用容器来运行你的服务。这意味着你可以通过提供 Dockerfile 来使用任何你喜欢的 runtime(例如,Deno 或 Bun)。如果未提供 Dockerfile,Google Cloud Run 将使用默认的 Node.js buildpack。
本指南假设你已经拥有 Google Cloud 账户和计费账户。
## 1. Install the CLI
当使用 Google Cloud Platform 时,使用 [gcloud CLI](https://cloud.google.com/sdk/docs/install) 最简单。
例如,在 MacOS 上使用 Homebrew:
```sh
brew install --cask gcloud-cli
```
使用 CLI 进行身份验证。
```sh
gcloud auth login
```
## 2. Project setup
创建项目。在提示符处接受自动生成的项目 ID。
```sh
gcloud projects create --set-as-default --name="my app"
```
为你的项目 ID 和项目号创建环境变量以便于重复使用。可能需要约 30 秒后项目才能通过 `gcloud projects list` 命令成功返回。
```sh
PROJECT_ID=$(gcloud projects list \
--format='value(projectId)' \
--filter='name="my app"')
PROJECT_NUMBER=$(gcloud projects list \
--format='value(projectNumber)' \
--filter='name="my app"')
echo $PROJECT_ID $PROJECT_NUMBER
```
查找你的计费账户 ID。
```sh
gcloud billing accounts list
```
将之前命令中的计费账户添加到项目。
```sh
gcloud billing projects link $PROJECT_ID \
--billing-account=[billing_account_id]
```
启用所需的 APIs。
```sh
gcloud services enable run.googleapis.com \
cloudbuild.googleapis.com
```
更新服务账户权限以访问 Cloud Build。
```sh
gcloud projects add-iam-policy-binding $PROJECT_ID \
--member=serviceAccount:$PROJECT_NUMBER-compute@developer.gserviceaccount.com \
--role=roles/run.builder
```
## 3. Hello World
使用 "create-hono" 命令开始你的项目。选择 `nodejs`。
```sh
npm create hono@latest my-app
```
进入 `my-app` 并安装依赖项。
```sh
cd my-app
npm i
```
将 `src/index.ts` 中的端口更新为 `8080`。
```ts
import { serve } from '@hono/node-server'
import { Hono } from 'hono'
const app = new Hono()
app.get('/', (c) => {
return c.text('Hello Hono!')
})
serve({
fetch: app.fetch,
port: 3000 // [!code --]
port: 8080 // [!code ++]
}, (info) => {
console.log(`Server is running on http://localhost:${info.port}`)
})
```
在本地运行开发服务器。然后在 Web 浏览器中访问 http://localhost:8080。
```sh
npm run dev
```
## 4. Deploy
开始部署并按照交互式提示操作(例如,选择一个 region)。
```sh
gcloud run deploy my-app --source . --allow-unauthenticated
```
## Changing runtimes
如果你想使用 Deno 或 Bun runtimes(或定制的 Nodejs 容器)进行部署,添加一个 `Dockerfile`(可选 `.dockerignore`)与你所需的环境。
有关容器化的信息,请参考:
- [Node.js](/docs/getting-started/nodejs#building-deployment)
- [Bun](https://bun.com/guides/ecosystem/docker)
- [Deno](https://docs.deno.com/examples/google_cloud_run_tutorial)
# Lambda@Edge
[Lambda@Edge](https://aws.amazon.com/lambda/edge/) 是 Amazon Web Services 的无服务器平台。它允许你在 Amazon CloudFront 的边缘位置运行 Lambda 函数,使你能够自定义 HTTP 请求/响应的行为。
Hono 支持 Node.js 18+ 环境的 Lambda@Edge。
## 1. Setup
在 Lambda@Edge 上创建应用程序时,使用 [CDK](https://docs.aws.amazon.com/serverless-application-model/latest/developerguide/serverless-cdk.html) 来设置 CloudFront、IAM Role、API Gateway 等功能很有用。
使用 `cdk` CLI 初始化项目。
::: code-group
```sh [npm]
mkdir my-app
cd my-app
cdk init app -l typescript
npm i hono
mkdir lambda
```
```sh [yarn]
mkdir my-app
cd my-app
cdk init app -l typescript
yarn add hono
mkdir lambda
```
```sh [pnpm]
mkdir my-app
cd my-app
cdk init app -l typescript
pnpm add hono
mkdir lambda
```
```sh [bun]
mkdir my-app
cd my-app
cdk init app -l typescript
bun add hono
mkdir lambda
```
:::
## 2. Hello World
编辑 `lambda/index_edge.ts`。
```ts
import { Hono } from 'hono'
import { handle } from 'hono/lambda-edge'
const app = new Hono()
app.get('/', (c) => c.text('Hello Hono on Lambda@Edge!'))
export const handler = handle(app)
```
## 3. Deploy
编辑 `bin/my-app.ts`。
```ts
#!/usr/bin/env node
import 'source-map-support/register'
import * as cdk from 'aws-cdk-lib'
import { MyAppStack } from '../lib/my-app-stack'
const app = new cdk.App()
new MyAppStack(app, 'MyAppStack', {
env: {
account: process.env.CDK_DEFAULT_ACCOUNT,
region: 'us-east-1',
},
})
```
编辑 `lambda/cdk-stack.ts`。
```ts
import { Construct } from 'constructs'
import * as cdk from 'aws-cdk-lib'
import * as cloudfront from 'aws-cdk-lib/aws-cloudfront'
import * as origins from 'aws-cdk-lib/aws-cloudfront-origins'
import * as lambda from 'aws-cdk-lib/aws-lambda'
import { NodejsFunction } from 'aws-cdk-lib/aws-lambda-nodejs'
import * as s3 from 'aws-cdk-lib/aws-s3'
export class MyAppStack extends cdk.Stack {
public readonly edgeFn: lambda.Function
constructor(scope: Construct, id: string, props?: cdk.StackProps) {
super(scope, id, props)
const edgeFn = new NodejsFunction(this, 'edgeViewer', {
entry: 'lambda/index_edge.ts',
handler: 'handler',
runtime: lambda.Runtime.NODEJS_20_X,
})
// Upload any html
const originBucket = new s3.Bucket(this, 'originBucket')
new cloudfront.Distribution(this, 'Cdn', {
defaultBehavior: {
origin: new origins.S3Origin(originBucket),
edgeLambdas: [
{
functionVersion: edgeFn.currentVersion,
eventType: cloudfront.LambdaEdgeEventType.VIEWER_REQUEST,
},
],
},
})
}
}
```
最后,运行命令部署:
```sh
cdk deploy
```
## Callback
如果你想添加 Basic Auth 并在验证后继续处理请求,可以使用 `c.env.callback()`
```ts
import { Hono } from 'hono'
import { basicAuth } from 'hono/basic-auth'
import type { Callback, CloudFrontRequest } from 'hono/lambda-edge'
import { handle } from 'hono/lambda-edge'
type Bindings = {
callback: Callback
request: CloudFrontRequest
}
const app = new Hono<{ Bindings: Bindings }>()
app.get(
'*',
basicAuth({
username: 'hono',
password: 'acoolproject',
})
)
app.get('/', async (c, next) => {
await next()
c.env.callback(null, c.env.request)
})
export const handler = handle(app)
```
# Netlify
Netlify 提供静态站点托管和无服务器后端服务。[Edge Functions](https://docs.netlify.com/edge-functions/overview/) 使我们能够使网页动态化。
Edge Functions 支持用 Deno 和 TypeScript 编写,通过 [Netlify CLI](https://docs.netlify.com/cli/get-started/) 轻松完成部署。使用 Hono,你可以为 Netlify Edge Functions 创建应用程序。
## 1. Setup
Netlify 有一个 starter。使用 "create-hono" 命令开始你的项目。为此示例选择 `netlify` template。
::: code-group
```sh [npm]
npm create hono@latest my-app
```
```sh [yarn]
yarn create hono my-app
```
```sh [pnpm]
pnpm create hono my-app
```
```sh [bun]
bun create hono@latest my-app
```
```sh [deno]
deno init --npm hono my-app
```
:::
进入 `my-app`。
## 2. Hello World
编辑 `netlify/edge-functions/index.ts`:
```ts
import { Hono } from 'jsr:@hono/hono'
import { handle } from 'jsr:@hono/hono/netlify'
const app = new Hono()
app.get('/', (c) => {
return c.text('Hello Hono!')
})
export default handle(app)
```
## 3. Run
使用 Netlify CLI 运行开发服务器。然后在 Web 浏览器中访问 `http://localhost:8888`。
```sh
netlify dev
```
## 4. Deploy
你可以使用 `netlify deploy` 命令部署。
```sh
netlify deploy --prod
```
## `Context`
你可以通过 `c.env` 访问 Netlify 的 `Context`:
```ts
import { Hono } from 'jsr:@hono/hono'
import { handle } from 'jsr:@hono/hono/netlify'
// 导入类型定义
import type { Context } from 'https://edge.netlify.com/'
export type Env = {
Bindings: {
context: Context
}
}
const app = new Hono()
app.get('/country', (c) =>
c.json({
'You are in': c.env.context.geo.country?.name,
})
)
export default handle(app)
```
# Next.js
Next.js 是一个灵活的 React 框架,为你提供构建快速 web 应用程序的构建块。
当使用 Node.js runtime 时,你可以在 Next.js 上运行 Hono。在 Vercel 上,使用 Vercel Functions 可以轻松部署带有 Hono 的 Next.js。
## 1. Setup
Next.js 有一个 starter。使用 "create-hono" 命令开始你的项目。为此示例选择 `nextjs` template。
::: code-group
```sh [npm]
npm create hono@latest my-app
```
```sh [yarn]
yarn create hono my-app
```
```sh [pnpm]
pnpm create hono my-app
```
```sh [bun]
bun create hono@latest my-app
```
```sh [deno]
deno init --npm hono my-app
```
:::
进入 `my-app` 并安装依赖项。
::: code-group
```sh [npm]
cd my-app
npm i
```
```sh [yarn]
cd my-app
yarn
```
```sh [pnpm]
cd my-app
pnpm i
```
```sh [bun]
cd my-app
bun i
```
:::
## 2. Hello World
如果你使用 App Router,编辑 `app/api/[[...route]]/route.ts`。更多信息参考 [Supported HTTP Methods](https://nextjs.org/docs/app/building-your-application/routing/route-handlers#supported-http-methods) 部分。
```ts
import { Hono } from 'hono'
import { handle } from 'hono/vercel'
const app = new Hono().basePath('/api')
app.get('/hello', (c) => {
return c.json({
message: 'Hello Next.js!',
})
})
export const GET = handle(app)
export const POST = handle(app)
```
## 3. Run
在本地运行开发服务器。然后在 Web 浏览器中访问 `http://localhost:3000`。
::: code-group
```sh [npm]
npm run dev
```
```sh [yarn]
yarn dev
```
```sh [pnpm]
pnpm dev
```
```sh [bun]
bun run dev
```
:::
现在,`/api/hello` 只返回 JSON,但如果你构建 React UIs,你可以用 Hono 创建全栈应用程序。
## 4. Deploy
如果你有 Vercel 账户,你可以通过链接 Git 仓库进行部署。
## Pages Router
如果你使用 Pages Router,你需要首先安装 Node.js adapter。
::: code-group
```sh [npm]
npm i @hono/node-server
```
```sh [yarn]
yarn add @hono/node-server
```
```sh [pnpm]
pnpm add @hono/node-server
```
```sh [bun]
bun add @hono/node-server
```
:::
然后,你可以在 `pages/api/[[...route]].ts` 中使用从 `@hono/node-server/vercel` 导入的 `handle` 函数。
```ts
import { Hono } from 'hono'
import { handle } from '@hono/node-server/vercel'
import type { PageConfig } from 'next'
export const config: PageConfig = {
api: {
bodyParser: false,
},
}
const app = new Hono().basePath('/api')
app.get('/hello', (c) => {
return c.json({
message: 'Hello Next.js!',
})
})
export default handle(app)
```
为了使其与 Pages Router 一起工作,重要的是通过在你的项目 dashboard 或 `.env` 文件中设置环境变量来禁用 Vercel Node.js helpers。
```text
NODEJS_HELPERS=0
```
# Node.js
[Node.js](https://nodejs.org/) 是一个开源、跨平台的 JavaScript runtime 环境。
Hono 最初不是为 Node.js 设计的,但使用 [Node.js Adapter](https://github.com/honojs/node-server),它也可以在 Node.js 上运行。
::: info
它在大于 18.x 的 Node.js 版本上运行。具体的 Node.js 版本要求如下:
- 18.x => 18.14.1+
- 19.x => 19.7.0+
- 20.x => 20.0.0+
基本上,你可以简单地使用每个主要版本的最新版本。
:::
## 1. Setup
Node.js 有一个 starter。使用 "create-hono" 命令开始你的项目。为此示例选择 `nodejs` template。
::: code-group
```sh [npm]
npm create hono@latest my-app
```
```sh [yarn]
yarn create hono my-app
```
```sh [pnpm]
pnpm create hono my-app
```
```sh [bun]
bun create hono@latest my-app
```
```sh [deno]
deno init --npm hono my-app
```
:::
进入 `my-app` 并安装依赖项。
::: code-group
```sh [npm]
cd my-app
npm i
```
```sh [yarn]
cd my-app
yarn
```
```sh [pnpm]
cd my-app
pnpm i
```
```sh [bun]
cd my-app
bun i
```
:::
## 2. Hello World
编辑 `src/index.ts`:
```ts
import { serve } from '@hono/node-server'
import { Hono } from 'hono'
const app = new Hono()
app.get('/', (c) => c.text('Hello Node.js!'))
serve(app)
```
如果你想优雅地关闭服务器,这样写:
```ts
const server = serve(app)
// 优雅关闭
process.on('SIGINT', () => {
server.close()
process.exit(0)
})
process.on('SIGTERM', () => {
server.close((err) => {
if (err) {
console.error(err)
process.exit(1)
}
process.exit(0)
})
})
```
## 3. Run
在本地运行开发服务器。然后在 Web 浏览器中访问 `http://localhost:3000`。
::: code-group
```sh [npm]
npm run dev
```
```sh [yarn]
yarn dev
```
```sh [pnpm]
pnpm dev
```
:::
## Change port number
你可以使用 `port` 选项指定端口号。
```ts
serve({
fetch: app.fetch,
port: 8787,
})
```
## Access the raw Node.js APIs
你可以从 `c.env.incoming` 和 `c.env.outgoing` 访问 Node.js APIs。
```ts
import { Hono } from 'hono'
import { serve, type HttpBindings } from '@hono/node-server'
// 如果你使用 HTTP2,使用 `Http2Bindings`
type Bindings = HttpBindings & {
/* ... */
}
const app = new Hono<{ Bindings: Bindings }>()
app.get('/', (c) => {
return c.json({
remoteAddress: c.env.incoming.socket.remoteAddress,
})
})
serve(app)
```
## Serve static files
你可以使用 `serveStatic` 从本地文件系统提供静态文件。例如,假设目录结构如下:
```sh
./
├── favicon.ico
├── index.ts
└── static
├── hello.txt
└── image.png
```
如果请求路径 `/static/*` 到来,你想返回 `./static` 下的文件,你可以这样写:
```ts
import { serveStatic } from '@hono/node-server/serve-static'
app.use('/static/*', serveStatic({ root: './' }))
```
::: warning
`root` 选项相对于当前工作目录(`process.cwd()`)解析路径。这意味着行为取决于**你从何处运行 Node.js 进程**,而不是你的源文件位于何处。如果你从不同的目录启动服务器,文件解析可能会失败。
为了可靠的路径解析,始终指向与源文件相同的目录,使用 `import.meta.url`:
```ts
import { fileURLToPath } from 'node:url'
import { serveStatic } from '@hono/node-server/serve-static'
app.use(
'/static/*',
serveStatic({ root: fileURLToPath(new URL('./', import.meta.url)) })
)
```
:::
使用 `path` 选项来提供目录根目录中的 `favicon.ico`:
```ts
app.use('/favicon.ico', serveStatic({ path: './favicon.ico' }))
```
如果请求路径 `/hello.txt` 或 `/image.png` 到来,你想返回 `./static/hello.txt` 或 `./static/image.png` 文件,你可以使用以下:
```ts
app.use('*', serveStatic({ root: './static' }))
```
### `rewriteRequestPath`
如果你想将 `http://localhost:3000/static/*` 映射到 `./statics`,可以使用 `rewriteRequestPath` 选项:
```ts
app.get(
'/static/*',
serveStatic({
root: './',
rewriteRequestPath: (path) =>
path.replace(/^\/static/, '/statics'),
})
)
```
## http2
你可以在 [Node.js http2 Server](https://nodejs.org/api/http2.html) 上运行 hono。
### unencrypted http2
```ts
import { createServer } from 'node:http2'
const server = serve({
fetch: app.fetch,
createServer,
})
```
### encrypted http2
```ts
import { createSecureServer } from 'node:http2'
import { readFileSync } from 'node:fs'
const server = serve({
fetch: app.fetch,
createServer: createSecureServer,
serverOptions: {
key: readFileSync('localhost-privkey.pem'),
cert: readFileSync('localhost-cert.pem'),
},
})
```
## Building & Deployment
::: code-group
```sh [npm]
npm run build
```
```sh [yarn]
yarn run build
```
```sh [pnpm]
pnpm run build
```
```sh [bun]
bun run build
```
::: info
带有前端框架的应用程序可能需要使用 [Hono's Vite plugins](https://github.com/honojs/vite-plugins)。
:::
### Dockerfile
以下是 Node.js Dockerfile 示例。
```Dockerfile
FROM node:22-alpine AS base
FROM base AS builder
RUN apk add --no-cache gcompat
WORKDIR /app
COPY package*json tsconfig.json src ./
RUN npm ci && \
npm run build && \
npm prune --production
FROM base AS runner
WORKDIR /app
RUN addgroup --system --gid 1001 nodejs
RUN adduser --system --uid 1001 hono
COPY --from=builder --chown=hono:nodejs /app/node_modules /app/node_modules
COPY --from=builder --chown=hono:nodejs /app/dist /app/dist
COPY --from=builder --chown=hono:nodejs /app/package.json /app/package.json
USER hono
EXPOSE 3000
CMD ["node", "/app/dist/index.js"]
```
# Service Worker
[Service Worker](https://developer.mozilla.org/en-US/docs/Web/API/Service_Worker_API) 是一个在浏览器后台运行的脚本,处理缓存和推送通知等任务。使用 Service Worker adapter,你可以在浏览器内作为 [FetchEvent](https://developer.mozilla.org/en-US/docs/Web/API/FetchEvent) 处理器运行用 Hono 制作的应用程序。
本页面展示使用 [Vite](https://vitejs.dev/) 创建项目的示例。
## 1. Setup
首先,创建并进入你的项目目录:
```sh
mkdir my-app
cd my-app
```
创建项目所需的文件。使用以下内容创建 `package.json` 文件:
```json
{
"name": "my-app",
"private": true,
"scripts": {
"dev": "vite dev"
},
"type": "module"
}
```
同样,使用以下内容创建 `tsconfig.json` 文件:
```json
{
"compilerOptions": {
"target": "ES2020",
"module": "ESNext",
"lib": ["ES2020", "DOM", "WebWorker"],
"moduleResolution": "bundler"
},
"include": ["./"],
"exclude": ["node_modules"]
}
```
接下来,安装必要的模块。
::: code-group
```sh [npm]
npm i hono
npm i -D vite
```
```sh [yarn]
yarn add hono
yarn add -D vite
```
```sh [pnpm]
pnpm add hono
pnpm add -D vite
```
```sh [bun]
bun add hono
bun add -D vite
```
:::
## 2. Hello World
编辑 `index.html`:
```html
Hello World by Service Worker
```
`main.ts` 是注册 Service Worker 的脚本:
```ts
function register() {
navigator.serviceWorker
.register('/sw.ts', { scope: '/sw', type: 'module' })
.then(
function (_registration) {
console.log('Register Service Worker: Success')
},
function (_error) {
console.log('Register Service Worker: Error')
}
)
}
function start() {
navigator.serviceWorker
.getRegistrations()
.then(function (registrations) {
for (const registration of registrations) {
console.log('Unregister Service Worker')
registration.unregister()
}
register()
})
}
start()
```
在 `sw.ts` 中,使用 Hono 创建应用程序,并使用 Service Worker adapter 的 `handle` 函数将其注册到 `fetch` 事件。这允许 Hono 应用程序拦截对 `/sw` 的访问。
```ts
// 支持类型
// https://github.com/microsoft/TypeScript/issues/14877
declare const self: ServiceWorkerGlobalScope
import { Hono } from 'hono'
import { handle } from 'hono/service-worker'
const app = new Hono().basePath('/sw')
app.get('/', (c) => c.text('Hello World'))
self.addEventListener('fetch', handle(app))
```
### Using `fire()`
`fire()` 函数自动为你调用 `addEventListener('fetch', handle(app))`,使代码更简洁。
```ts
import { Hono } from 'hono'
import { fire } from 'hono/service-worker'
const app = new Hono().basePath('/sw')
app.get('/', (c) => c.text('Hello World'))
fire(app)
```
## 3. Run
启动开发服务器。
::: code-group
```sh [npm]
npm run dev
```
```sh [yarn]
yarn dev
```
```sh [pnpm]
pnpm run dev
```
```sh [bun]
bun run dev
```
:::
默认情况下,开发服务器将在端口 `5173` 上运行。在浏览器中访问 `http://localhost:5173/` 完成 Service Worker 注册。然后,访问 `/sw` 查看来自 Hono 应用程序的响应。
# Supabase Edge Functions
[Supabase](https://supabase.com/) 是 Firebase 的开源替代方案,提供类似 Firebase 功能的一系列工具,包括数据库、身份验证、存储,现在还有无服务器函数。
Supabase Edge Functions 是服务器端 TypeScript 函数,全球分布,在离用户更近的地方运行以提高性能。这些函数使用 [Deno](https://deno.com/) 开发,带来了多种好处,包括改进的安全性和现代 JavaScript/TypeScript runtime。
以下是如何开始使用 Supabase Edge Functions:
## 1. Setup
### Prerequisites
在开始之前,请确保已安装 Supabase CLI。如果尚未安装,请按照 [官方文档](https://supabase.com/docs/guides/cli/getting-started) 中的说明操作。
### Creating a New Project
1. 打开终端或命令提示符。
2. 通过运行以下命令在本地机器上的目录中创建新的 Supabase 项目:
```bash
supabase init
```
此命令在当前目录中初始化新的 Supabase 项目。
### Adding an Edge Function
3. 在 Supabase 项目内,创建名为 `hello-world` 的新 Edge Function:
```bash
supabase functions new hello-world
```
此命令在项目中创建指定名称的新 Edge Function。
## 2. Hello World
通过修改文件 `supabase/functions/hello-world/index.ts` 编辑 `hello-world` 函数:
```ts
import { Hono } from 'jsr:@hono/hono'
// 更改为你的函数名称
const functionName = 'hello-world'
const app = new Hono().basePath(`/${functionName}`)
app.get('/hello', (c) => c.text('Hello from hono-server!'))
Deno.serve(app.fetch)
```
## 3. Run
要本地运行函数,使用以下命令:
1. 使用以下命令提供函数:
```bash
supabase start # 启动 supabase stack
supabase functions serve --no-verify-jwt # 启动 Functions 监视器
```
`--no-verify-jwt` 标志允许你在本地开发期间绕过 JWT 验证。
2. 使用 cURL 或 Postman 向 `http://127.0.0.1:54321/functions/v1/hello-world/hello` 发出 GET 请求:
```bash
curl --location 'http://127.0.0.1:54321/functions/v1/hello-world/hello'
```
此请求应返回文本 "Hello from hono-server!"。
## 4. Deploy
你可以使用单个命令部署 Supabase 中的所有 Edge Functions:
```bash
supabase functions deploy
```
或者,你可以通过在 deploy 命令中指定函数名称来部署单个 Edge Functions:
```bash
supabase functions deploy hello-world
```
有关更多部署方法,请访问 Supabase 文档的 [Deploying to Production](https://supabase.com/docs/guides/functions/deploy)。
# Vercel
Vercel 是 AI 云,提供开发者工具和云基础设施来构建、扩展和保护更快、更个性化的 web。
Hono 可以零配置部署到 Vercel。
## 1. Setup
Vercel 有一个 starter。使用 "create-hono" 命令开始你的项目。为此示例选择 `vercel` template。
::: code-group
```sh [npm]
npm create hono@latest my-app
```
```sh [yarn]
yarn create hono my-app
```
```sh [pnpm]
pnpm create hono my-app
```
```sh [bun]
bun create hono@latest my-app
```
```sh [deno]
deno init --npm hono my-app
```
:::
进入 `my-app` 并安装依赖项。
::: code-group
```sh [npm]
cd my-app
npm i
```
```sh [yarn]
cd my-app
yarn
```
```sh [pnpm]
cd my-app
pnpm i
```
```sh [bun]
cd my-app
bun i
```
:::
我们将在下一步使用 Vercel CLI 在本地处理应用程序。如果尚未安装,请按照 [Vercel CLI 文档](https://vercel.com/docs/cli) 全局安装它。
## 2. Hello World
在你的项目的 `index.ts` 或 `src/index.ts` 中,将 Hono 应用程序导出为默认导出。
```ts
import { Hono } from 'hono'
const app = new Hono()
const welcomeStrings = [
'Hello Hono!',
'To learn more about Hono on Vercel, visit https://vercel.com/docs/frameworks/backend/hono',
]
app.get('/', (c) => {
return c.text(welcomeStrings.join('\n\n'))
})
export default app
```
如果你使用 `vercel` template 开始,这已经为你设置好了。
## 3. Run
要在本地运行开发服务器:
```sh
vercel dev
```
访问 `localhost:3000` 将返回文本响应。
## 4. Deploy
使用 `vc deploy` 部署到 Vercel。
```sh
vercel deploy
```
## Further reading
[在 Vercel 文档中了解更多关于 Hono 的信息](https://vercel.com/docs/frameworks/backend/hono)。
# WebAssembly (w/ WASI)
[WebAssembly][wasm-core] 是一个安全、沙盒化、可移植的 runtime,在 web 浏览器内外运行。
实际上:
- 语言(如 JavaScript)_编译为_ WebAssembly(`.wasm` 文件)
- WebAssembly runtimes(如 [`wasmtime`][wasmtime] 或 [`jco`][jco])启用_运行_ WebAssembly 二进制文件
虽然核心 WebAssembly _无法_ 访问本地文件系统或套接字等,但 [WebAssembly System Interface][wasi] 介入以在 WebAssembly 工作负载下定义平台。
这意味着使用 WASI,WebAssembly 可以操作文件、套接字等更多内容。
::: info
想自己查看 WASI 接口?查看 [`wasi:http`][wasi-http]
:::
JS 中对 WebAssembly w/ WASI 的支持由 [StarlingMonkey][sm] 提供支持,得益于 StarlingMonkey 和 Hono 中对 Web standards 的关注,**Hono 可以在启用 WASI 的 WebAssembly 生态系统中开箱即用。**
[sm]: https://github.com/bytecodealliance/StarlingMonkey
[wasm-core]: https://webassembly.org/
[wasi]: https://wasi.dev/
[bca]: https://bytecodealliance.org/
[wasi-http]: https://github.com/WebAssembly/wasi-http
## 1. Setup
WebAssembly JS 生态系统提供工具来轻松开始构建启用 WASI 的 WebAssembly 组件:
- [StarlingMonkey][sm] 是 [SpiderMonkey][spidermonkey] 的分叉,编译为 WebAssembly 并启用组件
- [`componentize-js`][componentize-js] 将 JavaScript ES 模块转换为 WebAssembly 组件
- [`jco`][jco] 是一个多工具,构建组件、生成类型并在 Node.js 或浏览器等环境中运行组件
::: info
WebAssembly 有一个开放的生态系统并且是开源的,核心项目主要由 [Bytecode Alliance][bca] 及其成员管理。
新功能、问题、pull requests 和其他类型的贡献总是受欢迎的。
:::
虽然 Hono on WebAssembly 的 starter 还不可用,但你可以像其他任何项目一样启动 WebAssembly Hono 项目:
::: code-group
```sh [npm]
mkdir my-app
cd my-app
npm init
npm i hono
npm i -D @bytecodealliance/jco @bytecodealliance/componentize-js @bytecodealliance/jco-std
npm i -D rolldown
```
````sh [yarn]
mkdir my-app
cd my-app
npm init
yarn add hono
yarn add -D @bytecodealliance/jco @bytecodealliance/componentize-js @bytecodealliance/jco-std
yarn add -D rolldown
G```
```sh [pnpm]
mkdir my-app
cd my-app
pnpm init --init-type module
pnpm add hono
pnpm add -D @bytecodealliance/jco @bytecodealliance/componentize-js @bytecodealliance/jco-std
pnpm add -D rolldown
````
```sh [bun]
mkdir my-app
cd my-app
npm init
bun add hono
bun add -D @bytecodealliance/jco @bytecodealliance/componentize-js @bytecodealliance/jco-std
```
:::
::: info
为确保你的项目使用 ES 模块,确保 `package.json` 中的 `type` 设置为 `"module"`
:::
进入 `my-app` 文件夹后,安装依赖项并初始化 TypeScript:
::: code-group
```sh [npm]
npm i
npx tsc --init
```
```sh [yarn]
yarn
yarn tsc --init
```
```sh [pnpm]
pnpm i
pnpm exec --init
```
```sh [bun]
bun i
```
:::
一旦有了基本的 TypeScript 配置文件(`tsconfig.json`),请确保它有以下配置:
- `compilerOptions.module` 设置为 `"nodenext"`
由于 `componentize-js`(以及重用它的 `jco`)仅支持单个 JS 文件,因此需要捆绑,所以可以使用 [`rolldown`][rolldown] 创建单个文件捆绑包。
可以使用以下 Rolldown 配置(`rolldown.config.mjs`):
```js
import { defineConfig } from 'rolldown'
export default defineConfig({
input: 'src/component.ts',
external: /wasi:.*/,
output: {
file: 'dist/component.js',
format: 'esm',
},
})
```
::: info
随意使用你更舒服的任何其他捆绑工具(`rolldown`、`esbuild`、`rollup` 等)
:::
[jco]: https://github.com/bytecodealliance/jco
[componentize-js]: https://github.com/bytecodealliance/componentize-js
[rolldown]: https://rolldown.rs
[spidermonkey]: https://spidermonkey.dev/
## 2. Set up WIT interface & dependencies
[WebAssembly Interface Types (WIT)][wit] 是一个接口定义语言("IDL"),规定了 WebAssembly 组件使用的功能("imports")和提供的功能("exports")。
在标准化的 WIT 接口中,[`wasi:http`][wasi-http] 用于处理 HTTP 请求(无论是接收还是发送),由于我们打算制作一个 web 服务器,我们的组件必须在其 [WIT world][wit-world] 中声明使用 `wasi:http/incoming-handler`:
首先,让我们在名为 `wit/component.wit` 的文件中设置组件的 WIT world:
```txt
package example:hono;
world component {
export wasi:http/incoming-handler@0.2.6;
}
```
简单来说,上面的 WIT 文件意味着我们的组件"提供""接收"/"处理传入"HTTP 请求的功能。
`wasi:http/incoming-handler` 接口依赖于上游标准化的 WIT 接口(关于请求结构等的规范)。
要拉取那些第三方(由 Bytecode Alliance 维护)的 WIT 接口,我们可以使用的一个工具是 [`wkg`][wkg]:
```sh
wkg wit fetch
```
一旦 `wkg` 运行完成,你应该会发现你的 `wit` 文件夹中除了 `component.wit` 之外还有一个新的 `deps` 文件夹:
```
wit
├── component.wit
└── deps
├── wasi-cli-0.2.6
│ └── package.wit
├── wasi-clocks-0.2.6
│ └── package.wit
├── wasi-http-0.2.6
│ └── package.wit
├── wasi-io-0.2.6
│ └── package.wit
└── wasi-random-0.2.6
└── package.wit
```
[wkg]: https://github.com/bytecodealliance/wasm-pkg-tools
[wit-world]: https://github.com/WebAssembly/component-model/blob/main/design/mvp/WIT.md#wit-worlds
[wit]: https://github.com/WebAssembly/component-model/blob/main/design/mvp/WIT.md
## 3. Hello Wasm
要在 WebAssembly 中构建 HTTP 服务器,我们可以利用 [`jco-std`][jco-std] 项目,它包含的 helpers 使体验与标准 Hono 体验非常相似。
让我们在名为 `src/component.ts` 的文件中用基本的 Hono 应用程序作为 WebAssembly 组件来实现我们的 `component` world:
```ts
import { Hono } from 'hono'
import { fire } from '@bytecodealliance/jco-std/wasi/0.2.6/http/adapters/hono/server'
const app = new Hono()
app.get('/hello', (c) => {
return c.json({ message: 'Hello from WebAssembly!' })
})
fire(app)
// 虽然我们上面已经使用 wasi HTTP 调用了 `fire()`,
// 但我们仍然需要实际导出 `wasi:http/incoming-handler` 接口对象,
// 因为 jco 和 componentize-js 将寻找匹配 WASI 接口的 ES 模块导出。
export { incomingHandler } from '@bytecodealliance/jco-std/wasi/0.2.6/http/adapters/hono/server'
```
## 4. Build
由于我们使用 Rolldown(并且它配置为处理 TypeScript 编译),我们可以使用它来构建和捆绑:
::: code-group
```sh [npm]
npx rolldown -c
```
```sh [yarn]
yarn rolldown -c
```
```sh [pnpm]
pnpm exec rolldown -c
```
```sh [bun]
bun build --target=bun --outfile=dist/component.js ./src/component.ts
```
:::
::: info
捆绑步骤是必要的,因为 WebAssembly JS 生态系统工具目前仅支持单个 JS 文件,我们想包含 Hono 以及相关库。
对于要求更简单的组件,捆绑器不是必需的。
:::
要构建你的 WebAssembly 组件,使用 `jco`(间接使用 `componentize-js`):
::: code-group
```sh [npm]
npx jco componentize -w wit -o dist/component.wasm dist/component.js
```
```sh [yarn]
yarn jco componentize -w wit -o dist/component.wasm dist/component.js
```
```sh [pnpm]
pnpm exec jco componentize -w wit -o dist/component.wasm dist/component.js
```
```sh [bun]
bun run jco componentize -w wit -o dist/component.wasm dist/component.js
```
:::
## 5. Run
要运行你的 Hono WebAssembly HTTP 服务器,你可以使用任何启用 WASI 的 WebAssembly runtime:
- [`wasmtime`][wasmtime]
- `jco`(在 Node.js 中运行)
在本指南中,我们将使用 `jco serve`,因为它已经安装。
::: warning
`jco serve` 用于开发,不推荐用于生产环境。
:::
[wasmtime]: https://wasmtime.dev
::: code-group
```sh [npm]
npx jco serve dist/component.wasm
```
```sh [yarn]
yarn jco serve dist/component.wasm
```
```sh [pnpm]
pnpm exec jco serve dist/component.wasm
```
```sh [bun]
bun run jco serve dist/component.wasm
```
:::
你应该看到如下输出:
```
$ npx jco serve dist/component.wasm
Server listening @ localhost:8000...
```
向 `localhost:8000/hello` 发送请求将产生你在 Hono 应用程序中指定的 JSON 输出。
你应该看到如下输出:
```json
{ "message": "Hello from WebAssembly!" }
```
::: info
`jco serve` 通过将 WebAssembly 组件转换为基本的 WebAssembly coremodule 来工作,以便它可以在 Node.js 和浏览器等 runtimes 中运行。
这个过程通常通过 `jco transpile` 运行,这是我们可以在 JS 引擎(如 Node.js 和浏览器,可能使用 V8 或其他 Javascript 引擎)作为 WebAssembly Component runtimes 的方式。
`jco transpile` 如何工作超出了本指南的范围,你可以在 [the Jco book][jco-book] 中阅读更多相关信息
:::
## More information
要了解更多关于 WASI、WebAssembly 组件等更多信息,请查看以下资源:
- [BytecodeAlliance Component Model book][cm-book]
- [`jco` codebase][jco]
- [`jco` example components][jco-example-components](特别是 [Hono example][jco-example-component-hono])
- [Jco book][jco-book]
- [`componentize-js` codebase][componentize-js]
- [StarlingMonkey codebase][sm]
要与 WebAssembly 社区联系,提出问题、评论、贡献或提交问题:
- [Bytecode Alliance Zulip](https://bytecodealliance.zulipchat.com)(考虑在 [#jco channel](https://bytecodealliance.zulipchat.com/#narrow/channel/409526-jco) 中发帖)
- [Jco repository](https://github.com/bytecodealliance/jco)
- [componentize-js repository](https://github.com/bytecodealliance/componentize-js)
[cm-book]: https://component-model.bytecodealliance.org/
[jco-book]: https://bytecodealliance.github.io/jco/
[jco-example-components]: https://github.com/bytecodealliance/jco/tree/main/examples/components
[jco-example-component-hono]: https://github.com/bytecodealliance/jco/tree/main/examples/components/http-server-hono
# Benchmarks
基准测试只是基准测试,但对我们来说很重要。
## Routers
我们测量了一堆 JavaScript routers 的速度。例如,`find-my-way` 是 Fastify 内部使用的非常快的 router。
- @medley/router
- find-my-way
- koa-tree-router
- trek-router
- express(包括处理)
- koa-router
首先,我们在每个 router 中注册了以下路由。这些类似于现实世界中使用的路由。
```ts twoslash
interface Route {
method: string
path: string
}
// ---cut---
export const routes: Route[] = [
{ method: 'GET', path: '/user' },
{ method: 'GET', path: '/user/comments' },
{ method: 'GET', path: '/user/avatar' },
{ method: 'GET', path: '/user/lookup/username/:username' },
{ method: 'GET', path: '/user/lookup/email/:address' },
{ method: 'GET', path: '/event/:id' },
{ method: 'GET', path: '/event/:id/comments' },
{ method: 'POST', path: '/event/:id/comment' },
{ method: 'GET', path: '/map/:location/events' },
{ method: 'GET', path: '/status' },
{ method: 'GET', path: '/very/deeply/nested/route/hello/there' },
{ method: 'GET', path: '/static/*' },
]
```
然后我们向以下端点发送请求。
```ts twoslash
interface Route {
method: string
path: string
}
// ---cut---
const routes: (Route & { name: string })[] = [
{
name: 'short static',
method: 'GET',
path: '/user',
},
{
name: 'static with same radix',
method: 'GET',
path: '/user/comments',
},
{
name: 'dynamic route',
method: 'GET',
path: '/user/lookup/username/hey',
},
{
name: 'mixed static dynamic',
method: 'GET',
path: '/event/abcd1234/comments',
},
{
name: 'post',
method: 'POST',
path: '/event/abcd1234/comment',
},
{
name: 'long static',
method: 'GET',
path: '/very/deeply/nested/route/hello/there',
},
{
name: 'wildcard',
method: 'GET',
path: '/static/index.html',
},
]
```
让我们看看结果。
### On Node.js
以下截图显示了在 Node.js 上的结果。
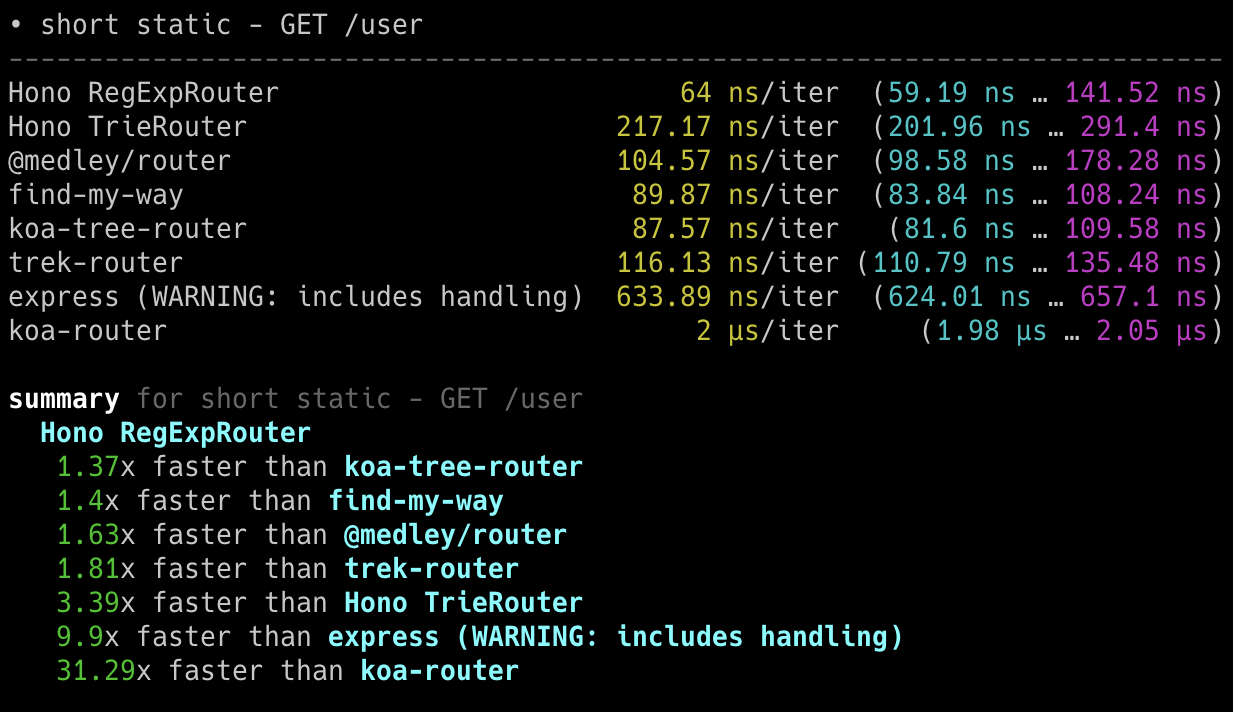
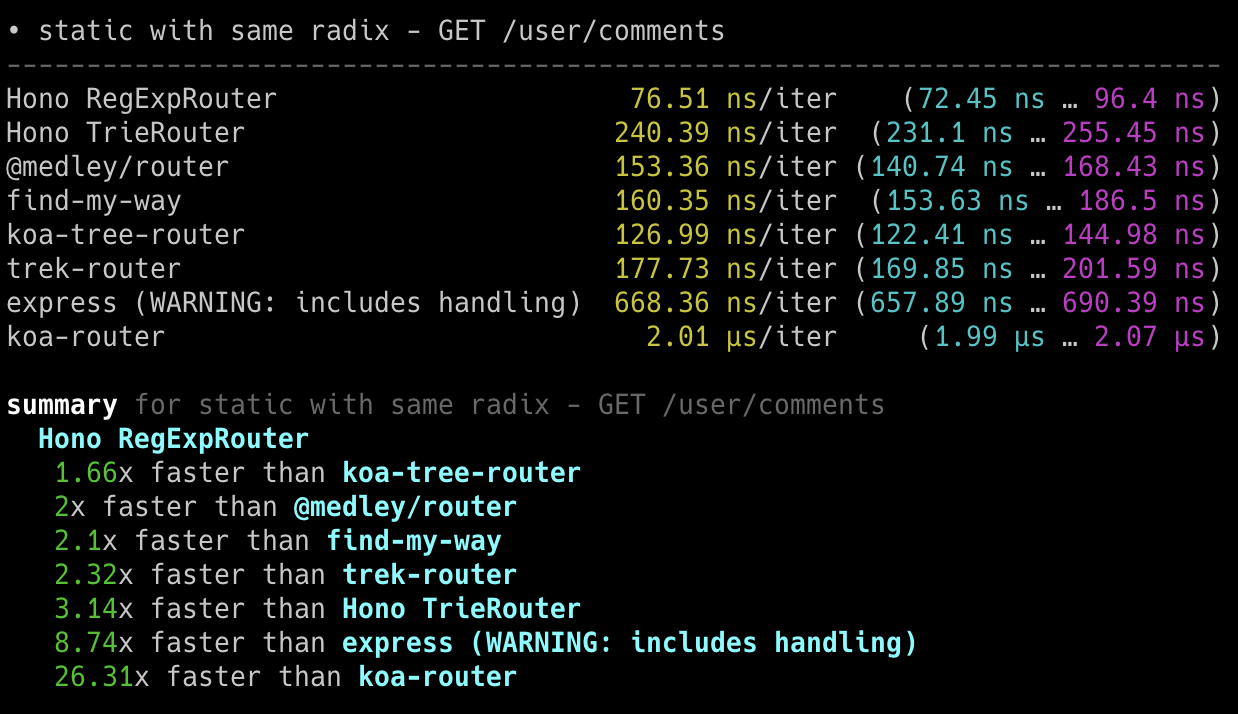
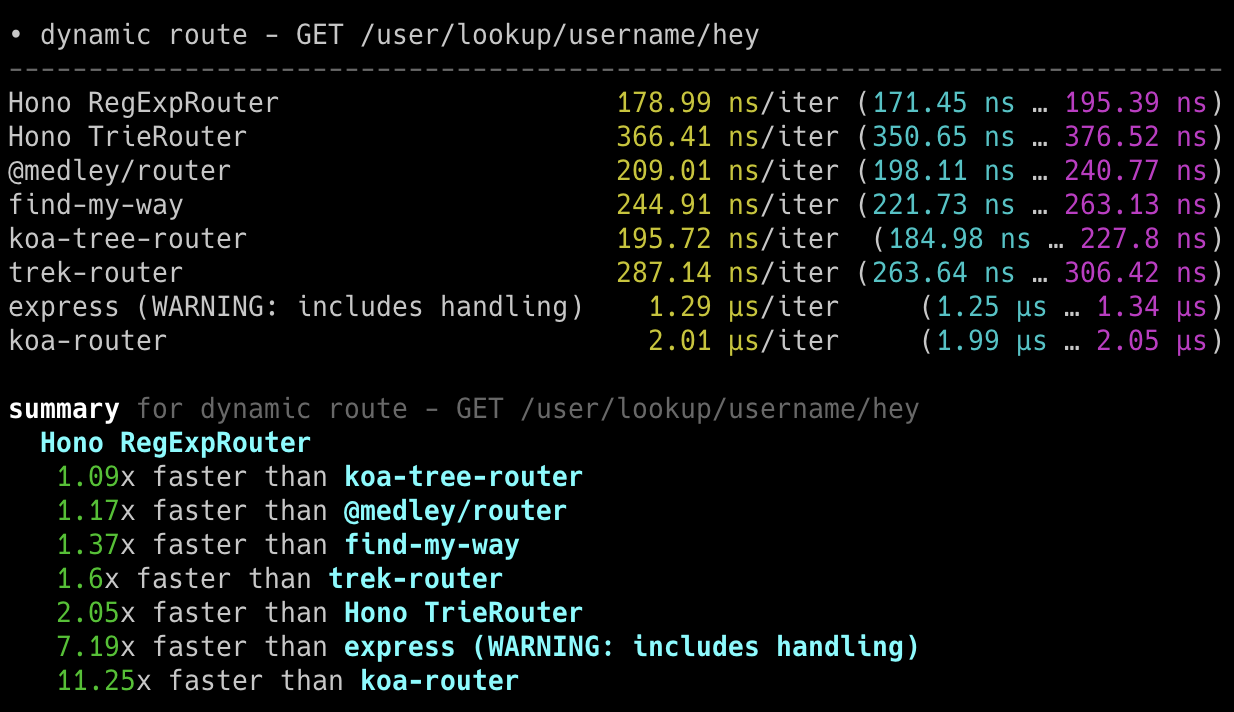
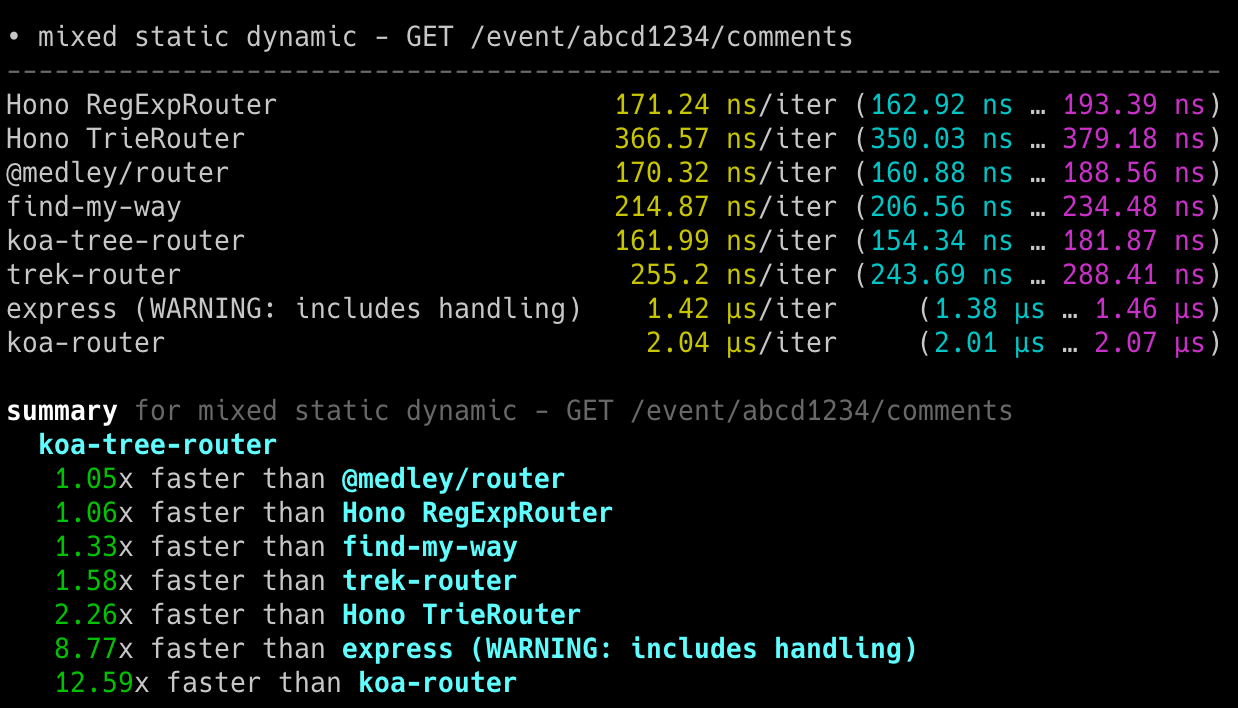
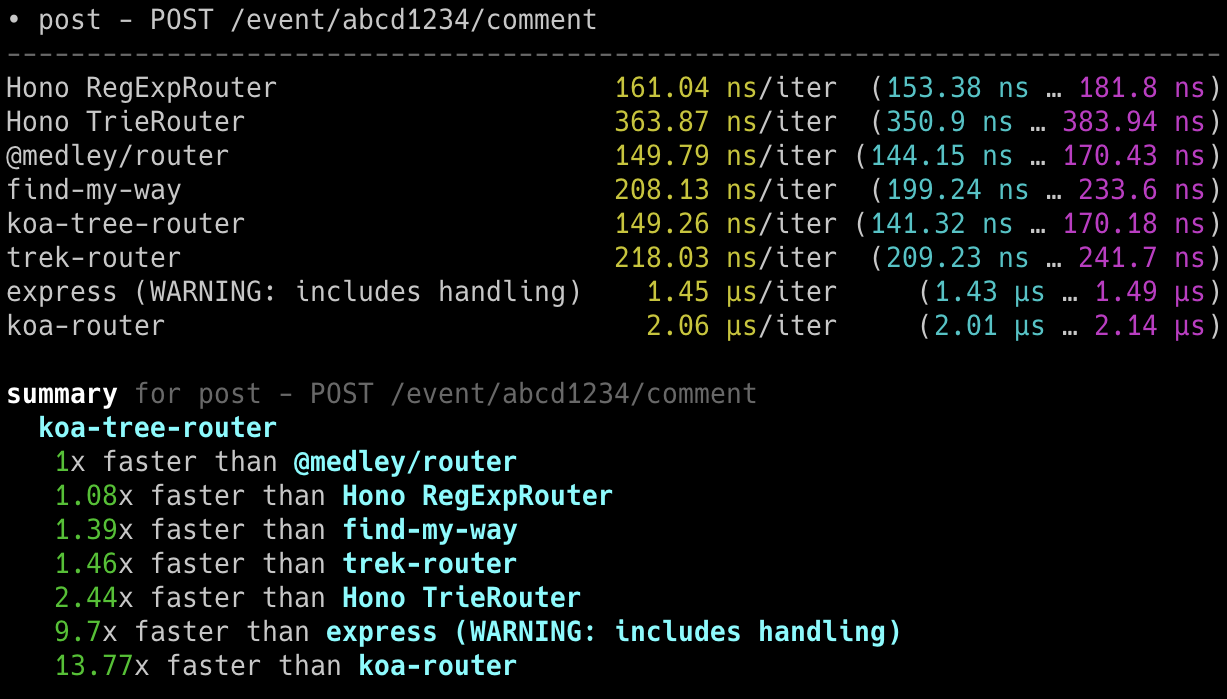
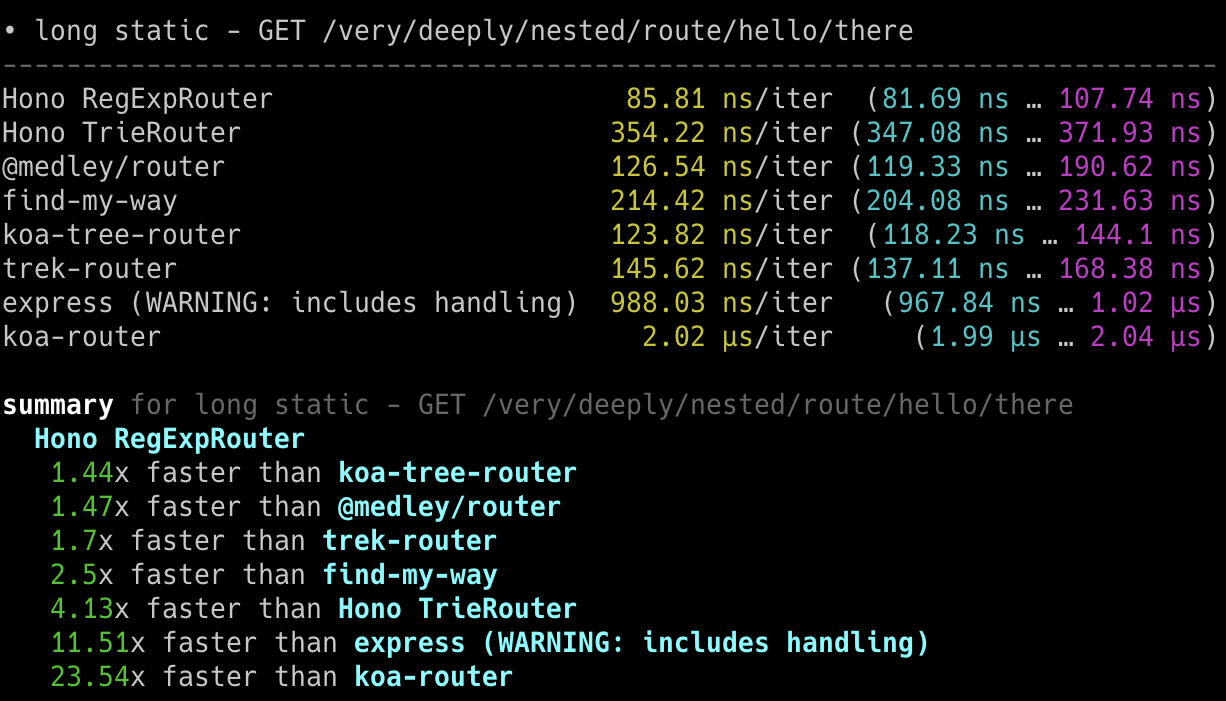
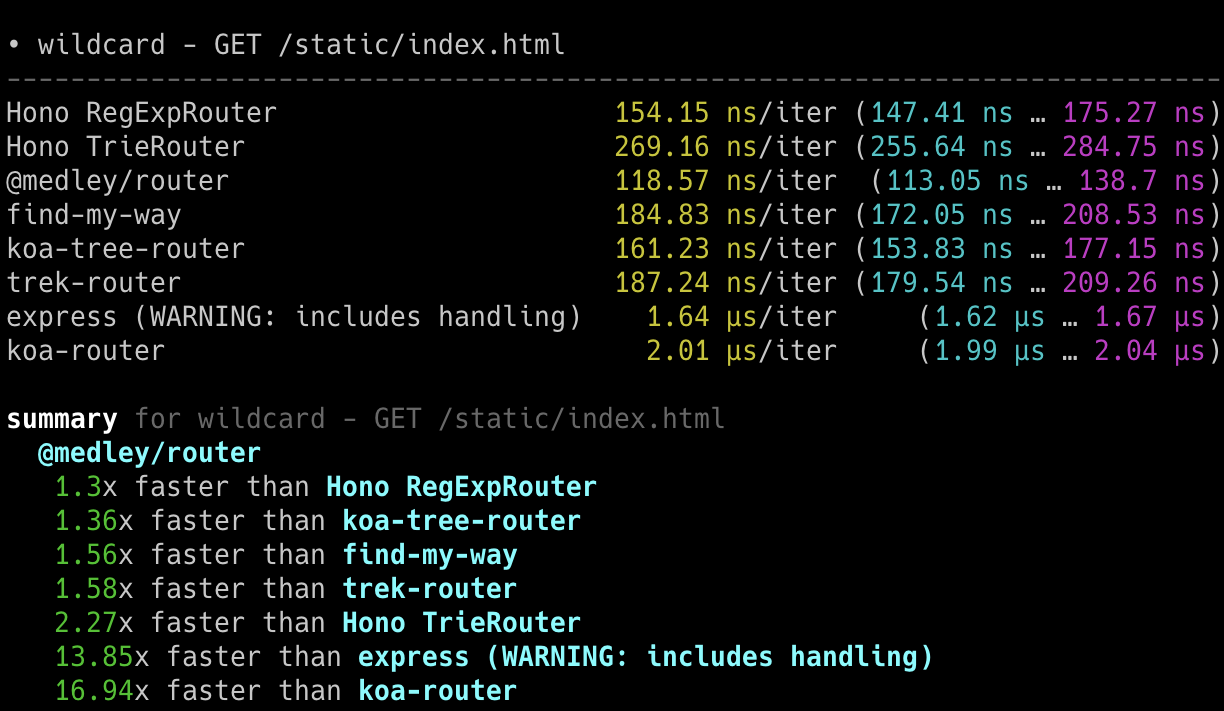
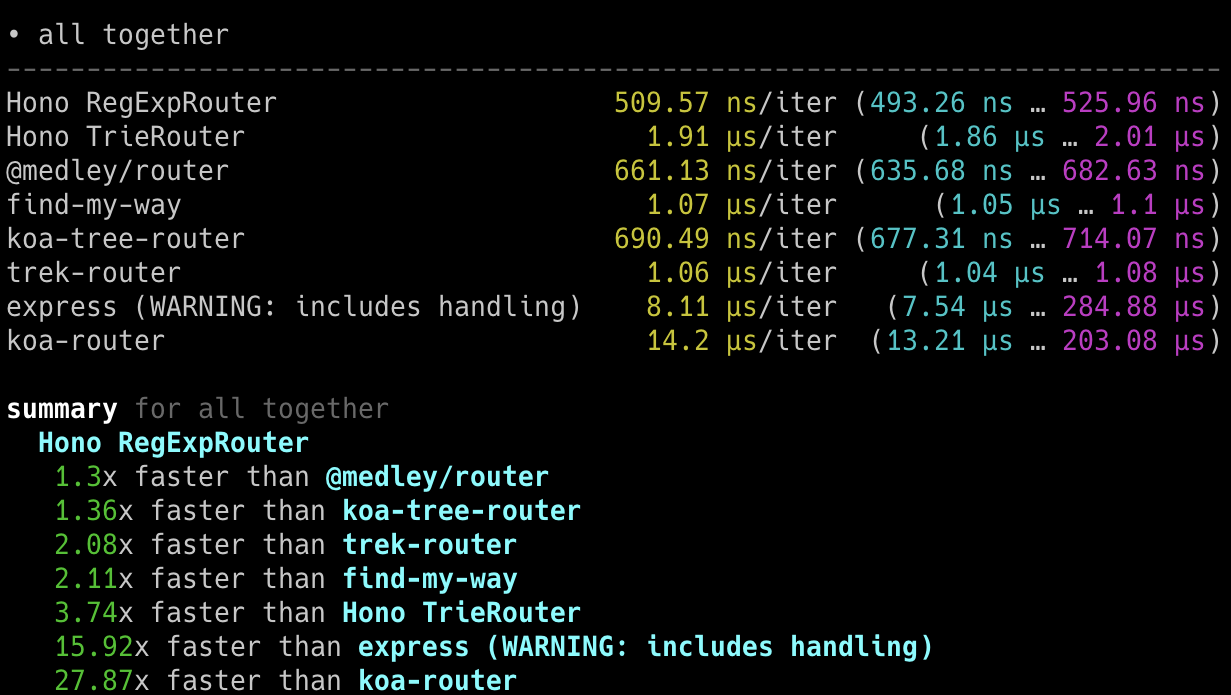
### On Bun
以下截图显示了在 Bun 上的结果。
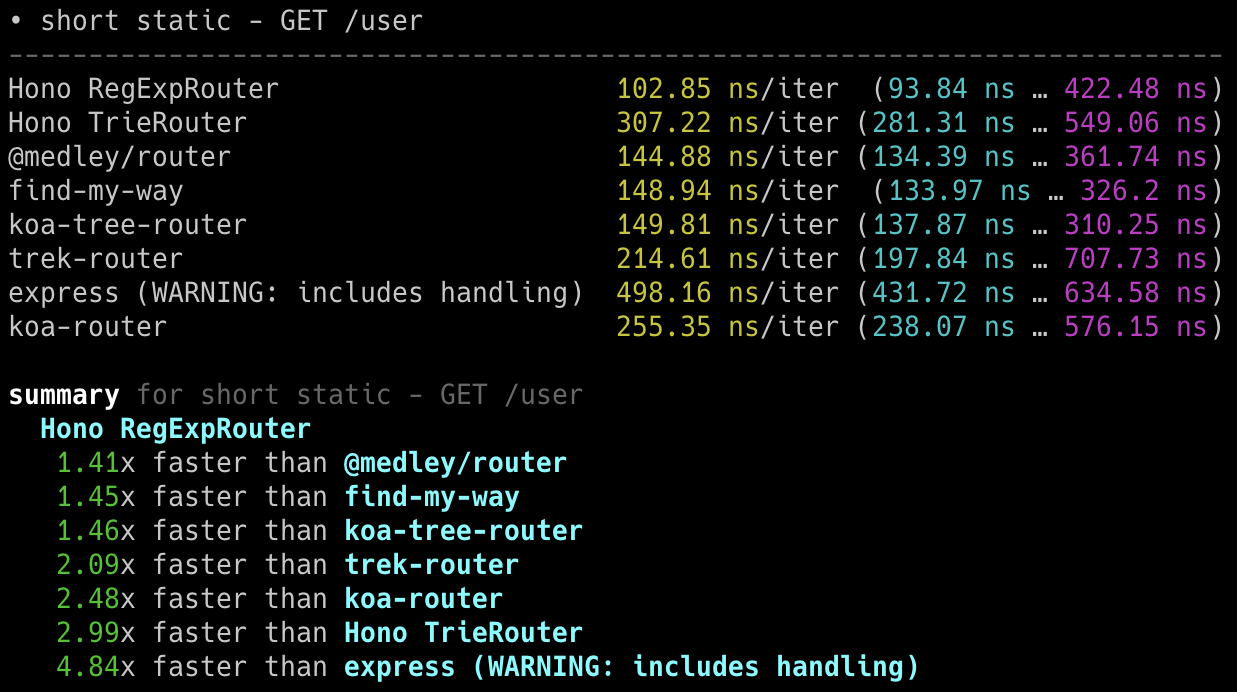
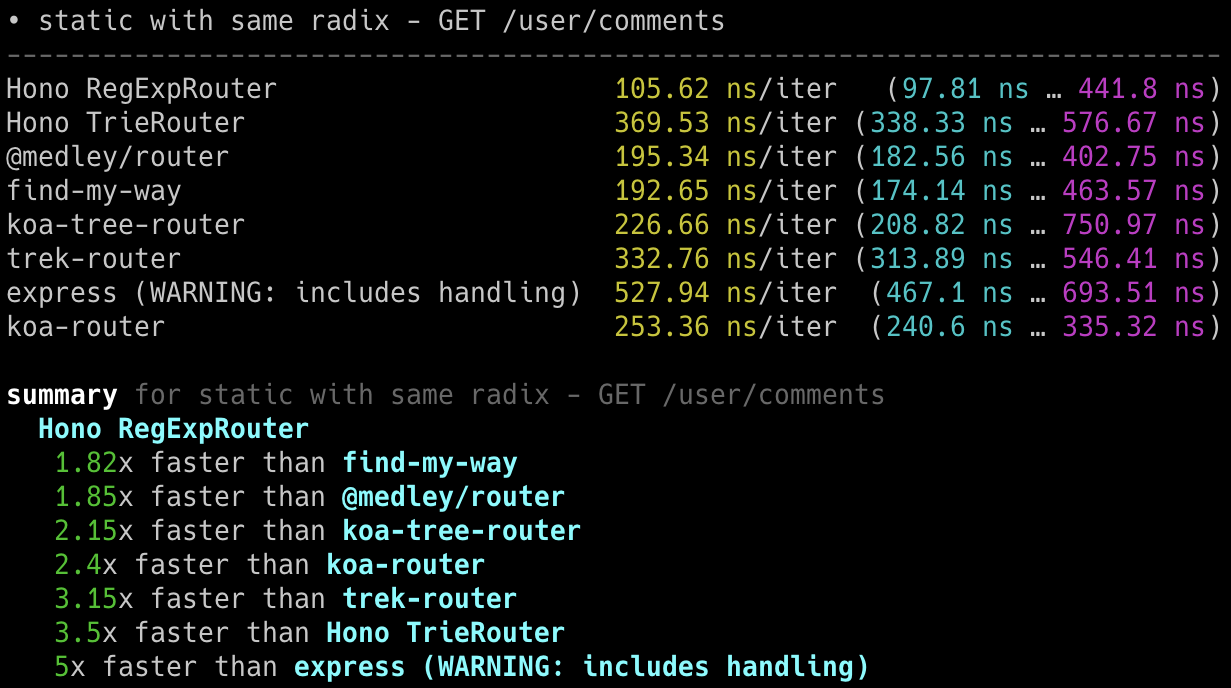
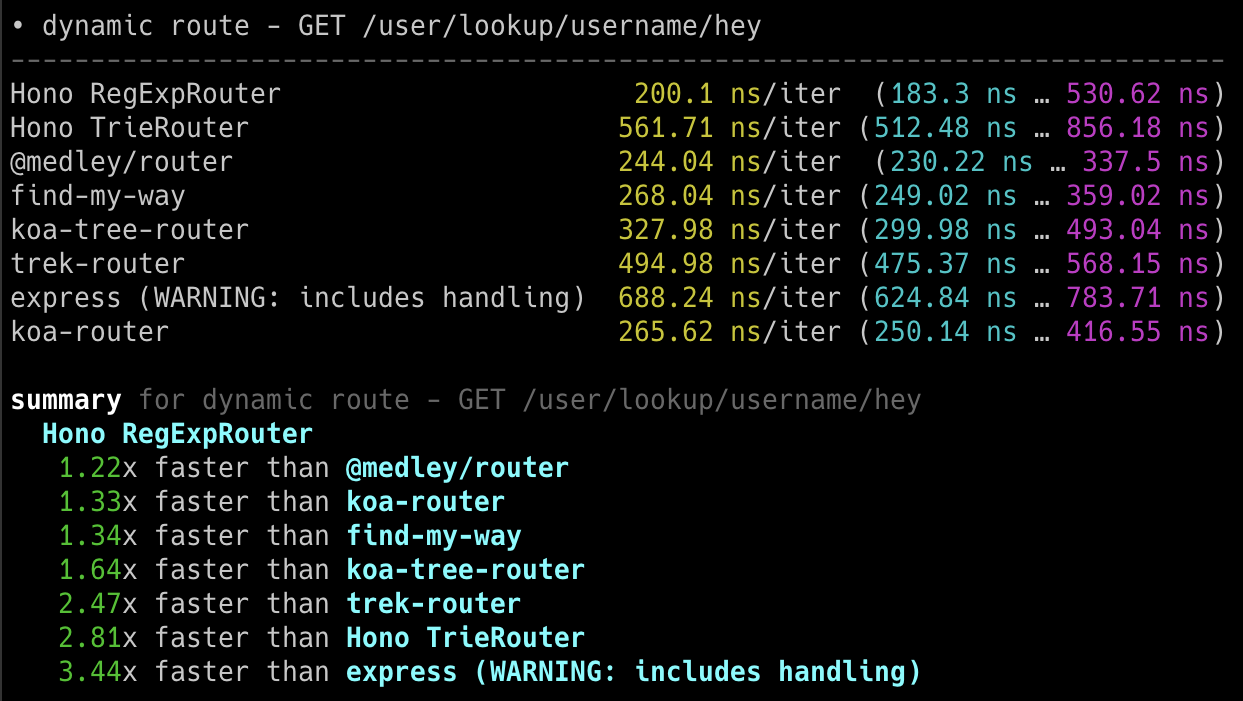
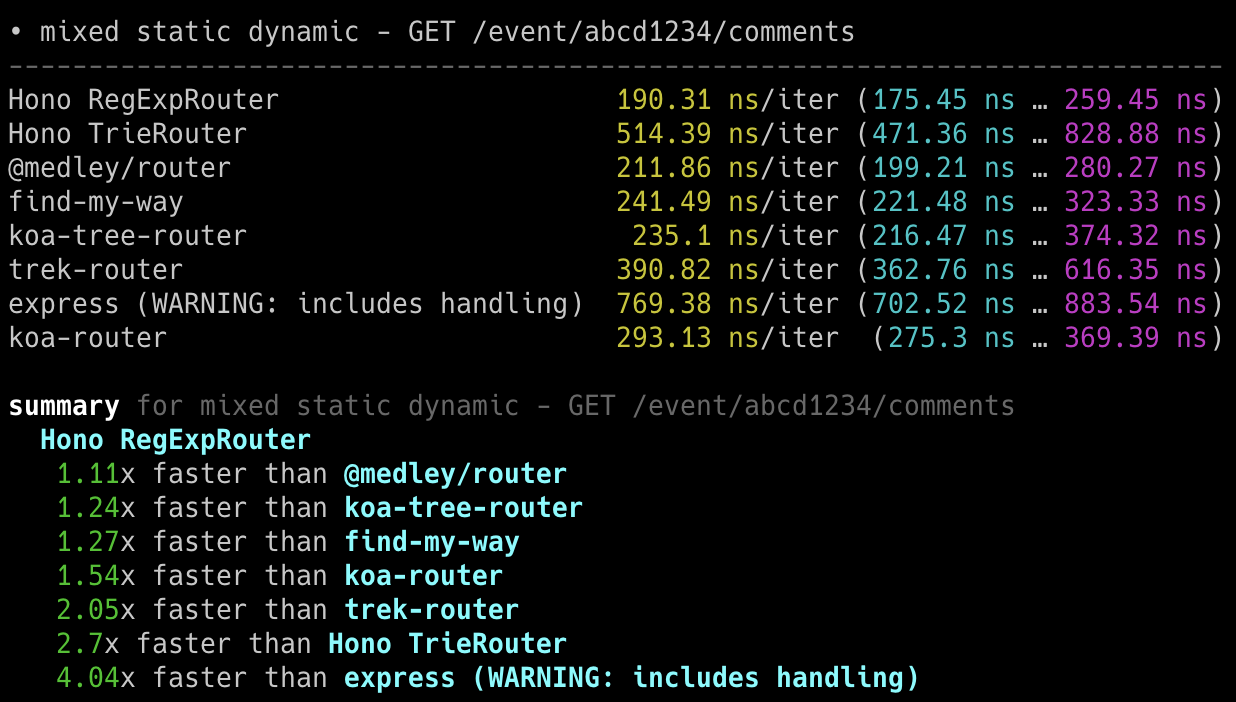
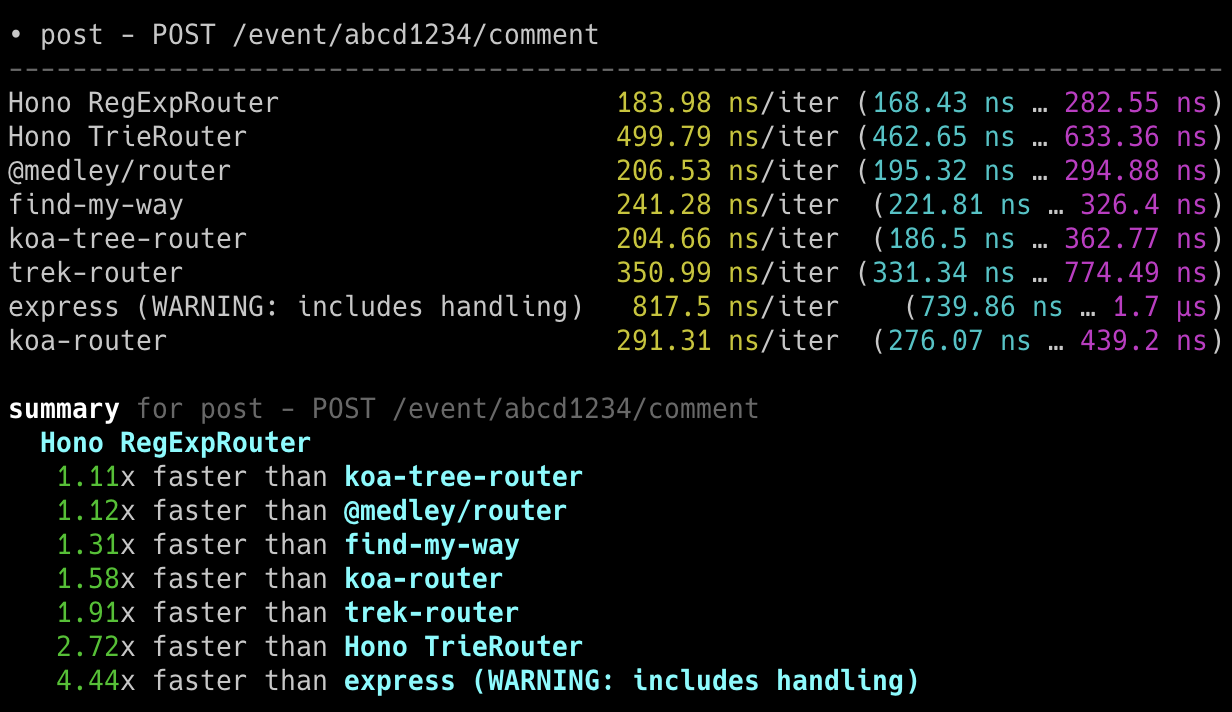
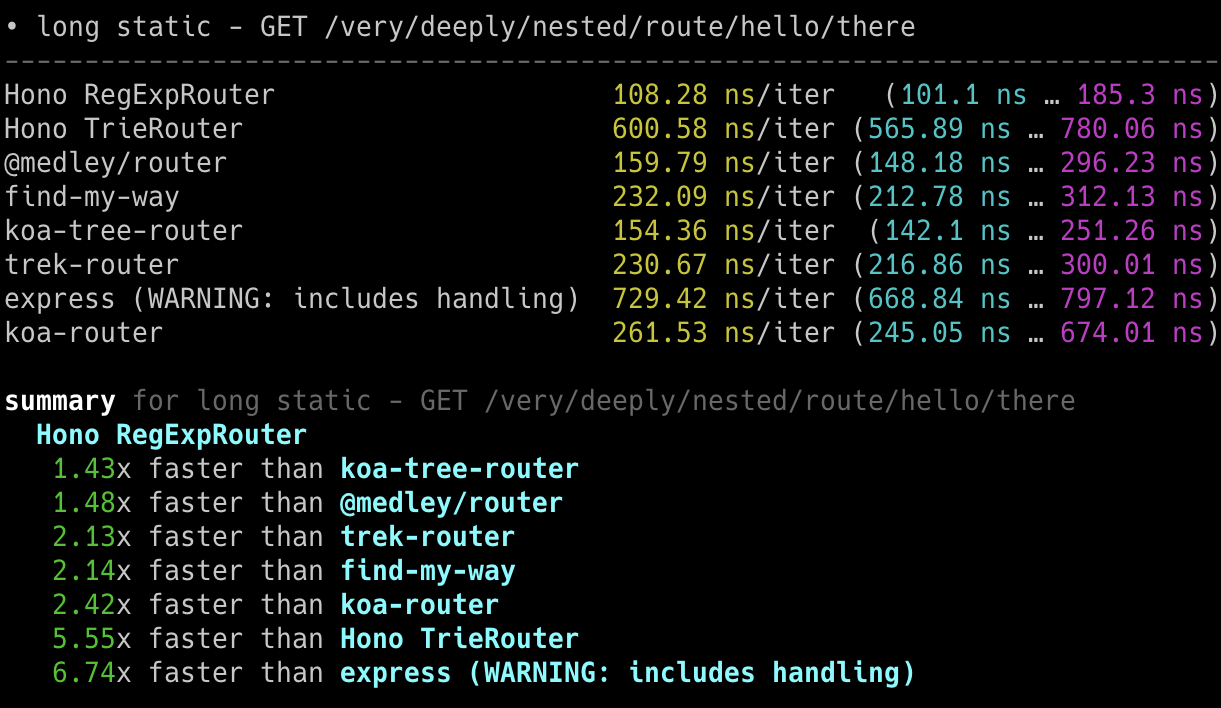
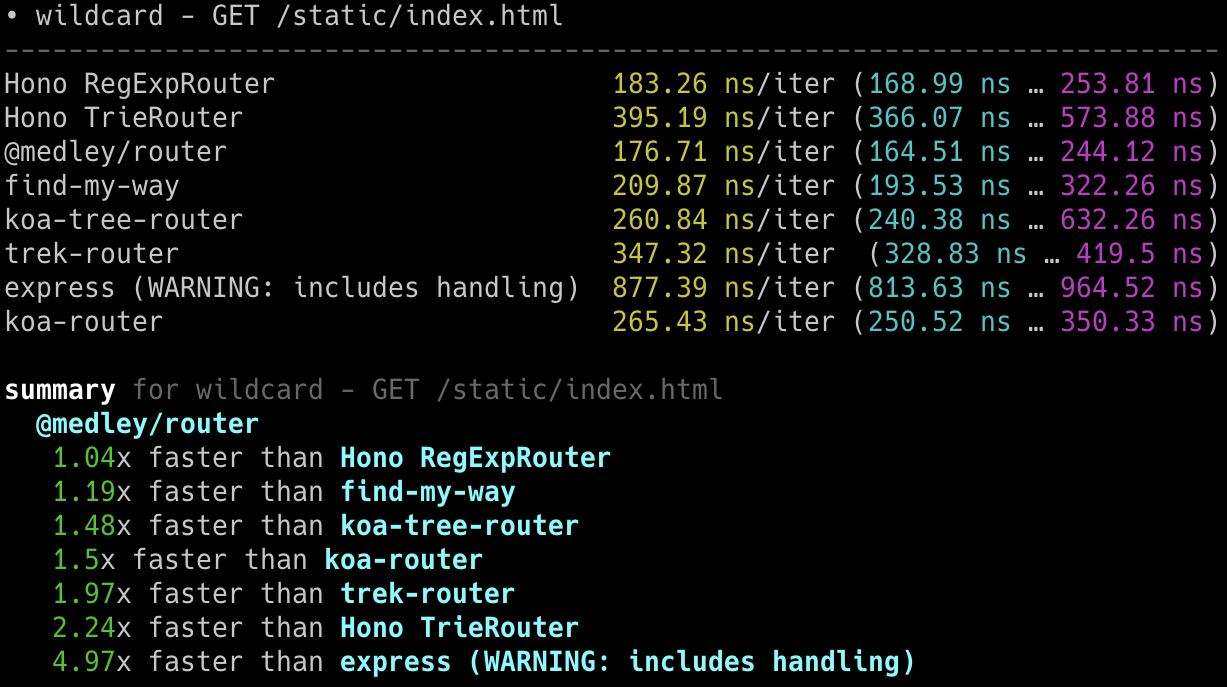
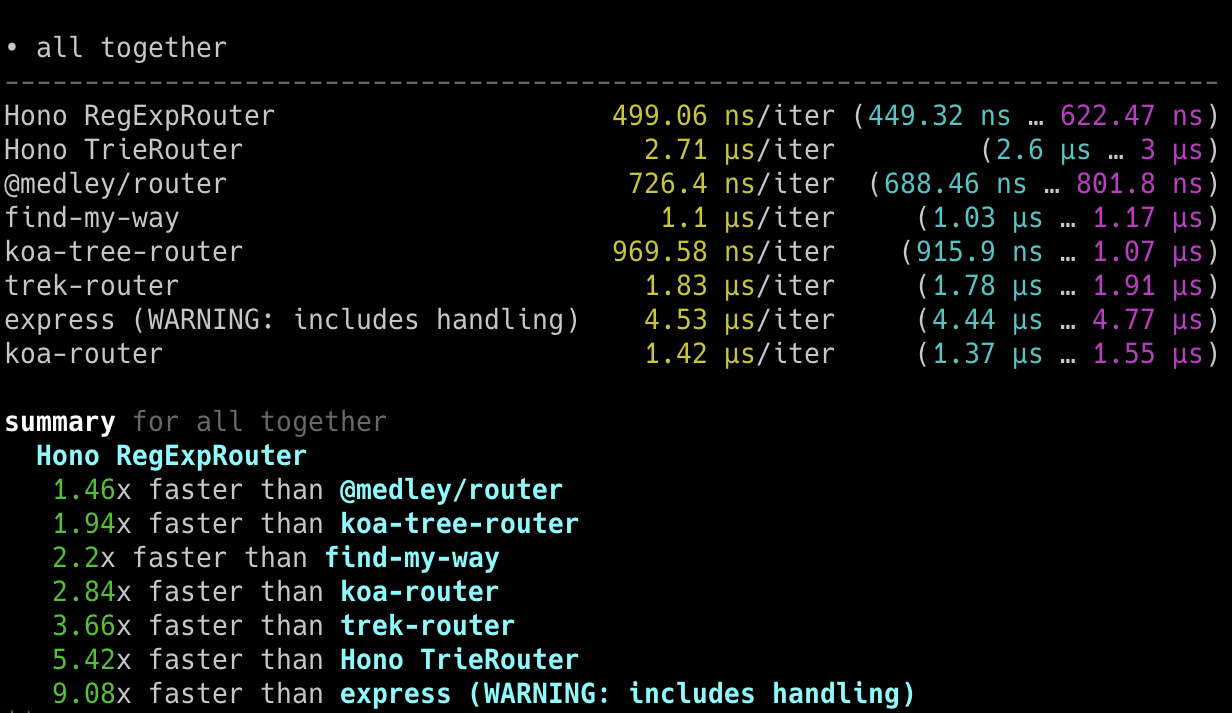
## Cloudflare Workers
与其他 Cloudflare Workers 的 routers 相比,**Hono 是最快的**。
- Machine: Apple MacBook Pro, 32 GiB, M1 Pro
- Scripts: [benchmarks/handle-event](https://github.com/honojs/hono/tree/main/benchmarks/handle-event)
```
Hono x 402,820 ops/sec ±4.78% (80 runs sampled)
itty-router x 212,598 ops/sec ±3.11% (87 runs sampled)
sunder x 297,036 ops/sec ±4.76% (77 runs sampled)
worktop x 197,345 ops/sec ±2.40% (88 runs sampled)
Fastest is Hono
✨ Done in 28.06s.
```
## Deno
与其他 Deno 框架相比,**Hono 是最快的**。
- Machine: Apple MacBook Pro, 32 GiB, M1 Pro, Deno v1.22.0
- Scripts: [benchmarks/deno](https://github.com/honojs/hono/tree/main/benchmarks/deno)
- Method: `bombardier --fasthttp -d 10s -c 100 'http://localhost:8000/user/lookup/username/foo'`
| Framework | Version | Results |
| --------- | :----------: | -----------------------: |
| **Hono** | 3.0.0 | **Requests/sec: 136112** |
| Fast | 4.0.0-beta.1 | Requests/sec: 103214 |
| Megalo | 0.3.0 | Requests/sec: 64597 |
| Faster | 5.7 | Requests/sec: 54801 |
| oak | 10.5.1 | Requests/sec: 43326 |
| opine | 2.2.0 | Requests/sec: 30700 |
另一个基准测试结果:[denosaurs/bench](https://github.com/denosaurs/bench)
## Bun
Hono 是 Bun 最快的框架之一。你可以在下面看到。
- [SaltyAom/bun-http-framework-benchmark](https://github.com/SaltyAom/bun-http-framework-benchmark)
# Developer Experience
要创建出色的应用程序,我们需要出色的开发体验。幸运的是,我们可以用 TypeScript 编写 Cloudflare Workers、Deno 和 Bun 的应用程序,而无需将其转译为 JavaScript。Hono 是用 TypeScript 编写的,可以使应用程序具有类型安全。
# Middleware
我们将返回 `Response` 的原语称为 "Handler"。"Middleware" 在 Handler 之前和之后执行,并处理 `Request` 和 `Response`。它像洋葱结构。

例如,我们可以编写中间件来添加 "X-Response-Time" header,如下所示:
```ts twoslash
import { Hono } from 'hono'
const app = new Hono()
// ---cut---
app.use(async (c, next) => {
const start = performance.now()
await next()
const end = performance.now()
c.res.headers.set('X-Response-Time', `${end - start}`)
})
```
使用这个简单的方法,我们可以编写自己的自定义中间件,也可以使用内置或第三方中间件。
# Philosophy
在本节中,我们讨论 Hono 的概念或哲学。
## Motivation
起初,我只是想在 Cloudflare Workers 上创建一个 web 应用程序。但是,没有适用于 Cloudflare Workers 的好框架。所以我开始构建 Hono。
我认为这将是一个学习如何使用 Trie 树构建 router 的好机会。然后一个朋友出现了,带来了超快的 router,叫做 "RegExpRouter"。我还有一个朋友创建了 Basic authentication middleware。
仅使用 Web Standard APIs,我们就可以让它在 Deno 和 Bun 上工作。当人们问"有 Bun 的 Express 吗?"时,我们可以回答:"没有,但有 Hono"。(虽然 Express 现在可以在 Bun 上工作。)
我们还有朋友制作 GraphQL servers、Firebase authentication 和 Sentry middleware。我们还有一个 Node.js adapter。生态系统已经兴起。
换句话说,Hono 非常快,使很多事情成为可能,并且可以在任何地方工作。我们可以想象 Hono 可能成为 **Web Standards 的标准**。
# Routers
routers 是 Hono 最重要的功能。
Hono 有五个 routers。
## RegExpRouter
**RegExpRouter** 是 JavaScript 世界中最快的 router。
虽然这被称为 "RegExp",但它不是使用 [path-to-regexp](https://github.com/pillarjs/path-to-regexp) 的 Express 风格实现。它们使用线性循环。因此,正则表达式匹配将对所有 routes 执行,随着 routes 增多,性能会下降。
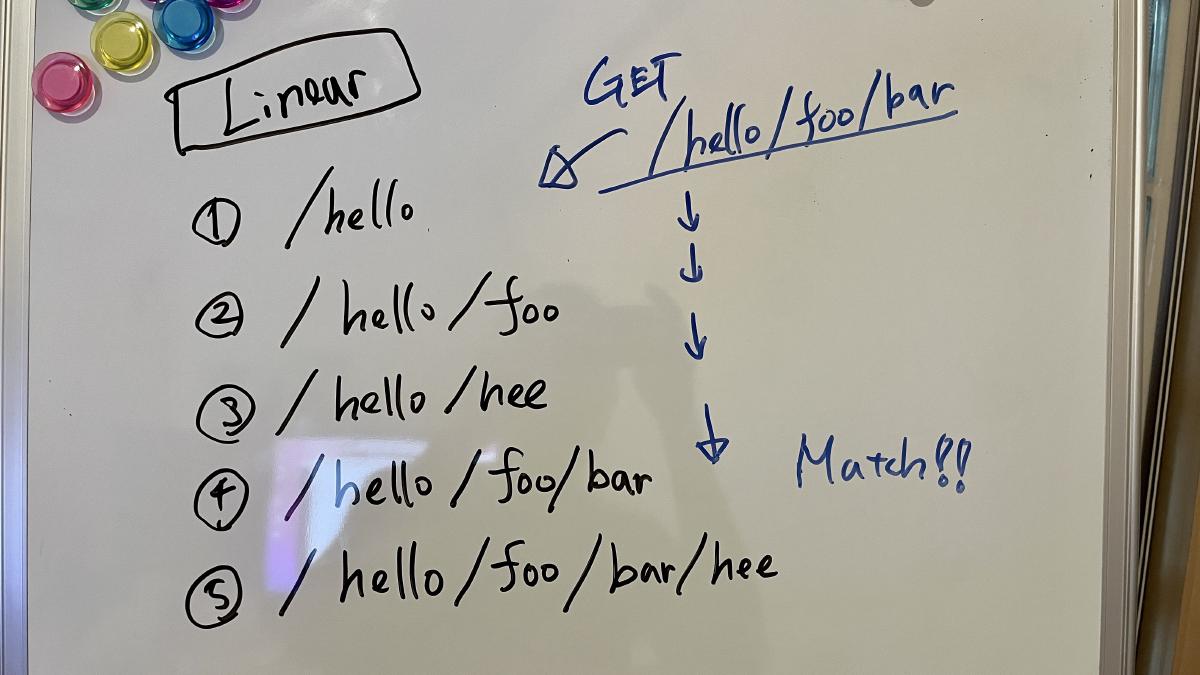
Hono 的 RegExpRouter 将 route 模式转换为 "一个大型正则表达式"。然后它可以通过一次性匹配获取结果。
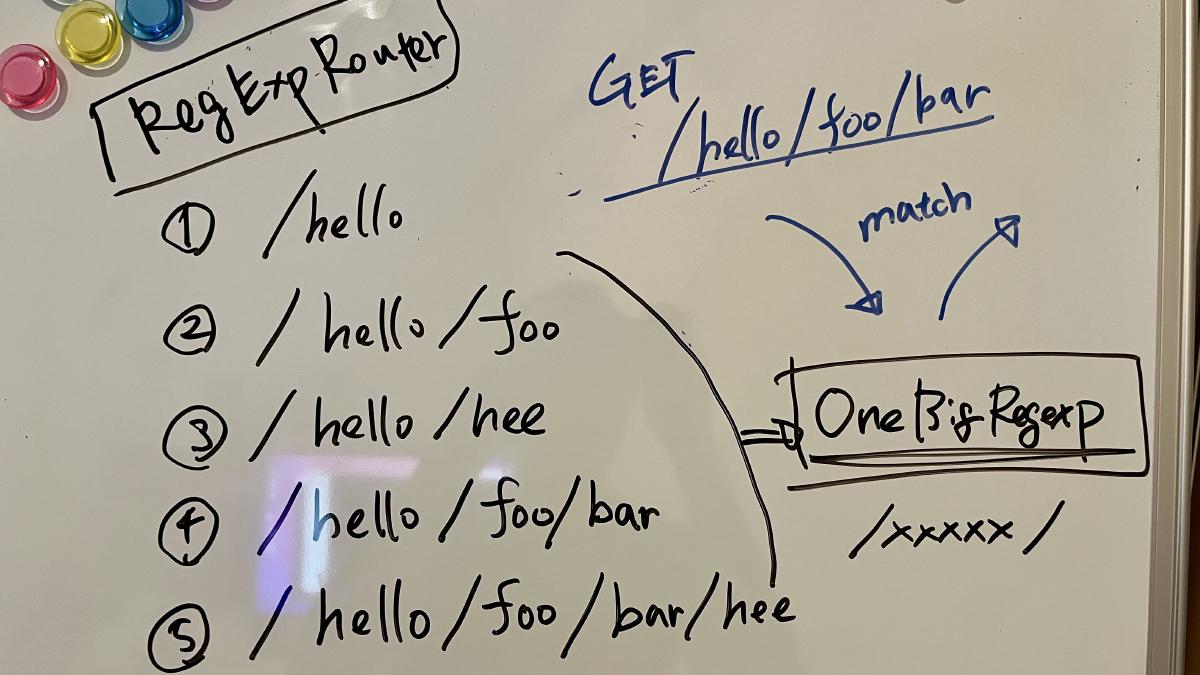
这在大多数情况下比使用基于树的算法(如 radix-tree)的方法更快。
但是,RegExpRouter 不支持所有路由模式,所以它通常与其他支持所有路由模式的 routers 之一结合使用。
## TrieRouter
**TrieRouter** 是使用 Trie-tree 算法的 router。像 RegExpRouter 一样,它不使用线性循环。

这个 router 不如 RegExpRouter 快,但比 Express router 快得多。TrieRouter 支持所有模式。
## SmartRouter
**SmartRouter** 在你使用多个 routers 时很有用。它通过推断注册的 routers 来选择最佳的 router。Hono 默认使用 SmartRouter、RegExpRouter 和 TrieRouter:
```ts
// 在 Hono 核心内部。
readonly defaultRouter: Router = new SmartRouter({
routers: [new RegExpRouter(), new TrieRouter()],
})
```
当应用程序启动时,SmartRouter 根据路由检测最快的 router 并继续使用它。
## LinearRouter
RegExpRouter 很快,但路由注册阶段可能稍慢。因此,它不适合每次请求都初始化的环境。
**LinearRouter** 针对 "one shot" 情况进行了优化。路由注册比 RegExpRouter 快得多,因为它使用线性方法添加路由而无需编译字符串。
以下是基准测试结果之一,其中包括路由注册阶段。
```console
• GET /user/lookup/username/hey
----------------------------------------------------- -----------------------------
LinearRouter 1.82 µs/iter (1.7 µs … 2.04 µs) 1.84 µs 2.04 µs 2.04 µs
MedleyRouter 4.44 µs/iter (4.34 µs … 4.54 µs) 4.48 µs 4.54 µs 4.54 µs
FindMyWay 60.36 µs/iter (45.5 µs … 1.9 ms) 59.88 µs 78.13 µs 82.92 µs
KoaTreeRouter 3.81 µs/iter (3.73 µs … 3.87 µs) 3.84 µs 3.87 µs 3.87 µs
TrekRouter 5.84 µs/iter (5.75 µs … 6.04 µs) 5.86 µs 6.04 µs 6.04 µs
summary for GET /user/lookup/username/hey
LinearRouter
2.1x faster than KoaTreeRouter
2.45x faster than MedleyRouter
3.21x faster than TrekRouter
33.24x faster than FindMyWay
```
## PatternRouter
**PatternRouter** 是 Hono routers 中最小的。
虽然 Hono 已经很紧凑,但如果你需要在资源有限的环境中使它更小,请使用 PatternRouter。
仅使用 PatternRouter 的应用程序大小在 15KB 以下。
```console
$ npx wrangler deploy --minify ./src/index.ts
⛅️ wrangler 3.20.0
-------------------
Total Upload: 14.68 KiB / gzip: 5.38 KiB
```
# Hono Stacks
Hono 使简单的事情变得简单,复杂的事情也变得简单。它不仅适合返回 JSON,还非常适合构建全栈应用程序,包括 REST API 服务器和客户端。
## RPC
Hono 的 RPC 功能允许你几乎无需更改代码即可共享 API 规范。由 `hc` 生成的客户端将读取规范并类型安全地访问端点。
以下库使其成为可能:
- Hono - API Server
- [Zod](https://zod.dev) - Validator
- [Zod Validator Middleware](https://github.com/honojs/middleware/tree/main/packages/zod-validator)
- `hc` - HTTP Client
我们可以称这组组件为 **Hono Stack**。现在让我们用它创建一个 API 服务器和客户端。
## Writing API
首先,编写一个接收 GET 请求并返回 JSON 的端点。
```ts twoslash
import { Hono } from 'hono'
const app = new Hono()
app.get('/hello', (c) => {
return c.json({
message: `Hello!`,
})
})
```
## Validation with Zod
使用 Zod 验证以接收查询参数的值。
```ts
import { zValidator } from '@hono/zod-validator'
import * as z from 'zod'
app.get(
'/hello',
zValidator(
'query',
z.object({
name: z.string(),
})
),
(c) => {
const { name } = c.req.valid('query')
return c.json({
message: `Hello! ${name}`,
})
}
)
```
## Sharing the Types
要发出端点规范,导出其类型。
::: warning
为了使 RPC 正确推断 routes,所有包含的方法必须是链式的,并且端点或 app 类型必须从声明的变量中推断。更多信息见 [Best Practices for RPC](https://hono.dev/docs/guides/best-practices#if-you-want-to-use-rpc-features)。
:::
```ts{1,17}
const route = app.get(
'/hello',
zValidator(
'query',
z.object({
name: z.string(),
})
),
(c) => {
const { name } = c.req.valid('query')
return c.json({
message: `Hello! ${name}`,
})
}
)
export type AppType = typeof route
```
## Client
接下来是客户端实现。通过将 `AppType` 类型作为泛型传递给 `hc` 来创建客户端对象。然后,神奇地,completion 可以工作,并建议端点路径和请求类型。
```ts
import { AppType } from './server'
import { hc } from 'hono/client'
const client = hc('/api')
const res = await client.hello.$get({
query: {
name: 'Hono',
},
})
```
`Response` 与 fetch API 兼容,但使用 `json()` 获取的数据具有类型。
```ts
const data = await res.json()
console.log(`${data.message}`)
```
共享 API 规范意味着你可以意识到服务器端的更改。
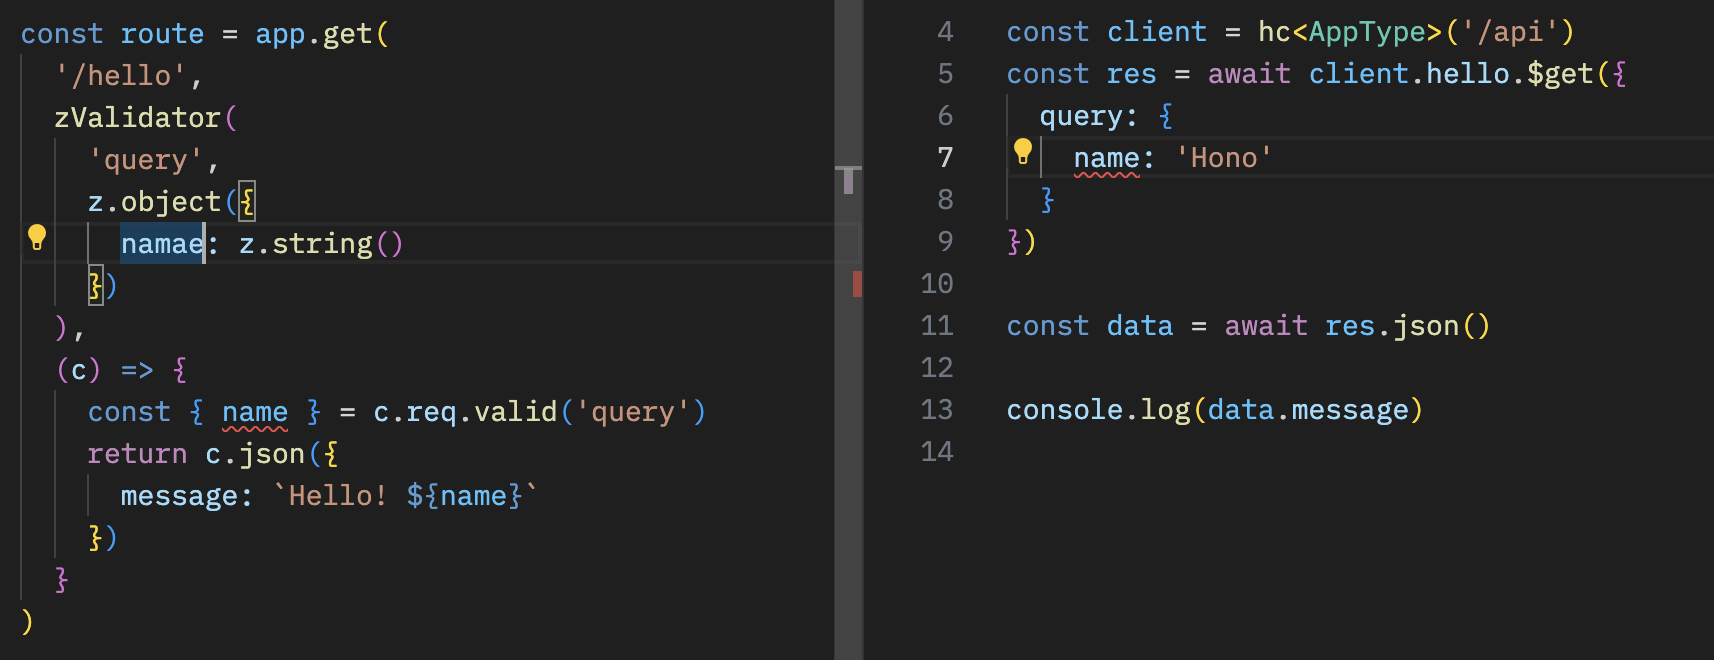
## With React
你可以使用 React 在 Cloudflare Pages 上创建应用程序。
API 服务器。
```ts
// functions/api/[[route]].ts
import { Hono } from 'hono'
import { handle } from 'hono/cloudflare-pages'
import * as z from 'zod'
import { zValidator } from '@hono/zod-validator'
const app = new Hono()
const schema = z.object({
id: z.string(),
title: z.string(),
})
type Todo = z.infer
const todos: Todo[] = []
const route = app
.post('/todo', zValidator('form', schema), (c) => {
const todo = c.req.valid('form')
todos.push(todo)
return c.json({
message: 'created!',
})
})
.get((c) => {
return c.json({
todos,
})
})
export type AppType = typeof route
export const onRequest = handle(app, '/api')
```
使用 React 和 React Query 的客户端。
```tsx
// src/App.tsx
import {
useQuery,
useMutation,
QueryClient,
QueryClientProvider,
} from '@tanstack/react-query'
import { AppType } from '../functions/api/[[route]]'
import { hc, InferResponseType, InferRequestType } from 'hono/client'
const queryClient = new QueryClient()
const client = hc('/api')
export default function App() {
return (
)
}
const Todos = () => {
const query = useQuery({
queryKey: ['todos'],
queryFn: async () => {
const res = await client.todo.$get()
return await res.json()
},
})
const $post = client.todo.$post
const mutation = useMutation<
InferResponseType,
Error,
InferRequestType['form']
>({
mutationFn: async (todo) => {
const res = await $post({
form: todo,
})
return await res.json()
},
onSuccess: async () => {
queryClient.invalidateQueries({ queryKey: ['todos'] })
},
onError: (error) => {
console.log(error)
},
})
return (
{query.data?.todos.map((todo) => (
- {todo.title}
))}
)
}
```
# Web Standards
Hono 仅使用 **Web Standards**,如 Fetch。它们最初用于 `fetch` 函数,由处理 HTTP 请求和响应的基本对象组成。除了 `Requests` 和 `Responses` 之外,还有 `URL`、`URLSearchParam`、`Headers` 等。
Cloudflare Workers、Deno 和 Bun 也建立在 Web Standards 之上。例如,一个返回 "Hello World" 的服务器可以这样写。这可以在 Cloudflare Workers 和 Bun 上运行。
```ts twoslash
export default {
async fetch() {
return new Response('Hello World')
},
}
```
Hono 仅使用 Web Standards,这意味着 Hono 可以在任何支持它们的 runtime 上运行。此外,我们有一个 Node.js adapter。Hono 可以在这些 runtimes 上运行:
- Cloudflare Workers (`workerd`)
- Deno
- Bun
- Fastly Compute
- AWS Lambda
- Node.js
- Vercel (edge-light)
- WebAssembly(通过 [`wasi:http`][wasi-http] 使用 [WebAssembly System Interface (WASI)][wasi])
它也适用于 Netlify 和其他平台。相同的代码在所有平台上都能运行。
Cloudflare Workers、Deno、Shopify 等启动了 [WinterCG](https://wintercg.org) 来讨论使用 Web Standards 实现 "web-interoperability" 的可能性。Hono 将跟随他们的步伐,追求 **Web Standards 的标准**。
[wasi]: https://github.com/WebAssembly/wasi
[wasi-http]: https://github.com/WebAssembly/wasi-http
# Context
`Context` 对象为每个请求创建,并在响应返回之前一直保持。你可以在其中存放值,设置要返回的头部和状态码,并访问 HonoRequest 和 Response 对象。
## req
`req` 是 HonoRequest 的实例。更多详情见 [HonoRequest](/docs/api/request)。
```ts twoslash
import { Hono } from 'hono'
const app = new Hono()
// ---cut---
app.get('/hello', (c) => {
const userAgent = c.req.header('User-Agent')
// ...
// ---cut-start---
return c.text(`Hello, ${userAgent}`)
// ---cut-end---
})
```
## status()
你可以使用 `c.status()` 设置 HTTP 状态码。默认值是 `200`。如果状态码是 `200`,则不必使用 `c.status()`。
```ts twoslash
import { Hono } from 'hono'
const app = new Hono()
// ---cut---
app.post('/posts', (c) => {
// 设置 HTTP 状态码
c.status(201)
return c.text('Your post is created!')
})
```
## header()
你可以为响应设置 HTTP Headers。
```ts twoslash
import { Hono } from 'hono'
const app = new Hono()
// ---cut---
app.get('/', (c) => {
// 设置 headers
c.header('X-Message', 'My custom message')
return c.text('Hello!')
})
```
## body()
返回 HTTP 响应。
::: info
**注意**:返回文本或 HTML 时,推荐使用 `c.text()` 或 `c.html()`。
:::
```ts twoslash
import { Hono } from 'hono'
const app = new Hono()
// ---cut---
app.get('/welcome', (c) => {
c.header('Content-Type', 'text/plain')
// 返回响应体
return c.body('Thank you for coming')
})
```
你也可以这样写:
```ts twoslash
import { Hono } from 'hono'
const app = new Hono()
// ---cut---
app.get('/welcome', (c) => {
return c.body('Thank you for coming', 201, {
'X-Message': 'Hello!',
'Content-Type': 'text/plain',
})
})
```
响应与下面的 `Response` 对象相同:
```ts twoslash
new Response('Thank you for coming', {
status: 201,
headers: {
'X-Message': 'Hello!',
'Content-Type': 'text/plain',
},
})
```
## text()
渲染文本,`Content-Type: text/plain`。
```ts twoslash
import { Hono } from 'hono'
const app = new Hono()
// ---cut---
app.get('/say', (c) => {
return c.text('Hello!')
})
```
## json()
渲染 JSON,`Content-Type: application/json`。
```ts twoslash
import { Hono } from 'hono'
const app = new Hono()
// ---cut---
app.get('/api', (c) => {
return c.json({ message: 'Hello!' })
})
```
## html()
渲染 HTML,`Content-Type: text/html`。
```ts twoslash
import { Hono } from 'hono'
const app = new Hono()
// ---cut---
app.get('/', (c) => {
return c.html('Hello! Hono!
')
})
```
## notFound()
返回 `Not Found` 响应。你可以使用 [`app.notFound()`](/docs/api/hono#not-found) 自定义它。
```ts twoslash
import { Hono } from 'hono'
const app = new Hono()
// ---cut---
app.get('/notfound', (c) => {
return c.notFound()
})
```
## redirect()
重定向,默认状态码是 `302`。
```ts twoslash
import { Hono } from 'hono'
const app = new Hono()
// ---cut---
app.get('/redirect', (c) => {
return c.redirect('/')
})
app.get('/redirect-permanently', (c) => {
return c.redirect('/', 301)
})
```
## res
你可以访问将要返回的 [Response] 对象。
```ts twoslash
import { Hono } from 'hono'
const app = new Hono()
// ---cut---
// Response 对象
app.use('/', async (c, next) => {
await next()
c.res.headers.append('X-Debug', 'Debug message')
})
```
[Response]: https://developer.mozilla.org/en-US/docs/Web/API/Response
## set() / get()
获取和设置任意的键值对,生命周期为当前请求。这允许在中间件之间或从中间件到路由处理器传递特定值。
```ts twoslash
import { Hono } from 'hono'
const app = new Hono<{ Variables: { message: string } }>()
// ---cut---
app.use(async (c, next) => {
c.set('message', 'Hono is cool!!')
await next()
})
app.get('/', (c) => {
const message = c.get('message')
return c.text(`The message is "${message}"`)
})
```
将 `Variables` 作为泛型传递给 `Hono` 的构造函数以使其类型安全。
```ts twoslash
import { Hono } from 'hono'
// ---cut---
type Variables = {
message: string
}
const app = new Hono<{ Variables: Variables }>()
```
`c.set` / `c.get` 的值仅在同一请求内保留。它们不能在不同的请求之间共享或持久化。
## var
你也可以使用 `c.var` 访问变量的值。
```ts twoslash
import type { Context } from 'hono'
declare const c: Context
// ---cut---
const result = c.var.client.oneMethod()
```
如果你想创建一个提供自定义方法的中间件,可以这样写:
```ts twoslash
import { Hono } from 'hono'
import { createMiddleware } from 'hono/factory'
// ---cut---
type Env = {
Variables: {
echo: (str: string) => string
}
}
const app = new Hono()
const echoMiddleware = createMiddleware(async (c, next) => {
c.set('echo', (str) => str)
await next()
})
app.get('/echo', echoMiddleware, (c) => {
return c.text(c.var.echo('Hello!'))
})
```
如果你想在多个处理器中使用该中间件,可以使用 `app.use()`。然后,你需要将 `Env` 作为泛型传递给 `Hono` 的构造函数以使其类型安全。
```ts twoslash
import { Hono } from 'hono'
import type { MiddlewareHandler } from 'hono/types'
declare const echoMiddleware: MiddlewareHandler
type Env = {
Variables: {
echo: (str: string) => string
}
}
// ---cut---
const app = new Hono()
app.use(echoMiddleware)
app.get('/echo', (c) => {
return c.text(c.var.echo('Hello!'))
})
```
## render() / setRenderer()
你可以在自定义中间件中使用 `c.setRenderer()` 设置布局。
```tsx twoslash
/** @jsx jsx */
/** @jsxImportSource hono/jsx */
import { Hono } from 'hono'
const app = new Hono()
// ---cut---
app.use(async (c, next) => {
c.setRenderer((content) => {
return c.html(
{content}
)
})
await next()
})
```
然后,你可以使用 `c.render()` 在此布局中创建响应。
```ts twoslash
import { Hono } from 'hono'
const app = new Hono()
// ---cut---
app.get('/', (c) => {
return c.render('Hello!')
})
```
输出将是:
```html
Hello!
```
此外,此功能提供了自定义参数的灵活性。为了确保类型安全,可以定义类型:
```ts
declare module 'hono' {
interface ContextRenderer {
(
content: string | Promise,
head: { title: string }
): Response | Promise
}
}
```
以下是使用示例:
```ts
app.use('/pages/*', async (c, next) => {
c.setRenderer((content, head) => {
return c.html(
{head.title}
{content}
)
})
await next()
})
app.get('/pages/my-favorite', (c) => {
return c.render(Ramen and Sushi
, {
title: 'My favorite',
})
})
app.get('/pages/my-hobbies', (c) => {
return c.render(Watching baseball
, {
title: 'My hobbies',
})
})
```
## executionCtx
你可以访问 Cloudflare Workers 特定的 [ExecutionContext](https://developers.cloudflare.com/workers/runtime-apis/context/)。
```ts twoslash
import { Hono } from 'hono'
const app = new Hono<{
Bindings: {
KV: any
}
}>()
declare const key: string
declare const data: string
// ---cut---
// ExecutionContext 对象
app.get('/foo', async (c) => {
c.executionCtx.waitUntil(c.env.KV.put(key, data))
// ...
})
```
`ExecutionContext` 还有一个 [`exports`](https://developers.cloudflare.com/workers/runtime-apis/context/#exports) 字段。要获得 Wrangler 生成类型的自动补全,你可以使用模块 augmentation:
```ts
import 'hono'
declare module 'hono' {
interface ExecutionContext {
readonly exports: Cloudflare.Exports
}
}
```
## event
你可以访问 Cloudflare Workers 特定的 `FetchEvent`。这在 "Service Worker" 语法中使用。但现在不推荐使用。
```ts twoslash
import { Hono } from 'hono'
declare const key: string
declare const data: string
type KVNamespace = any
// ---cut---
// 类型定义以进行类型推断
type Bindings = {
MY_KV: KVNamespace
}
const app = new Hono<{ Bindings: Bindings }>()
// FetchEvent 对象(仅在使用 Service Worker 语法时设置)
app.get('/foo', async (c) => {
c.event.waitUntil(c.env.MY_KV.put(key, data))
// ...
})
```
## env
在 Cloudflare Workers 环境变量中,绑定到 worker 的 secrets、KV namespaces、D1 database、R2 bucket 等被称为 bindings。无论类型如何,bindings 始终可作为全局变量使用,并可以通过上下文 `c.env.BINDING_KEY` 访问。
```ts twoslash
import { Hono } from 'hono'
type KVNamespace = any
// ---cut---
// 类型定义以进行类型推断
type Bindings = {
MY_KV: KVNamespace
}
const app = new Hono<{ Bindings: Bindings }>()
// Cloudflare Workers 的环境对象
app.get('/', async (c) => {
c.env.MY_KV.get('my-key')
// ...
})
```
## error
如果 Handler 抛出错误,错误对象会放置在 `c.error` 中。你可以在中间件中访问它。
```ts twoslash
import { Hono } from 'hono'
const app = new Hono()
// ---cut---
app.use(async (c, next) => {
await next()
if (c.error) {
// do something...
}
})
```
## ContextVariableMap
例如,如果你想在使用特定中间件时为变量添加类型定义,可以扩展 `ContextVariableMap`。例如:
```ts
declare module 'hono' {
interface ContextVariableMap {
result: string
}
}
```
然后你可以在中间件中使用它:
```ts twoslash
import { createMiddleware } from 'hono/factory'
// ---cut---
const mw = createMiddleware(async (c, next) => {
c.set('result', 'some values') // result 是 string 类型
await next()
})
```
在处理器中,变量会被推断为正确的类型:
```ts twoslash
import { Hono } from 'hono'
const app = new Hono<{ Variables: { result: string } }>()
// ---cut---
app.get('/', (c) => {
const val = c.get('result') // val 是 string 类型
// ...
return c.json({ result: val })
})
```
# HTTPException
当发生致命错误时,Hono(以及许多生态系统中间件)可能会抛出 `HTTPException`。这是一个自定义的 Hono `Error`,简化了[返回错误响应](#handling-httpexceptions) 的过程。
## Throwing HTTPExceptions
你可以通过指定状态码以及消息或自定义响应来抛出你自己的 HTTPExceptions。
### Custom Message
对于基本的 `text` 响应,只需设置错误 `message`。
```ts twoslash
import { HTTPException } from 'hono/http-exception'
throw new HTTPException(401, { message: 'Unauthorized' })
```
### Custom Response
对于其他响应类型,或要设置响应 headers,使用 `res` 选项。_注意,传递给构造函数的状态码用于创建响应。_
```ts twoslash
import { HTTPException } from 'hono/http-exception'
const errorResponse = new Response('Unauthorized', {
status: 401, // 这个会被忽略
headers: {
Authenticate: 'error="invalid_token"',
},
})
throw new HTTPException(401, { res: errorResponse })
```
### Cause
在任何一种情况下,你都可以使用 [`cause`](https://developer.mozilla.org/en-US/docs/Web/JavaScript/Reference/Global_Objects/Error/cause) 选项向 HTTPException 添加任意数据。
```ts twoslash
import { Hono, Context } from 'hono'
import { HTTPException } from 'hono/http-exception'
const app = new Hono()
declare const message: string
declare const authorize: (c: Context) => Promise
// ---cut---
app.post('/login', async (c) => {
try {
await authorize(c)
} catch (cause) {
throw new HTTPException(401, { message, cause })
}
return c.redirect('/')
})
```
## Handling HTTPExceptions
你可以使用 [`app.onError`](/docs/api/hono#error-handling) 处理未捕获的 HTTPExceptions。它们包含一个 `getResponse` 方法,返回一个根据错误 `status` 创建的新 `Response`,以及错误 `message` 或抛出错误时设置的[自定义响应](#custom-response)。
```ts twoslash
import { Hono } from 'hono'
const app = new Hono()
// ---cut---
import { HTTPException } from 'hono/http-exception'
// ...
app.onError((err, c) => {
if (err instanceof HTTPException) {
// 返回 HTTPException 生成的错误响应
return err.getResponse()
}
// 对于任何其他意外错误,记录日志并返回通用的 500 响应
console.error(err)
return c.text('Internal Server Error', 500)
})
```
::: warning
**`HTTPException.getResponse` 不知道 `Context`**。要包含已在 `Context` 中设置的 headers,你必须将它们应用到新的 `Response`。
:::
# App - Hono
`Hono` 是主要对象。它会被首先导入并一直使用到最后。
```ts twoslash
import { Hono } from 'hono'
const app = new Hono()
//...
export default app // 用于 Cloudflare Workers 或 Bun
```
## Methods
`Hono` 实例有以下方法:
- app.**HTTP_METHOD**(\[path,\]handler|middleware...)
- app.**all**(\[path,\]handler|middleware...)
- app.**on**(method|method[], path|path[], handler|middleware...)
- app.**use**(\[path,\]middleware)
- app.**route**(path, \[app\])
- app.**basePath**(path)
- app.**notFound**(handler)
- app.**onError**(err, handler)
- app.**mount**(path, anotherApp)
- app.**fire**()
- app.**fetch**(request, env, event)
- app.**request**(path, options)
其中第一部分用于路由,请参阅 [routing section](/docs/api/routing)。
## Not Found
`app.notFound` 允许你自定义 Not Found 响应。
```ts twoslash
import { Hono } from 'hono'
const app = new Hono()
// ---cut---
app.notFound((c) => {
return c.text('Custom 404 Message', 404)
})
```
:::warning
`notFound` 方法仅从顶级 app 调用。更多信息见这个 [issue](https://github.com/honojs/hono/issues/3465#issuecomment-2381210165)。
:::
## Error Handling
`app.onError` 允许你处理未捕获的错误并返回自定义响应。
```ts twoslash
import { Hono } from 'hono'
const app = new Hono()
// ---cut---
app.onError((err, c) => {
console.error(`${err}`)
return c.text('Custom Error Message', 500)
})
```
::: info
如果父 app 和其 routes 都有 `onError` 处理器,route 级别的处理器优先级更高。
:::
## fire()
::: warning
**`app.fire()` 已弃用**。改用 `hono/service-worker` 中的 `fire()`。详情见 [Service Worker documentation](/docs/getting-started/service-worker)。
:::
`app.fire()` 自动添加全局 `fetch` 事件监听器。
这对于遵循 [Service Worker API](https://developer.mozilla.org/en-US/docs/Web/API/Service_Worker_API) 的环境很有用,例如 [非 ES module Cloudflare Workers](https://developers.cloudflare.com/workers/reference/migrate-to-module-workers/)。
`app.fire()` 为你执行以下操作:
```ts
addEventListener('fetch', (event: FetchEventLike): void => {
event.respondWith(this.dispatch(...))
})
```
## fetch()
`app.fetch` 将成为你的应用程序入口点。
对于 Cloudflare Workers,你可以使用以下代码:
```ts twoslash
import { Hono } from 'hono'
const app = new Hono()
type Env = any
type ExecutionContext = any
// ---cut---
export default {
fetch(request: Request, env: Env, ctx: ExecutionContext) {
return app.fetch(request, env, ctx)
},
}
```
或者只需:
```ts twoslash
import { Hono } from 'hono'
const app = new Hono()
// ---cut---
export default app
```
Bun:
```ts
export default app // [!code --]
export default { // [!code ++]
port: 3000, // [!code ++]
fetch: app.fetch, // [!code ++]
} // [!code ++]
```
## request()
`request` 是一个用于测试的实用方法。
你可以传递 URL 或路径名来发送 GET 请求。`app` 将返回 `Response` 对象。
```ts twoslash
import { Hono } from 'hono'
const app = new Hono()
declare const test: (name: string, fn: () => void) => void
declare const expect: (value: any) => any
// ---cut---
test('GET /hello is ok', async () => {
const res = await app.request('/hello')
expect(res.status).toBe(200)
})
```
你也可以传递 `Request` 对象:
```ts twoslash
import { Hono } from 'hono'
const app = new Hono()
declare const test: (name: string, fn: () => void) => void
declare const expect: (value: any) => any
// ---cut---
test('POST /message is ok', async () => {
const req = new Request('Hello!', {
method: 'POST',
})
const res = await app.request(req)
expect(res.status).toBe(201)
})
```
## mount()
`mount()` 允许你将用其他框架构建的应用程序挂载到你的 Hono 应用程序中。
```ts
import { Router as IttyRouter } from 'itty-router'
import { Hono } from 'hono'
// 创建 itty-router 应用程序
const ittyRouter = IttyRouter()
// 处理 `GET /itty-router/hello`
ittyRouter.get('/hello', () => new Response('Hello from itty-router'))
// Hono 应用程序
const app = new Hono()
// 挂载!
app.mount('/itty-router', ittyRouter.handle)
```
## strict mode
strict mode 默认为 `true`,区分以下 routes:
- `/hello`
- `/hello/`
`app.get('/hello')` 不会匹配 `GET /hello/`。
通过将 strict mode 设置为 `false`,两条路径将被同等对待。
```ts twoslash
import { Hono } from 'hono'
// ---cut---
const app = new Hono({ strict: false })
```
## router option
`router` 选项指定使用哪个 router。默认 router 是 `SmartRouter`。如果你想使用 `RegExpRouter`,将其传递给新的 `Hono` 实例:
```ts twoslash
import { Hono } from 'hono'
// ---cut---
import { RegExpRouter } from 'hono/router/reg-exp-router'
const app = new Hono({ router: new RegExpRouter() })
```
## Generics
你可以传递泛型来指定 Cloudflare Workers Bindings 和 `c.set`/`c.get` 中使用的变量的类型。
```ts twoslash
import { Hono } from 'hono'
type User = any
declare const user: User
// ---cut---
type Bindings = {
TOKEN: string
}
type Variables = {
user: User
}
const app = new Hono<{
Bindings: Bindings
Variables: Variables
}>()
app.use('/auth/*', async (c, next) => {
const token = c.env.TOKEN // token 是 `string`
// ...
c.set('user', user) // user 应该是 `User`
await next()
})
```
# API
Hono 的 API 很简单。仅由 Web Standards 的扩展对象组成。因此,你可以很快地理解它。
在本节中,我们介绍 Hono 的 API,如下所示:
- Hono 对象
- 关于路由
- Context 对象
- 关于中间件
# Presets
Hono 有多个 routers,每个都针对特定用途设计。你可以在 Hono 的构造函数中指定要使用的 router。
**Presets** 为常见用例提供,因此你不必每次都指定 router。从所有 presets 导入的 `Hono` 类是相同的,唯一区别在于 router。因此,你可以互换使用它们。
## `hono`
用法:
```ts twoslash
import { Hono } from 'hono'
```
Routers:
```ts
this.router = new SmartRouter({
routers: [new RegExpRouter(), new TrieRouter()],
})
```
## `hono/quick`
用法:
```ts twoslash
import { Hono } from 'hono/quick'
```
Router:
```ts
this.router = new SmartRouter({
routers: [new LinearRouter(), new TrieRouter()],
})
```
## `hono/tiny`
用法:
```ts twoslash
import { Hono } from 'hono/tiny'
```
Router:
```ts
this.router = new PatternRouter()
```
## Which preset should I use?
| Preset | 适用平台 |
| ------------ | ------------------------------------------------------------------------------------------------------------------------------------------------------------------------------------------------------------------------------------------------------------------------------------------------------------------------------------------------------------------------------------------------------------------------------------------------------------------------------------------------------------------------------------------------------------------ |
| `hono` | 这在大多数用例中强烈推荐。虽然注册阶段可能比 `hono/quick` 慢,但一旦启动就会表现出高性能。它非常适合用 **Deno**、**Bun** 或 **Node.js** 构建的长生命周期服务器。它也适合 **Fastly Compute**,因为在该平台上路由注册发生在应用程序构建阶段。对于 **Cloudflare Workers**、**Deno Deploy** 等使用 v8 isolates 的环境,这个 preset 也合适。因为 isolates 在启动后会持续一段时间。 |
| `hono/quick` | 这个 preset 专为每次请求都初始化应用程序的环境设计。 |
| `hono/tiny` | 这是最小的 router 包,适合资源有限的环境。 |
# HonoRequest
`HonoRequest` 是一个可以从 `c.req` 获取的对象,它包装了 [Request](https://developer.mozilla.org/en-US/docs/Web/API/Request) 对象。
## param()
获取路径参数的值。
```ts twoslash
import { Hono } from 'hono'
const app = new Hono()
// ---cut---
// 捕获的 params
app.get('/entry/:id', async (c) => {
const id = c.req.param('id')
// ^?
// ...
})
// 一次性获取所有 params
app.get('/entry/:id/comment/:commentId', async (c) => {
const { id, commentId } = c.req.param()
// ^?
})
```
## query()
获取 querystring 参数。
```ts twoslash
import { Hono } from 'hono'
const app = new Hono()
// ---cut---
// Query params
app.get('/search', async (c) => {
const query = c.req.query('q')
// ^?
})
// 一次性获取所有 params
app.get('/search', async (c) => {
const { q, limit, offset } = c.req.query()
// ^?
})
```
## queries()
获取多个 querystring 参数值,例如 `/search?tags=A&tags=B`
```ts twoslash
import { Hono } from 'hono'
const app = new Hono()
// ---cut---
app.get('/search', async (c) => {
// tags 将是 string[]
const tags = c.req.queries('tags')
// ^?
// ...
})
```
## header()
获取请求 header 值。
```ts twoslash
import { Hono } from 'hono'
const app = new Hono()
// ---cut---
app.get('/', (c) => {
const userAgent = c.req.header('User-Agent')
// ^?
return c.text(`Your user agent is ${userAgent}`)
})
```
::: warning
当 `c.req.header()` 不带参数调用时,返回的记录中的所有键都是**小写的**。
如果你想获取大写名称的 header 值,使用 `c.req.header("X-Foo")`。
```ts
// ❌ 不会工作
const headerRecord = c.req.header()
const foo = headerRecord['X-Foo']
// ✅ 会工作
const foo = c.req.header('X-Foo')
```
:::
## parseBody()
解析 `multipart/form-data` 或 `application/x-www-form-urlencoded` 类型的 Request body
```ts twoslash
import { Hono } from 'hono'
const app = new Hono()
// ---cut---
app.post('/entry', async (c) => {
const body = await c.req.parseBody()
// ...
})
```
`parseBody()` 支持以下行为。
**单个文件**
```ts twoslash
import { Context } from 'hono'
declare const c: Context
// ---cut---
const body = await c.req.parseBody()
const data = body['foo']
// ^?
```
`body['foo']` 是 `(string | File)`。
如果上传了多个文件,将使用最后一个。
### 多个文件
```ts twoslash
import { Context } from 'hono'
declare const c: Context
// ---cut---
const body = await c.req.parseBody()
body['foo[]']
```
`body['foo[]']` 始终是 `(string | File)[]`。
需要 `[]` 后缀。
### 多个文件或同名字段
如果你有一个允许多个 `` 的输入字段或多个具有相同名称的复选框 ``。
```ts twoslash
import { Context } from 'hono'
declare const c: Context
// ---cut---
const body = await c.req.parseBody({ all: true })
body['foo']
```
`all` 选项默认禁用。
- 如果 `body['foo']` 是多个文件,它将被解析为 `(string | File)[]`。
- 如果 `body['foo']` 是单个文件,它将被解析为 `(string | File)`。
### 点表示法
如果你将 `dot` 选项设置为 `true`,返回值将根据点表示法进行结构化。
想象接收以下数据:
```ts twoslash
const data = new FormData()
data.append('obj.key1', 'value1')
data.append('obj.key2', 'value2')
```
你可以通过设置 `dot` 选项为 `true` 来获取结构化值:
```ts twoslash
import { Context } from 'hono'
declare const c: Context
// ---cut---
const body = await c.req.parseBody({ dot: true })
// body 是 `{ obj: { key1: 'value1', key2: 'value2' } }`
```
## json()
解析 `application/json` 类型的请求 body
```ts twoslash
import { Hono } from 'hono'
const app = new Hono()
// ---cut---
app.post('/entry', async (c) => {
const body = await c.req.json()
// ...
})
```
## text()
解析 `text/plain` 类型的请求 body
```ts twoslash
import { Hono } from 'hono'
const app = new Hono()
// ---cut---
app.post('/entry', async (c) => {
const body = await c.req.text()
// ...
})
```
## arrayBuffer()
将请求 body 解析为 `ArrayBuffer`
```ts twoslash
import { Hono } from 'hono'
const app = new Hono()
// ---cut---
app.post('/entry', async (c) => {
const body = await c.req.arrayBuffer()
// ...
})
```
## blob()
将请求 body 解析为 `Blob`。
```ts twoslash
import { Hono } from 'hono'
const app = new Hono()
// ---cut---
app.post('/entry', async (c) => {
const body = await c.req.blob()
// ...
})
```
## formData()
将请求 body 解析为 `FormData`。
```ts twoslash
import { Hono } from 'hono'
const app = new Hono()
// ---cut---
app.post('/entry', async (c) => {
const body = await c.req.formData()
// ...
})
```
## valid()
获取验证后的数据。
```ts
app.post('/posts', async (c) => {
const { title, body } = c.req.valid('form')
// ...
})
```
可用目标如下:
- `form`
- `json`
- `query`
- `header`
- `cookie`
- `param`
使用示例见 [Validation section](/docs/guides/validation)。
## routePath
::: warning
**在 v4.8.0 中已弃用**:此属性已弃用。改用 [Route Helper](/docs/helpers/route) 中的 `routePath()`。
:::
你可以像这样在处理器中检索注册的路径:
```ts twoslash
import { Hono } from 'hono'
const app = new Hono()
// ---cut---
app.get('/posts/:id', (c) => {
return c.json({ path: c.req.routePath })
})
```
如果你访问 `/posts/123`,它将返回 `/posts/:id`:
```json
{ "path": "/posts/:id" }
```
## matchedRoutes
::: warning
**在 v4.8.0 中已弃用**:此属性已弃用。改用 [Route Helper](/docs/helpers/route) 中的 `matchedRoutes()`。
:::
它在处理器中返回匹配的路由,这对于调试很有用。
```ts twoslash
import { Hono } from 'hono'
const app = new Hono()
// ---cut---
app.use(async function logger(c, next) {
await next()
c.req.matchedRoutes.forEach(({ handler, method, path }, i) => {
const name =
handler.name ||
(handler.length < 2 ? '[handler]' : '[middleware]')
console.log(
method,
' ',
path,
' '.repeat(Math.max(10 - path.length, 0)),
name,
i === c.req.routeIndex ? '<- respond from here' : ''
)
})
})
```
## path
请求 pathname。
```ts twoslash
import { Hono } from 'hono'
const app = new Hono()
// ---cut---
app.get('/about/me', async (c) => {
const pathname = c.req.path // `/about/me`
// ...
})
```
## url
请求 url 字符串。
```ts twoslash
import { Hono } from 'hono'
const app = new Hono()
// ---cut---
app.get('/about/me', async (c) => {
const url = c.req.url // `http://localhost:8787/about/me`
// ...
})
```
## method
请求的方法名。
```ts twoslash
import { Hono } from 'hono'
const app = new Hono()
// ---cut---
app.get('/about/me', async (c) => {
const method = c.req.method // `GET`
// ...
})
```
## raw
原始 [`Request`](https://developer.mozilla.org/en-US/docs/Web/API/Request) 对象。
```ts
// 对于 Cloudflare Workers
app.post('/', async (c) => {
const metadata = c.req.raw.cf?.hostMetadata?
// ...
})
```
## cloneRawRequest()
从 HonoRequest 克隆原始 Request 对象。即使在请求 body 已被验证器或 HonoRequest 方法消费后也能工作。
```ts twoslash
import { Hono } from 'hono'
const app = new Hono()
import { cloneRawRequest } from 'hono/request'
import { validator } from 'hono/validator'
app.post(
'/forward',
validator('json', (data) => data),
async (c) => {
// 验证后克隆
const clonedReq = await cloneRawRequest(c.req)
// 不会抛出错误
await clonedReq.json()
// ...
}
)
```
# Routing
Hono 的路由灵活且直观。让我们来看看。
## Basic
```ts twoslash
import { Hono } from 'hono'
const app = new Hono()
// ---cut---
// HTTP Methods
app.get('/', (c) => c.text('GET /'))
app.post('/', (c) => c.text('POST /'))
app.put('/', (c) => c.text('PUT /'))
app.delete('/', (c) => c.text('DELETE /'))
// Wildcard
app.get('/wild/*/card', (c) => {
return c.text('GET /wild/*/card')
})
// Any HTTP methods
app.all('/hello', (c) => c.text('Any Method /hello'))
// Custom HTTP method
app.on('PURGE', '/cache', (c) => c.text('PURGE Method /cache'))
// Multiple Method
app.on(['PUT', 'DELETE'], '/post', (c) =>
c.text('PUT or DELETE /post')
)
// Multiple Paths
app.on('GET', ['/hello', '/ja/hello', '/en/hello'], (c) =>
c.text('Hello')
)
```
## Path Parameter
```ts twoslash
import { Hono } from 'hono'
const app = new Hono()
// ---cut---
app.get('/user/:name', async (c) => {
const name = c.req.param('name')
// ^?
// ...
})
```
或一次性获取所有参数:
```ts twoslash
import { Hono } from 'hono'
const app = new Hono()
// ---cut---
app.get('/posts/:id/comment/:comment_id', async (c) => {
const { id, comment_id } = c.req.param()
// ^?
// ...
})
```
## Optional Parameter
```ts twoslash
import { Hono } from 'hono'
const app = new Hono()
// ---cut---
// 将匹配 `/api/animal` 和 `/api/animal/:type`
app.get('/api/animal/:type?', (c) => c.text('Animal!'))
```
## Regexp
```ts twoslash
import { Hono } from 'hono'
const app = new Hono()
// ---cut---
app.get('/post/:date{[0-9]+}/:title{[a-z]+}', async (c) => {
const { date, title } = c.req.param()
// ^?
// ...
})
```
## Including slashes
```ts twoslash
import { Hono } from 'hono'
const app = new Hono()
// ---cut---
app.get('/posts/:filename{.+\\.png}', async (c) => {
//...
})
```
## Chained route
```ts twoslash
import { Hono } from 'hono'
const app = new Hono()
// ---cut---
app
.get('/endpoint', (c) => {
return c.text('GET /endpoint')
})
.post((c) => {
return c.text('POST /endpoint')
})
.delete((c) => {
return c.text('DELETE /endpoint')
})
```
## Grouping
你可以使用 Hono 实例对路由进行分组,并使用 route 方法将它们添加到主 app。
```ts twoslash
import { Hono } from 'hono'
// ---cut---
const book = new Hono()
book.get('/', (c) => c.text('List Books')) // GET /book
book.get('/:id', (c) => {
// GET /book/:id
const id = c.req.param('id')
return c.text('Get Book: ' + id)
})
book.post('/', (c) => c.text('Create Book')) // POST /book
const app = new Hono()
app.route('/book', book)
```
## Grouping without changing base
你也可以在保持 base 的同时对多个实例进行分组。
```ts twoslash
import { Hono } from 'hono'
// ---cut---
const book = new Hono()
book.get('/book', (c) => c.text('List Books')) // GET /book
book.post('/book', (c) => c.text('Create Book')) // POST /book
const user = new Hono().basePath('/user')
user.get('/', (c) => c.text('List Users')) // GET /user
user.post('/', (c) => c.text('Create User')) // POST /user
const app = new Hono()
app.route('/', book) // 处理 /book
app.route('/', user) // 处理 /user
```
## Base path
你可以指定 base path。
```ts twoslash
import { Hono } from 'hono'
// ---cut---
const api = new Hono().basePath('/api')
api.get('/book', (c) => c.text('List Books')) // GET /api/book
```
## Routing with hostname
如果包含 hostname,它也能正常工作。
```ts twoslash
import { Hono } from 'hono'
// ---cut---
const app = new Hono({
getPath: (req) => req.url.replace(/^https?:\/([^?]+).*$/, '$1'),
})
app.get('/www1.example.com/hello', (c) => c.text('hello www1'))
app.get('/www2.example.com/hello', (c) => c.text('hello www2'))
```
## Routing with `host` Header value
如果你在 Hono 构造函数中设置 `getPath()` 函数,Hono 可以处理 `host` header 值。
```ts twoslash
import { Hono } from 'hono'
// ---cut---
const app = new Hono({
getPath: (req) =>
'/' +
req.headers.get('host') +
req.url.replace(/^https?:\/\/[^/]+(\/[^?]*).*/, '$1'),
})
app.get('/www1.example.com/hello', (c) => c.text('hello www1'))
// 以下请求将匹配路由:
// new Request('http://www1.example.com/hello', {
// headers: { host: 'www1.example.com' },
// })
```
通过应用这个,例如,你可以通过 `User-Agent` header 改变路由。
## Routing priority
Handlers 或 middleware 将按注册顺序执行。
```ts twoslash
import { Hono } from 'hono'
const app = new Hono()
// ---cut---
app.get('/book/a', (c) => c.text('a')) // a
app.get('/book/:slug', (c) => c.text('common')) // common
```
```
GET /book/a ---> `a`
GET /book/b ---> `common`
```
当 handler 执行时,进程将停止。
```ts twoslash
import { Hono } from 'hono'
const app = new Hono()
// ---cut---
app.get('*', (c) => c.text('common')) // common
app.get('/foo', (c) => c.text('foo')) // foo
```
```
GET /foo ---> `common` // foo 将不会 dispatch
```
如果你有想要执行的 middleware,请在 handler 上方编写代码。
```ts twoslash
import { Hono } from 'hono'
import { logger } from 'hono/logger'
const app = new Hono()
// ---cut---
app.use(logger())
app.get('/foo', (c) => c.text('foo'))
```
如果你想有一个"_fallback_"handler,请在其他 handler 下方编写代码。
```ts twoslash
import { Hono } from 'hono'
const app = new Hono()
// ---cut---
app.get('/bar', (c) => c.text('bar')) // bar
app.get('*', (c) => c.text('fallback')) // fallback
```
```
GET /bar ---> `bar`
GET /foo ---> `fallback`
```
## Grouping ordering
注意,路由分组的错误很难察觉。`route()` 函数从第二个参数(如 `three` 或 `two`)获取存储的路由,并将其添加到自己的(`two` 或 `app`)路由中。
```ts
three.get('/hi', (c) => c.text('hi'))
two.route('/three', three)
app.route('/two', two)
export default app
```
它将返回 200 响应。
```
GET /two/three/hi ---> `hi`
```
然而,如果顺序错误,它将返回 404。
```ts twoslash
import { Hono } from 'hono'
const app = new Hono()
const two = new Hono()
const three = new Hono()
// ---cut---
three.get('/hi', (c) => c.text('hi'))
app.route('/two', two) // `two` 没有 routes
two.route('/three', three)
export default app
```
```
GET /two/three/hi ---> 404 Not Found
```